
DATEV Rechnungsdatenservice 1.0
Package: BILLING
1. General
Through the DATEV integration, invoices and posting records can be sent automatically to DATEV Unternehmen Online. This saves you valuable time, reduces costs and minimises errors.
The DATEV interface in brainX is based on the internet-based platform DATEV Unternehmen online.
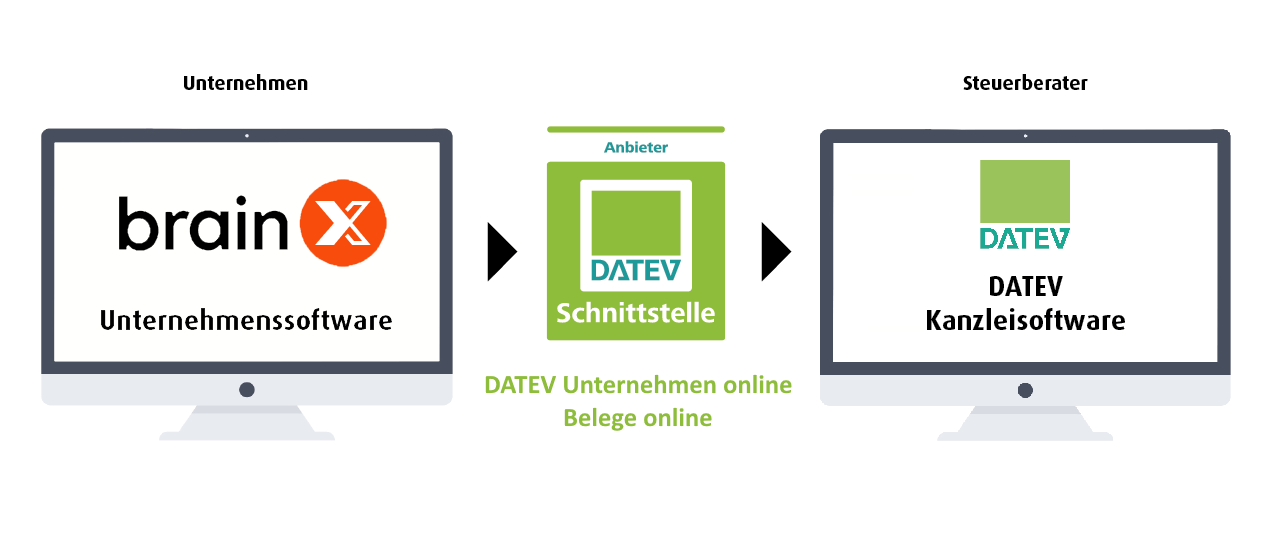 Schema of the DATEV interface
To register or log in to “DATEV Unternehmen online”, the browser “Google Chrome” or “Microsoft Edge” is recommended (see also the DATEV help pages Recommended browsers for DATEV Unternehmen online and Browsers and DATEV programs). The interface in brainX itself is cross-platform and not browser-dependent.
Furthermore, a suitable login procedure (DATEV SmartLogin, DATEV SmartCard or DATEV mIDentity) from DATEV is required in order to register or log in to “DATEV Unternehmen online”.
An export of Invoices, Incoming Invoices, Cancellations and Credits from brainX can, regardless of the operating system used, be carried out with any supported browser of brainX!
1.1. DATEV Rechnungsdatenservice 1.0 vs. DATEV Buchungsdatenservice
Basically, two integrations are available:
- DATEV Rechnungsdatenservice 1.0 → transfers vouchers and generates posting proposals (provided general ledger accounts are configured)
- DATEV Buchungsdatenservice → transfers complete posting records/batches and the master data of the creditors/debtors
Graphical representation of the different processes:
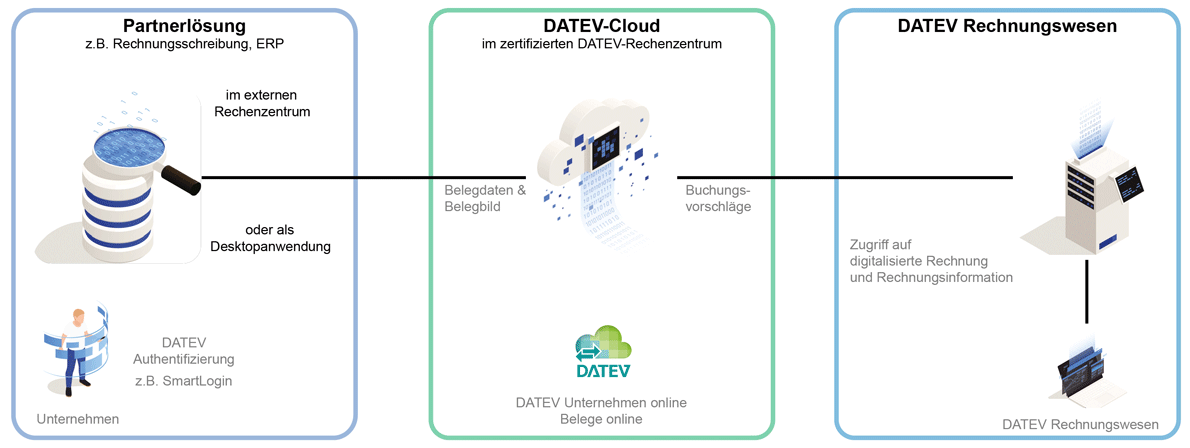 Process graphic DATEV Rechnungsdatenservice 1.0
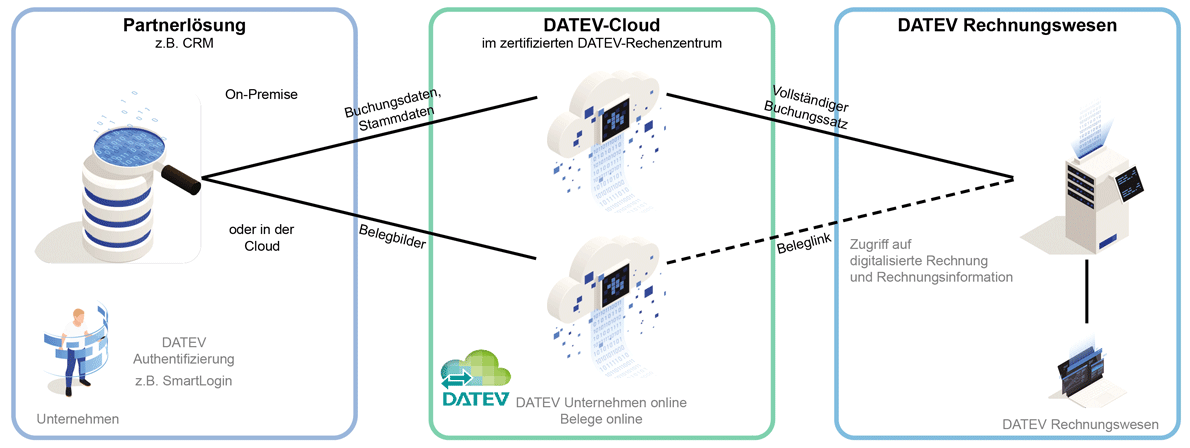 Process graphic DATEV Buchungsdatenservice
The advantage here clearly lies with the DATEV Buchungsdatenservice: once the data has been carefully entered into brainX at the start, the accounting is also faster at the end. Posting records are transferred in full to DATEV. This means less work in your own accounting or in the external tax firm, and the company benefits from enormous cost savings.
However, the procedure for the export within brainX is more or less identical for both integrations: in the list view of the modules Invoices, Incoming Invoices, Cancellations and Credits, selected records can be exported by means of actions, which however differ depending on the integration used:
| DATEV Rechnungsdatenservice 1.0 | DATEV Buchungsdatenservice | |
|---|---|---|
| Actions |
|
|
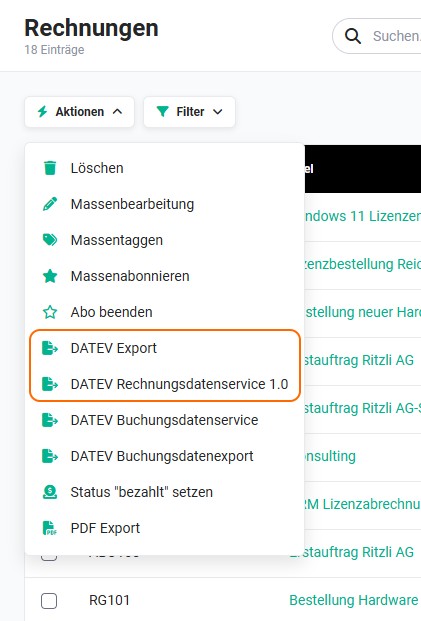 Invoices module - Actions Rechnungsdatenservice
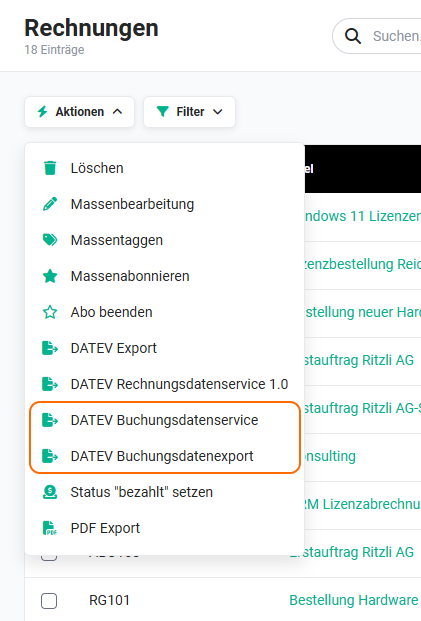 Invoices module - Actions Buchungsdatenservice
2. DATEV Rechnungsdatenservice 1.0
2.1. Activation
To use DATEV Rechnungsdatenservice, an Organization is required on the platform DATEV Unternehmen online.
On the brainX side, no special activation is necessary if the brainX package “Billing” has been booked.
2.2. Global Settings
After opening the settings item “DATEV Rechnungsdatenservice 1.0” in the company information, it appears as follows:
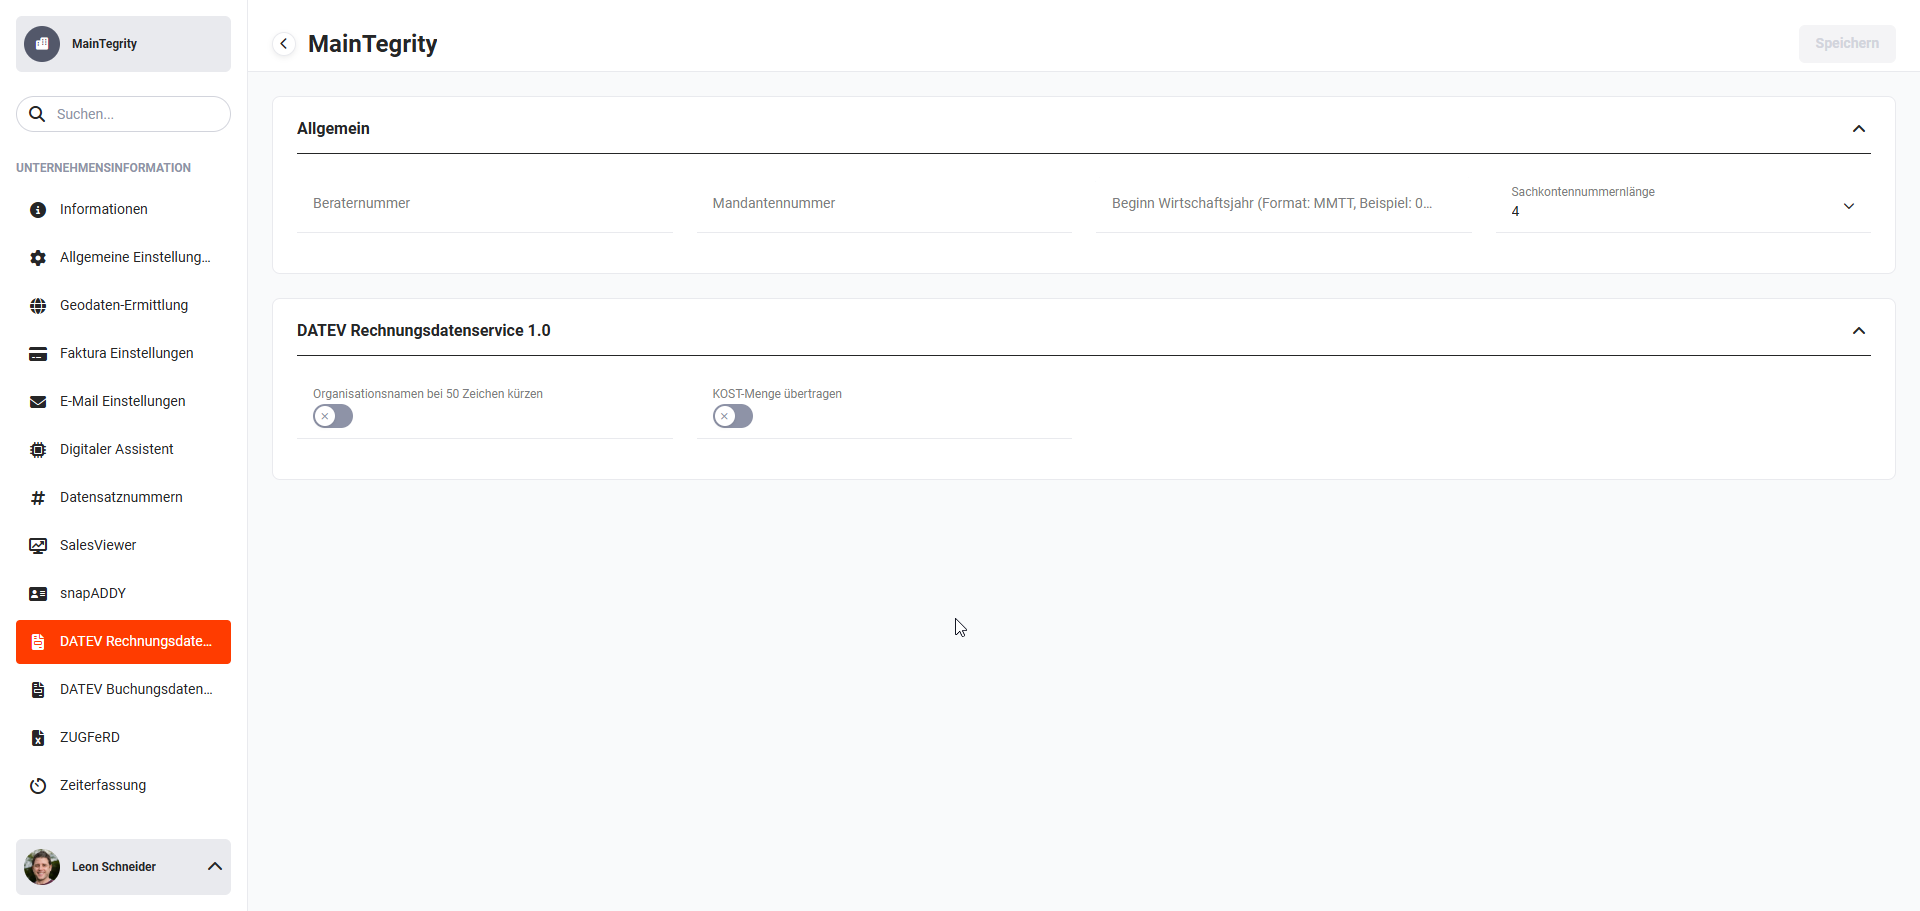 Global Settings - Company information - DATEV Rechnungsdatenservice 1.0
2.2.1. Settings DATEV Rechnungsdatenservice 1.0
After opening the settings item “DATEV Rechnungsdatenservice 1.0” in the company information, the following blocks/fields are displayed:
- General
- Consultant number → Input field for the consultant number
- Client number → Input field for the client number
- Start of fiscal year → Date field for entering the fiscal year in the format: MMDD, example: 0731 for 31 July
- General ledger account number length → picklist with numeric values for defining the general ledger account number length
- DATEV Rechnungsdatenservice 1.0
- Shorten organisation names at 50 characters → Toggle for the setting whether organisation names should be shortened at 50 characters
- Transfer COST quantity → Toggle for the setting whether the COST quantity should be transferred (value entry for a specific reference figure for a cost centre such as km, % etc. - is determined from the “Quantity” of the product position(s))
2.2.2. Visibility of the list view action
For the integration “DATEV Rechnungsdatenservice 1.0”, there are basically two actions in the list view in the Billing modules:
Since usually only one of the actions is used/needed in the list views, it is advisable to hide the action that is not needed by means of the permission settings, or to completely deactivate the actions for users who are not supposed to carry out a DATEV export.
2.2.3. Company information
Before the first export is started, it must be ensured that the correct company address is stored in Company information - Information.
2.2.4. GTC - General Terms and Conditions
The “GTC - General Terms and Conditions”, which are also required for the DATEV export, must be entered in Global Settings - Company information - Information in the settings item Terms and Conditions.
When creating an invoice etc., these are then automatically transferred into the “GTC” field of the record.
2.3. User Settings
Every user who wants to use the “DATEV Rechnungsdatenservice” action requires a personal access key for the DATEV login! No personal access key is required for the “DATEV Export” action.
This access key can be created in My Settings - Integrations.
After clicking the “DATEV” tile, the popup “Access key management (Token)” opens.
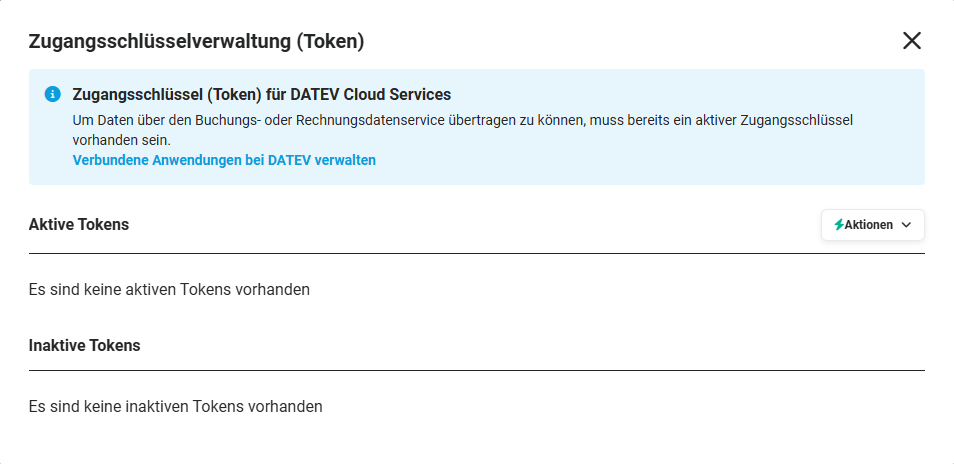 Popup Access key management (Token)
The popup “Access key management (Token)” is divided into the following areas:
- Access key (Token) for DATEV Cloud Services → Link “Manage connected applications at DATEV” for the DATEV login
- Active tokens → Display of the active tokens
- Inactive tokens → Display of the inactive tokens
- Button “Actions” → opens a flyout menu to request a new access key:
- Short-term token (11 hours)
- Long-term token (2 years)
The access key management is multi-organization capable. This means that requested tokens are only valid for one Organization at a time.
2.3.1. Request a new access key
After clicking the “Actions” button, a flyout menu opens in which either a short-term token (validity period 11 hours) or a long-term token (validity period 2 years) can be requested.
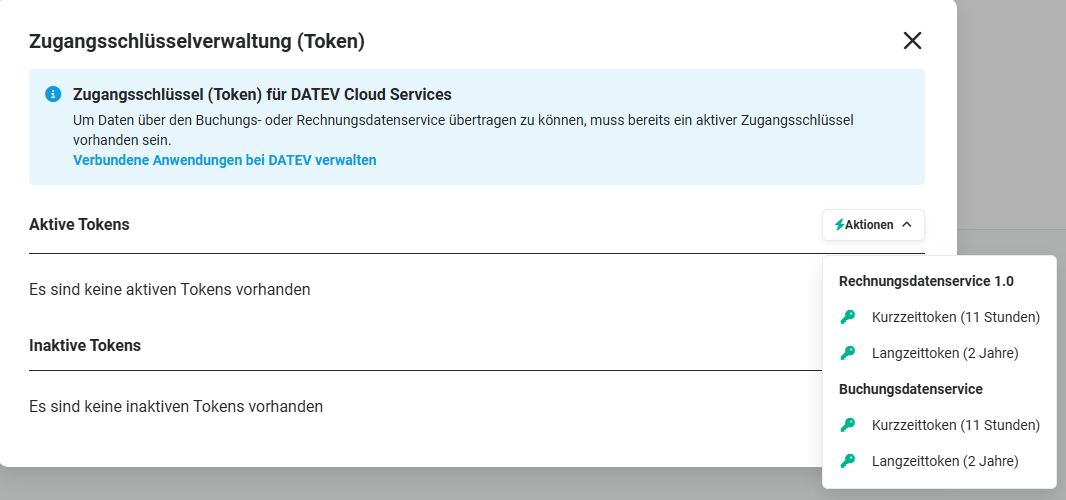 Popup Access key management (Token) - Actions button
To support multiple organizations, the popup “Master data” opens before requesting a long-term token, for checking the consultant and client number, which are already pre-filled by the system.
2.3.2. Manage connected applications at DATEV
After clicking the link “Manage connected applications at DATEV”, the login page for the DATEV login opens in a new browser tab.
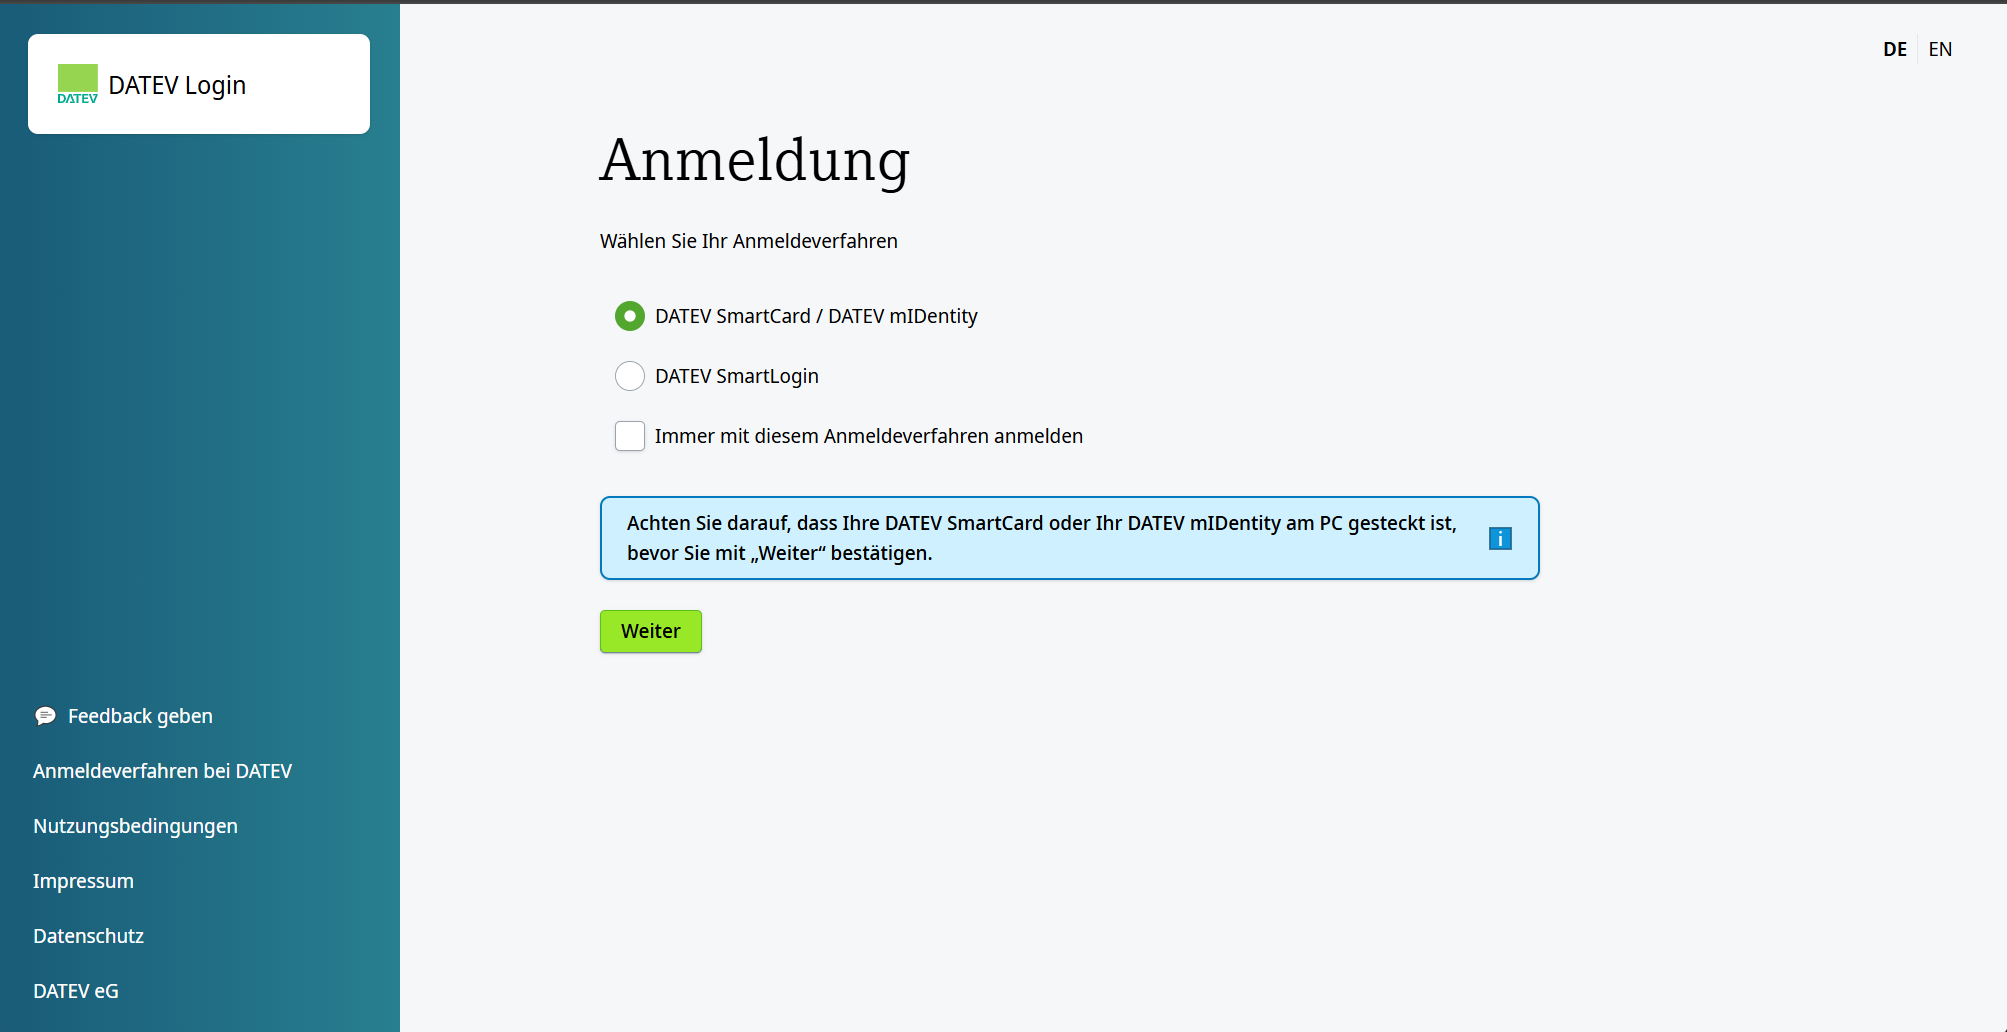 DATEV Login - Sign in
Two login procedures are available here:
-
DATEV SmartCard / DATEV mIDentity
DATEV SmartCard / DATEV mIDentity enables secure access to the applications of the DATEV data centre. The DATEV SmartCard is, for example, inserted into the DATEV mIDentity stick card reader. Use is possible with the DATEV security package on a Windows PC.
The browser “Edge” from Microsoft or “Google Chrome” on a Windows PC is required here in order to log in to DATEV Unternehmen online. A USB stick provided by DATEV functions as the “Smartcard” here.
For detailed information on the DATEV SmartCard, see DATEV online help.
-
DATEV SmartLogin
DATEV SmartLogin is an authentication procedure for online applications by means of a smartphone app (smartphone or tablet with a Google Android or Apple iOS operating system) using a QR code.
Note: Please note that only one person can be authenticated at a time by means of the smartphone app.
For detailed information on DATEV SmartLogin, see DATEV online help SmartLogin.
After selecting the login type and clicking the “Next” button, the required permissions still have to be granted to the application “brainX Datenservice”.
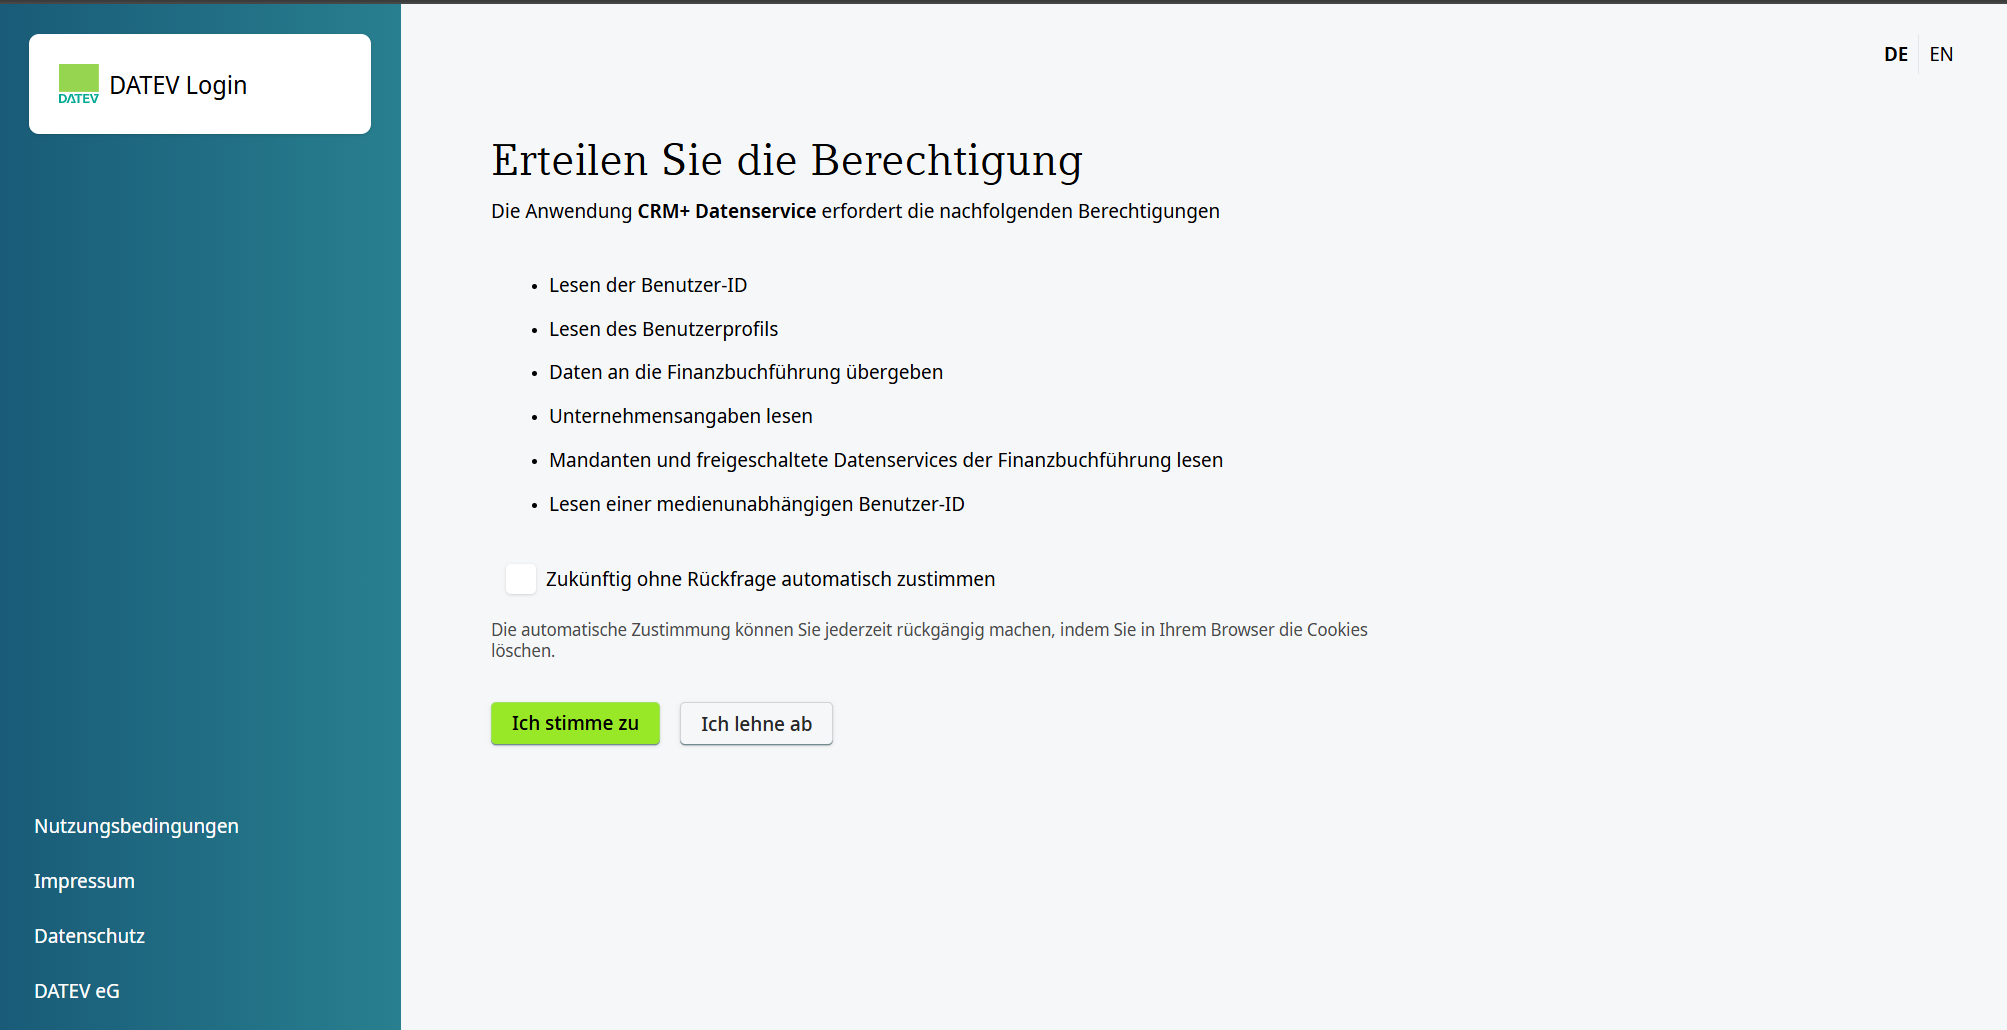 DATEV Login - Grant permission
After requesting a token - regardless of whether “Short-term token (11 hours)” or “Long-term token (2 years)” - the token is displayed after a check in the popup “Access key management (Token)” in the “Active tokens” block.
If the check for requesting a token is not passed, an error message is displayed with a corresponding note on the cause.
2.3.3. Display of active/inactive tokens
In the popup “Access key management (Token)”, all active/inactive tokens are listed.
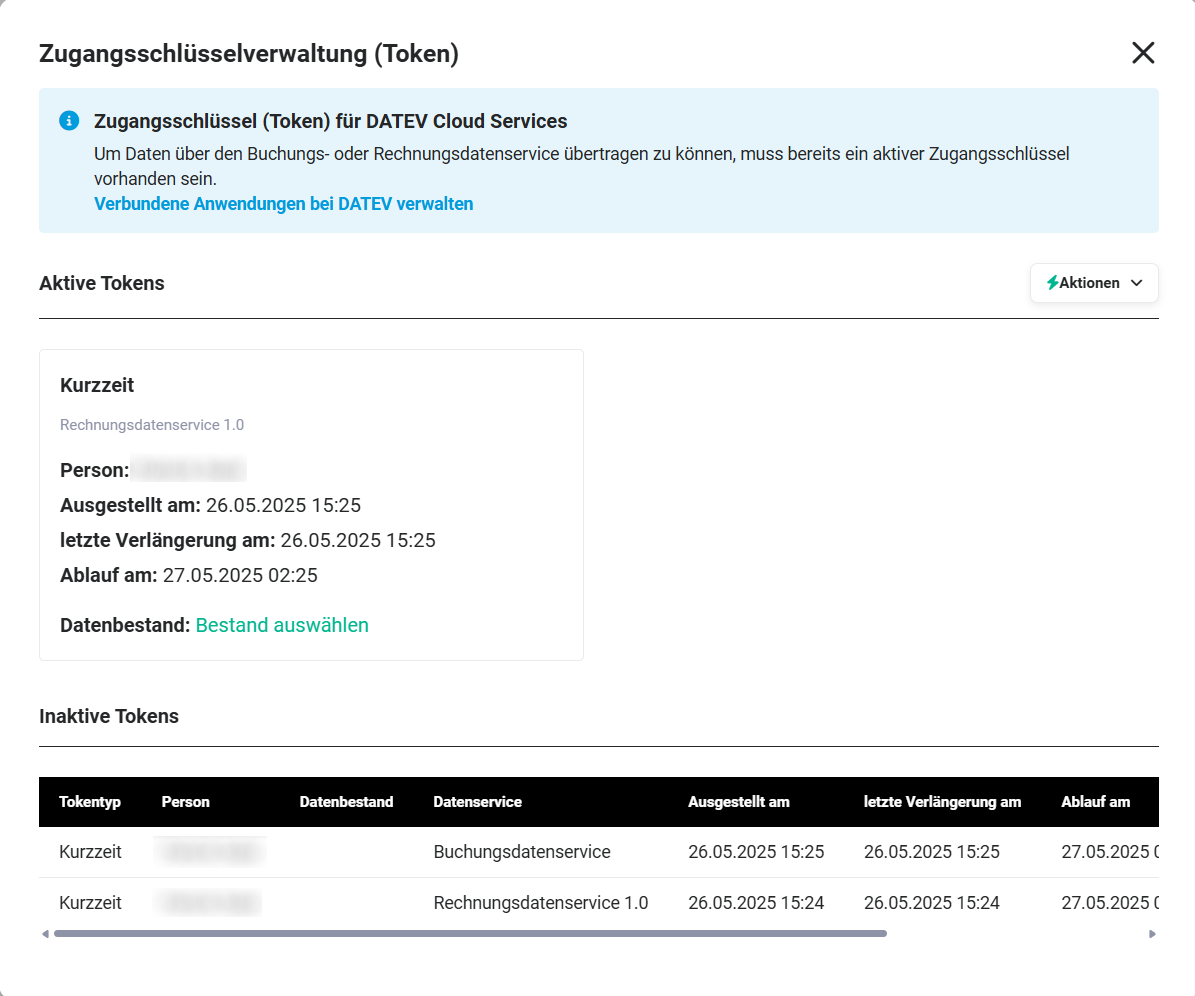 Popup Access key management (Token) - active/inactive tokens
2.3.3.1. Active tokens
An active token is displayed in a tile in which the following information is shown:
- Person → First and last name of the person to whom the DATEV access medium (SmartLogin or SmartCard) is registered
- Issued on → Date and time of the issuance of the token
- Last renewal on → Date and time of the renewal of the token. Technically, the tokens only have a runtime of 15 minutes and are therefore automatically renewed regularly. The tokens can be extended at most up to the general validity period (short-term token 11 hours, long-term token 2 years).
- Expires on → Date and time when the token loses its validity
- Data stock → Display for which data stock the token is valid. Displayed here is either the consultant and client number (for a long-term token), or the action link Select stock (for a short-term token). If a stock has already been selected, the stock is also displayed here incl. icons for editing and deleting.
2.3.3.2. Inactive tokens
The overview table shows the following columns:
- Token type → Display of which token type it is: short-term token or long-term token
- Person → First and last name of the person to whom the DATEV access medium (SmartLogin or SmartCard) is registered
- Data stock → Display for which data stock the token is valid. Displayed here is the consultant and client number (for a long-term token). If a stock has already been selected, the stock is also displayed here incl. icons for editing and deleting.
- Data service → Display of the data service used (DATEV Rechnungsdatenservice 1.0 or DATEV Buchungsdatenservice)
- Issued on → Date and time of the issuance of the token
- Last renewal on → Date and time of the renewal of the token. Technically, the tokens only have a runtime of 15 minutes and are therefore automatically renewed regularly. The tokens can be extended at most up to the general validity period (short-term token 11 hours, long-term token 2 years).
- Expires on → Date and time when the token loses its validity
- Access key revoked → Date and time when the token was revoked, see section Revoke access key
- Tokens are stored encrypted in the brainX database
- inactive tokens are deleted from the brainX database
- per user and data service (DATEV Rechnungsdatenservice 1.0 and DATEV Buchungsdatenservice), only one token can exist
- if a long-term token exists, the long-term token is deleted when requesting a short-term token
2.3.3.3. Action “Select stock”
The action link “Select stock” is basically only available with a short-term token! Long-term tokens are basically bound to one stock and must be requested anew if the stock is changed.
After clicking the action link, the popup “Master data” opens for checking the consultant and client number, which are already pre-filled by the system.
If the consultant and client number is not correct, an Organization can be selected by means of the “Select from list” button. A further popup “Master data” opens here, in which, by clicking the Organization name, the consultant and client number are transferred into the first popup “Master data”. After clicking the “Save” button in the first popup “Master data”, this information is saved and displayed in the popup “Access key management (Token)” instead of the action link “Select stock”.
If the consultant and client number were not entered correctly during manual entry, a corresponding note is displayed.
In this case, the consultant and client number must be checked and corrected accordingly.
2.3.3.4. Revoke access key
Access keys (Tokens) lose their validity after a defined time. The validity period depends on the type of token (short-term token or long-term token):
- Short-term token: 11 hours or after a logout of the user
- Long-term token: 2 years or after requesting a short-term token
For security reasons, the option was implemented to also manually revoke still valid (active) access keys (tokens).
In the popup “Access key management (Token)”, the action icon “Revoke access key” (icon “x”) is displayed in the tile of the active token on mouseover.
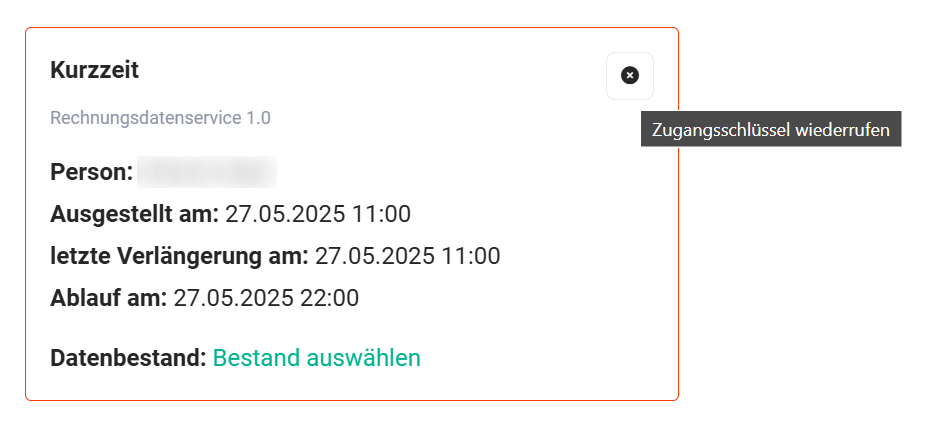 Popup Access key management (Token) - active tokens - Revoke access key
2.4. Module Settings
In addition to the standard mandatory fields in brainX, further fields are still required for the DATEV Rechnungsdatenservice 1.0 - depending on the respective module.
Standard mandatory fields are each marked with a red star in the editing view of a record and are mandatory in order to be able to save a record.
There are both mandatory fields that are defined as such due to the system, as well as fields that may have been defined as mandatory fields by a corresponding marking in the module management.
2.4.1. Module-specific mandatory fields
Fields that are required for the DATEV export, or fields that are transferred to DATEV, are module-dependent and can be taken from the following table:
| Invoices | Incoming Invoices | Credits | Cancellations |
|---|---|---|---|
| Invoice date | Receipt date | Credit date | Invoice date |
| Invoice no. | Incoming invoice no. | Credit no. | Cancellation no. |
| Invoice address: Street* | Vendor (street, house number, postcode and city)* | Invoice address: Street* | Invoice address: Street* |
| Invoice address: City | - | Invoice address: City | Invoice address: City |
| Invoice address: Postcode | - | Invoice address: Postcode | Invoice address: Postcode |
| Invoice address: Country code* | - | Invoice address: Country code* | Invoice address: Country code* |
| Phone* | - | Phone* | Phone* |
| Fax* | - | Fax* | Fax* |
| Email address* | - | Email address* | Email address* |
| GTC | GTC | GTC | GTC |
| Cost centre* | Cost centre* | Cost centre* | Cost centre* |
| General ledger account* | General ledger account* | - | - |
| original posting voucher | original posting voucher | original posting voucher | original posting voucher |
| Organization or Contact | - | Organization or Contact | Organization or Contact |
| Currency | Currency | Currency | Currency |
| Net amount | Net amount (is calculated by the system from amount and tax) | Net amount | Net amount |
| Tax amount | Tax amount | Tax amount | Tax amount |
| Gross amount | Gross amount | Gross amount | Gross amount |
| Product position(s): Name | - | Product position(s): Name | Product position(s): Name |
| Product position(s): Tax percent | - | Product position(s): Tax percent | Product position(s): Tax percent |
| Product position(s): Position net | - | Product position(s): Position net | Product position(s): Position net |
| Product position(s): Position tax | - | Product position(s): Position tax | Product position(s): Position tax |
| Product position(s): Position gross | - | Product position(s): Position gross | Product position(s): Position gross |
*= optional
In the modules Organizations and Vendors, a corresponding number can be stored in the fields “Debtor number” (Organizations module) and “Creditor number” (Vendors module). The fields are not mandatory fields; the entry of the numbers is optional.
If, for example, an invoice is referenced to an Organization and the “Debtor number” field is filled for this Organization, then this number is also transferred to DATEV. It should be noted here that the numbers stored in brainX must correspond to the DATEV number range, as otherwise a corresponding error message is displayed.
The respective numbers must be within a certain number range:
- Debtor number (Organization): 10000 - 69999
- Creditor number (Vendors): 70000 - 99999
The length of the numbers is based on the length of the general ledger account numbers. For the four characters set by default, the specified number ranges are correct. The length of the debtor/creditor numbers always corresponds to the length of the general ledger account numbers + 1.
If the length of the general ledger account numbers is set to 5, the debtor/creditor numbers are 6 characters long, i.e. 100000 to 699999 and 700000 to 999999.
In the Incoming Invoices module, the field “Payment method” (picklist) is available.
In the Vendors module, there is the additional block “Creditor number by payment method”, in which the fields “Payment method” (picklist) and “Creditor number” (number field) are available. Depending on the payment method, different creditor numbers can be stored.
2.5. Usage
In the list view of the modules Invoices, Incoming Invoices, Cancellations and Credits, selected records can be exported by means of actions.
In order to be able to transfer data via the DATEV Rechnungsdatenservice 1.0, an active access key (short-term or long-term token) must be available.
If no access key is available before a transfer, a corresponding message (popup) is displayed.
If the “Confirm” button is clicked in the popup, the “DATEV Login” page opens in a new browser tab. After the login, the browser tab of the DATEV login closes and the list view of the module is displayed again.
2.5.1. Actions in the list view
For the integration “DATEV Rechnungsdatenservice 1.0”, there are basically two actions in the list view in the Billing modules:
2.5.1.1. DATEV Export
“DATEV Export” is the simplest form of data transfer to DATEV. The export generates a Zip file (compressed file), which must be transferred separately to DATEV.
The transfer of the vouchers must be carried out separately by means of the program DATEV Belegtransfer. You can obtain further information on the program “DATEV Belegtransfer” directly from DATEV or your tax advisor.
The program “DATEV Belegtransfer” can only be installed on a Windows PC!
2.5.1.2. DATEV Rechnungsdatenservice 1.0
By means of the action “DATEV Rechnungsdatenservice 1.0”, general ledger accounts and cost centres can also be transferred to DATEV - in addition to the functionalities of the “DATEV Export” action.
An example export carried out in the Invoices module is presented as described below.
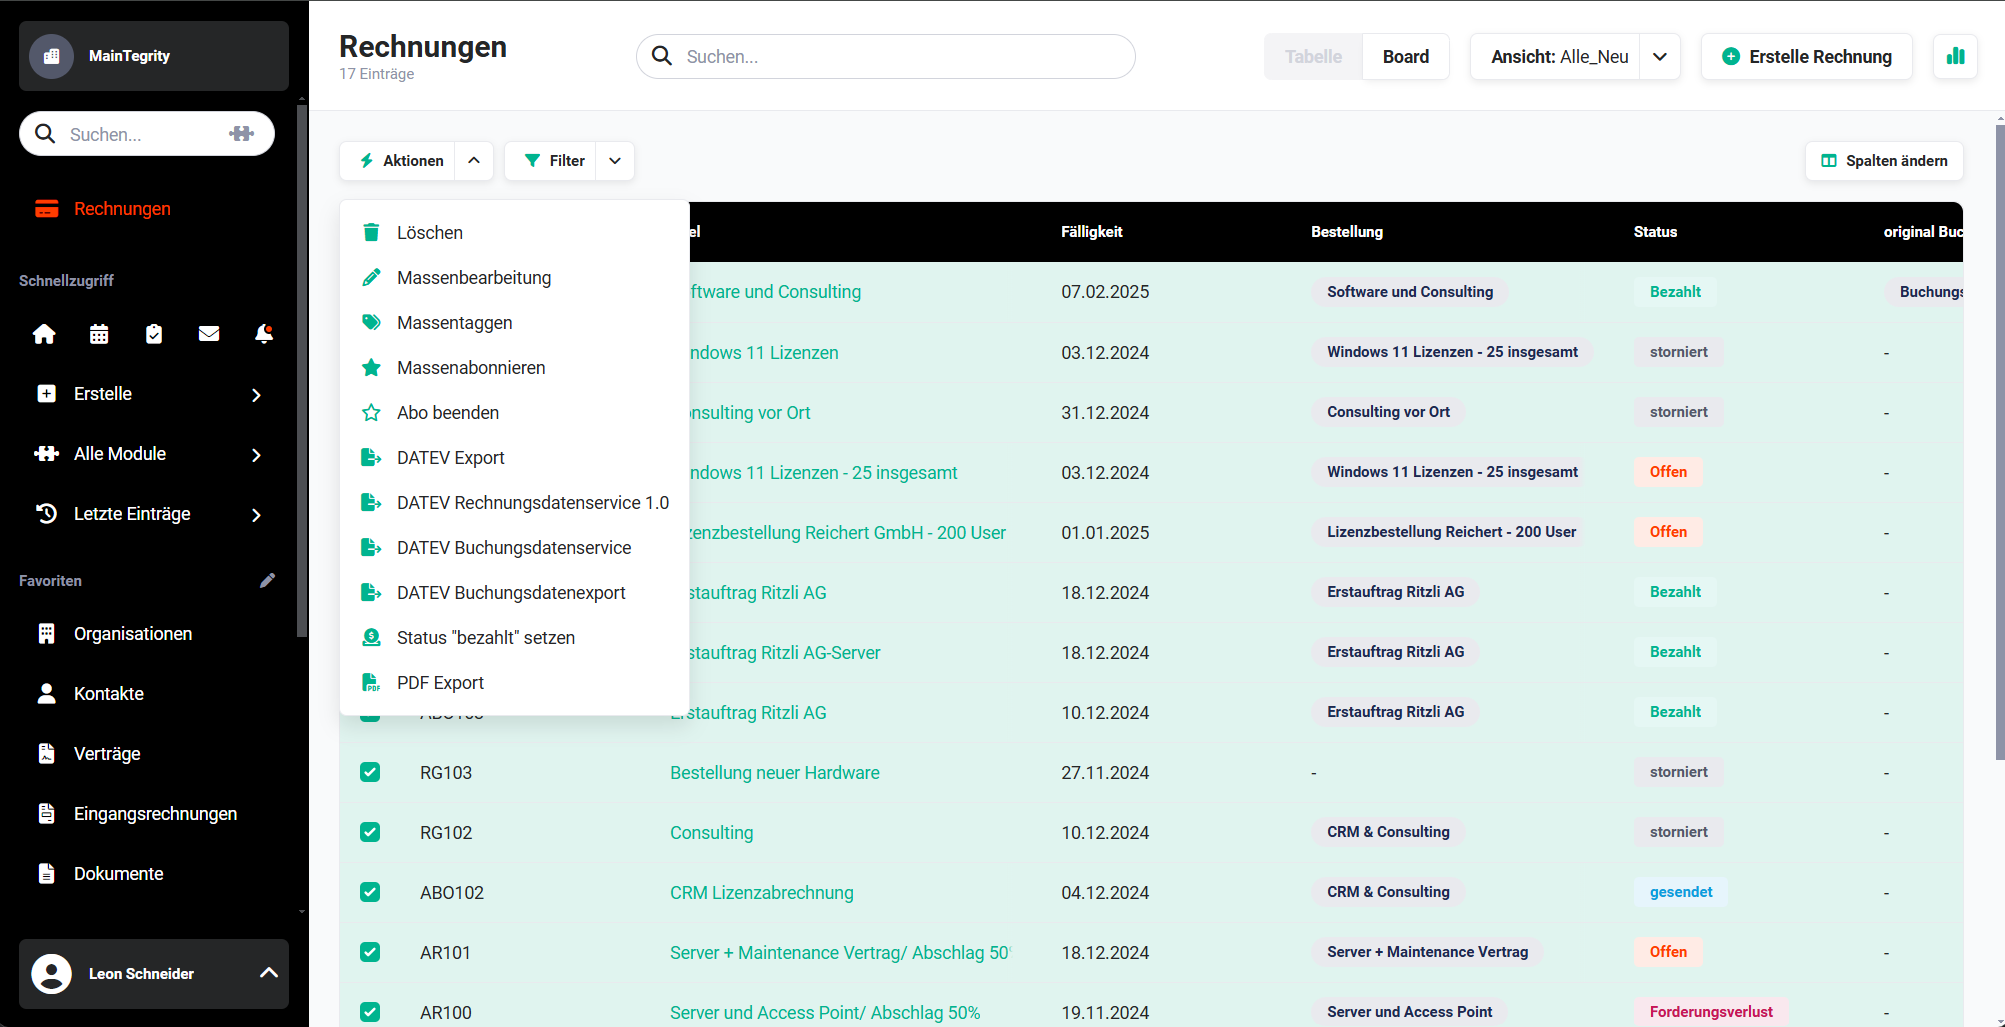
After selecting the records (checkbox) in the list view and a click on the list view action “DATEV Rechnungsdatenservice 1.0”, a popup is displayed to start the transfer of the data to DATEV.
After clicking the “transfer now” button in the popup, the request is processed by DATEV and visually displayed by means of a progress bar.
Depending on the load of the DATEV servers and the number of records, this step can take a few minutes to several hours (rarer extreme case).
If the transfer takes a very long time, the status of the DATEV data centre can be retrieved by means of a link in the popup.
When all data has been successfully sent to DATEVconnect online, a corresponding message appears.
2.5.2. Posting vouchers
In the Billing modules Invoices, Incoming Invoices, Cancellations and Credits, fields for posting vouchers are available:
2.5.2.1. Field “original posting voucher”
The field “original posting voucher” offers the option of linking a document with the corresponding record. It is required to note the voucher that was sent to the customer.
The posting voucher must necessarily correspond to the document that was sent to the invoice recipient. A PDF or image file must be stored in this document. There is the option of setting the customer voucher by normally editing the record. In this case, all referenced document records are available for selection. The posting voucher can also be set by a PDF export or an Automation (email with PDF attachment).
2.5.2.2. Field “last posting voucher”
The field “last posting voucher” is a reference field to the respectively last created posting voucher. This last posting voucher can, for example, be an invoice incl. reminder fees.
Both the original posting voucher and the last posting voucher are transferred to “DATEV Unternehmen online” and used as a posting voucher.
As long as no “original posting voucher” is available yet, the option “Use as posting voucher” is active by default during the PDF export. If an “original posting voucher” is already linked, the option is deactivated by default.
With the DATEV Rechnungsdatenservice 1.0, no reminder fees are transferred!
Reminder fees are only transferred with the [DATEV Buchungsdatenservice]() if this has been activated in the settings!
2.5.3. Error messages
If an error occurs during the transfer of the data, the reason for the error is indicated in brainX in a notification window. Below is a list of possible causes of errors.
| Error message | Solution |
|---|---|
| An export could not be carried out due to missing or incorrect field values. |
|
| The fiscal year YYYY is not created in DATEV Unternehmen online. | Create the fiscal year YYYY in DATEV Unternehmen. |
| The account length stored in the add-on settings (number x) does not match the account length in DATEV (number y)! | Correct the account length in the settings. |
| A transfer error occurred during the export of records. | Error analysis at DATEV Unternehmen online |
2.5.3.1. Error analysis at DATEV Unternehmen online
For precise error analysis, you can determine the type of error at DATEV Unternehmen online under “Belege > Protokolle > Import”.
After logging in to DATEV Unternehmen online, open the item “Startseite Belege”:
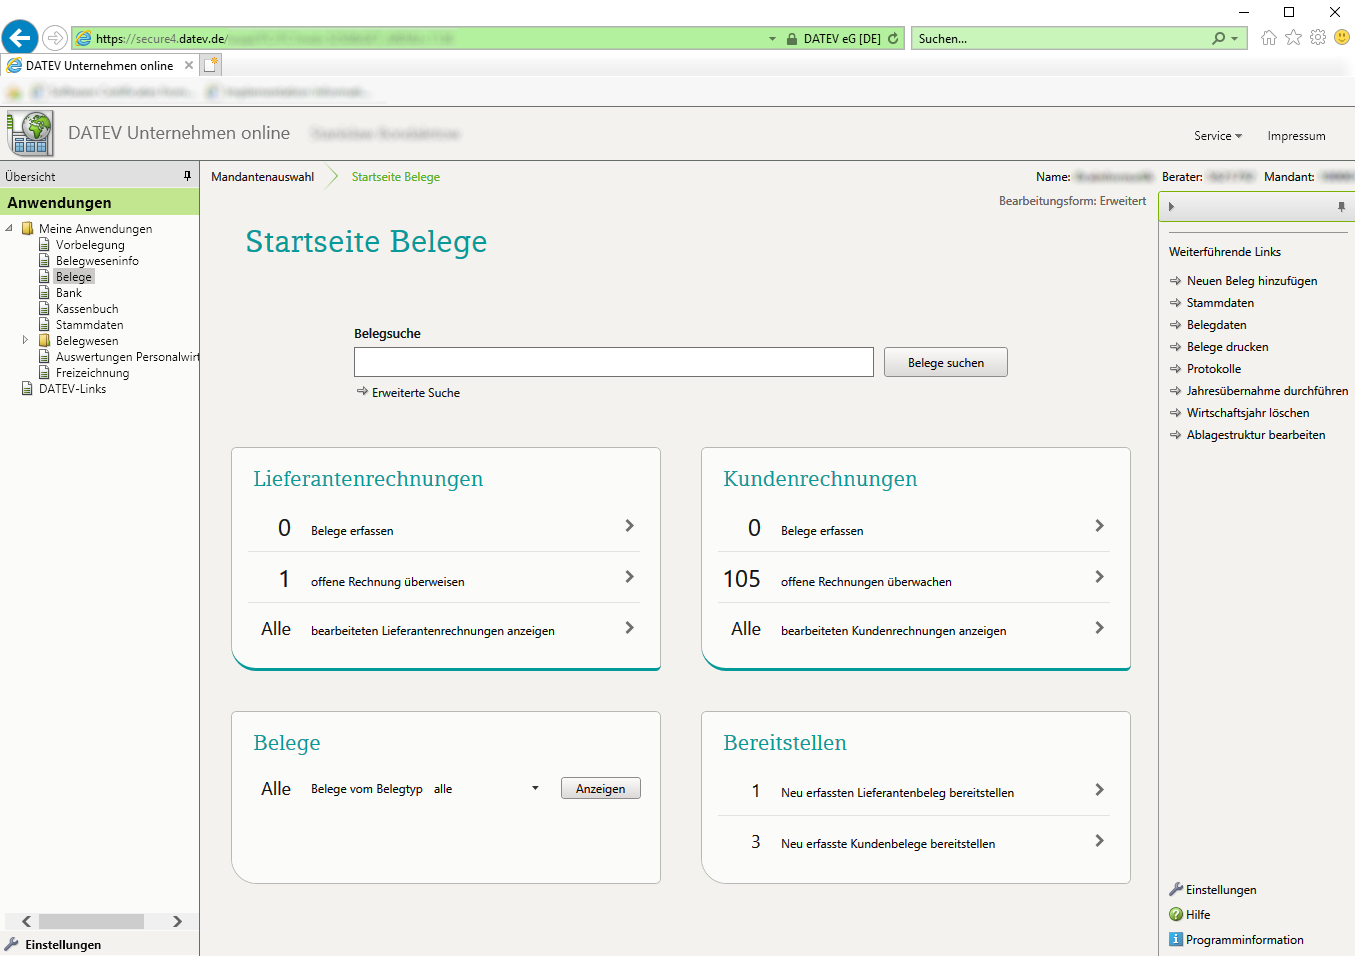 DATEV Unternehmen online - Startseite Belege
In the next step, the import logs are opened:
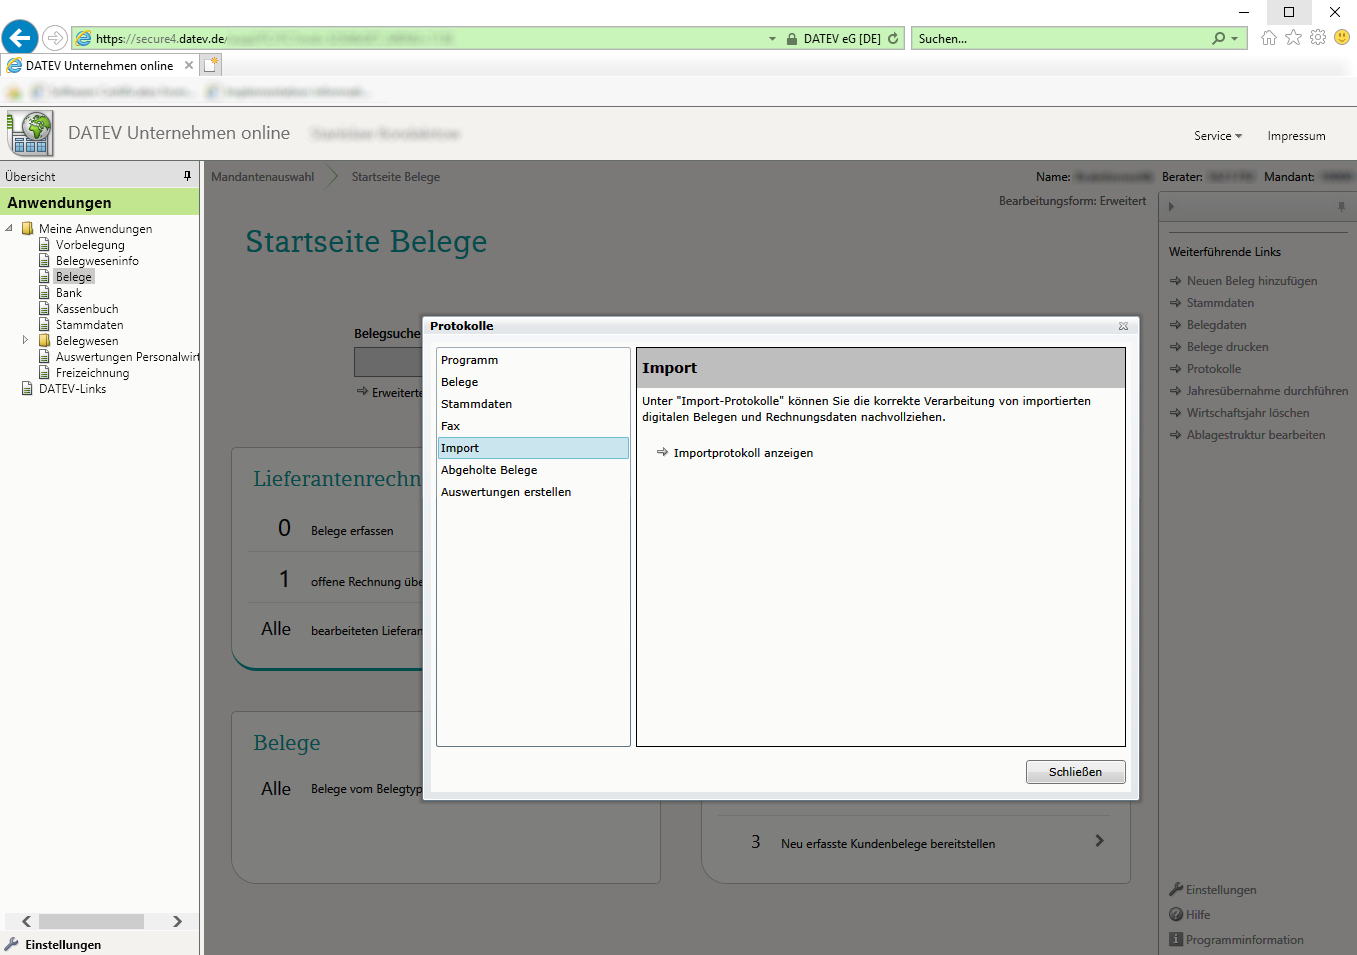 DATEV Unternehmen online - Import logs
To open the required log, the corresponding period must first be selected for the vouchers:
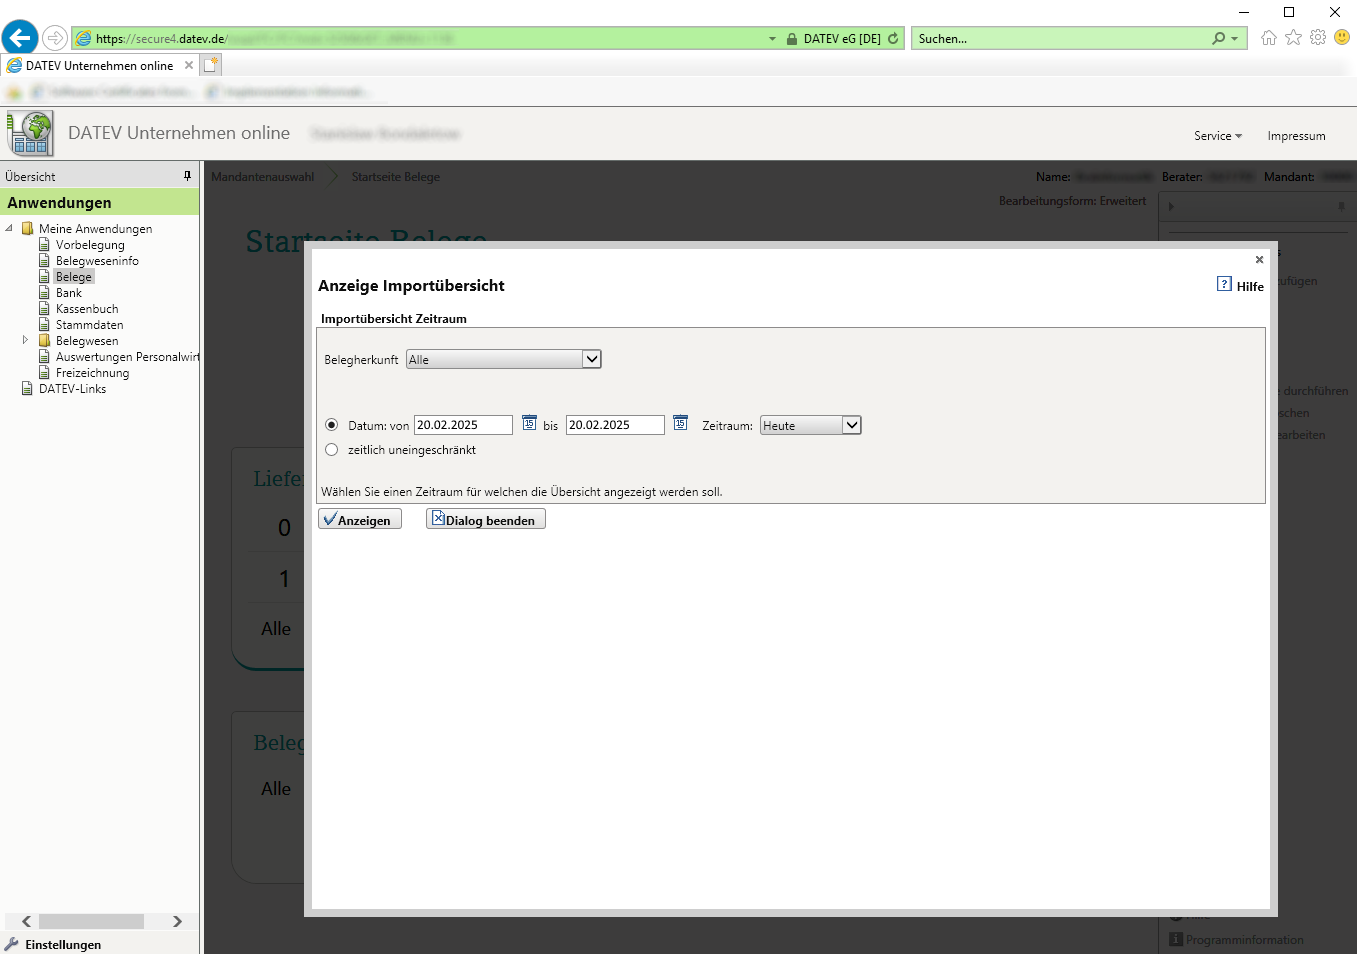 DATEV Unternehmen online - Display import overview
All logs of the selected period are now displayed:
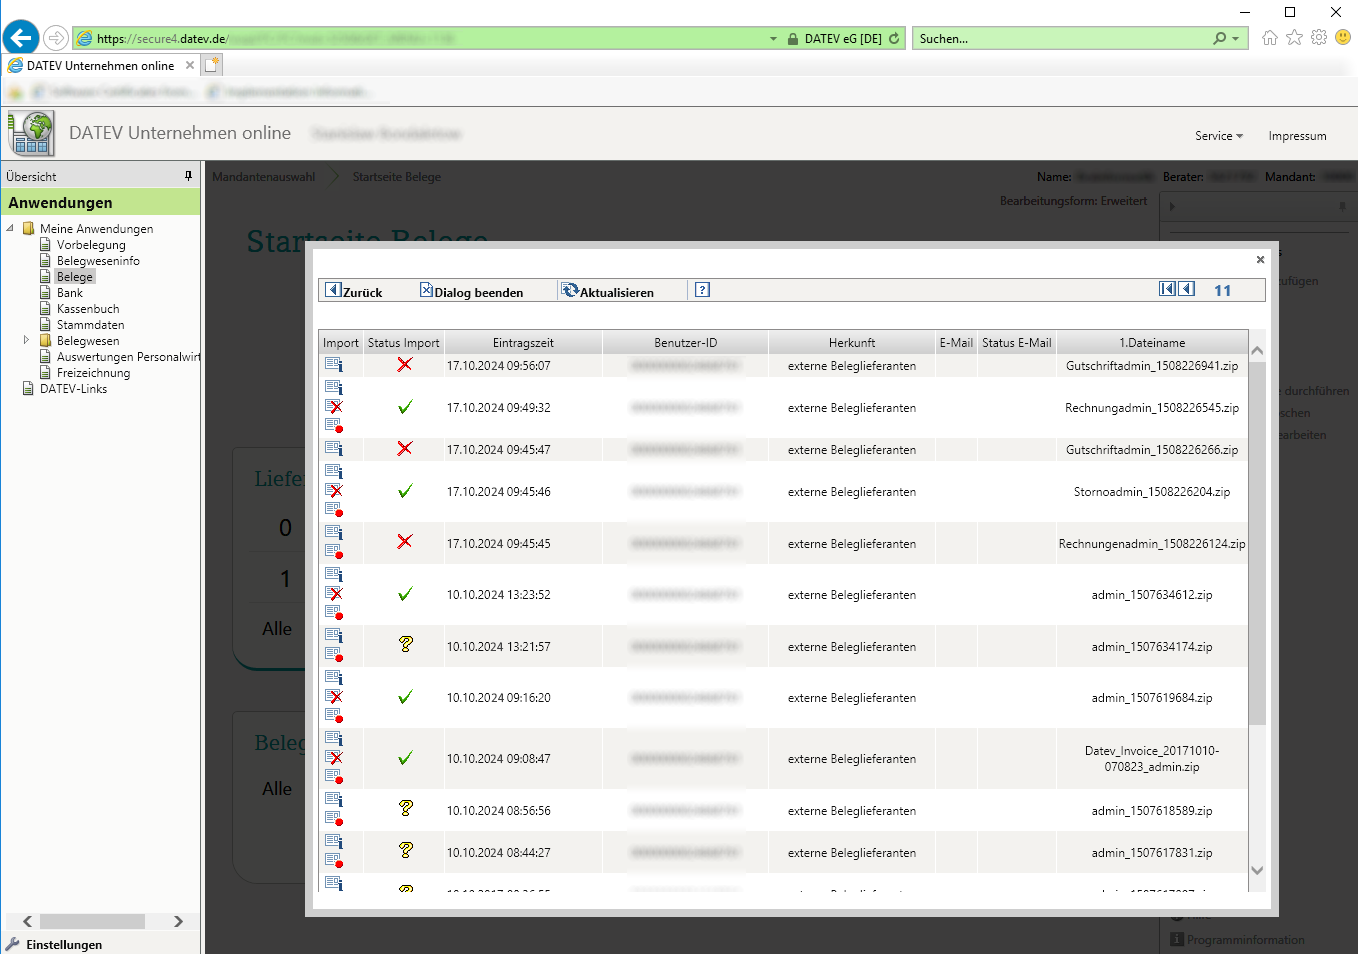 DATEV Unternehmen online - Import list
After selecting a log, it is displayed in detail in a new window. Mostly two types of error occur here:
a) Error message: “Invoice does not match invoice schema”
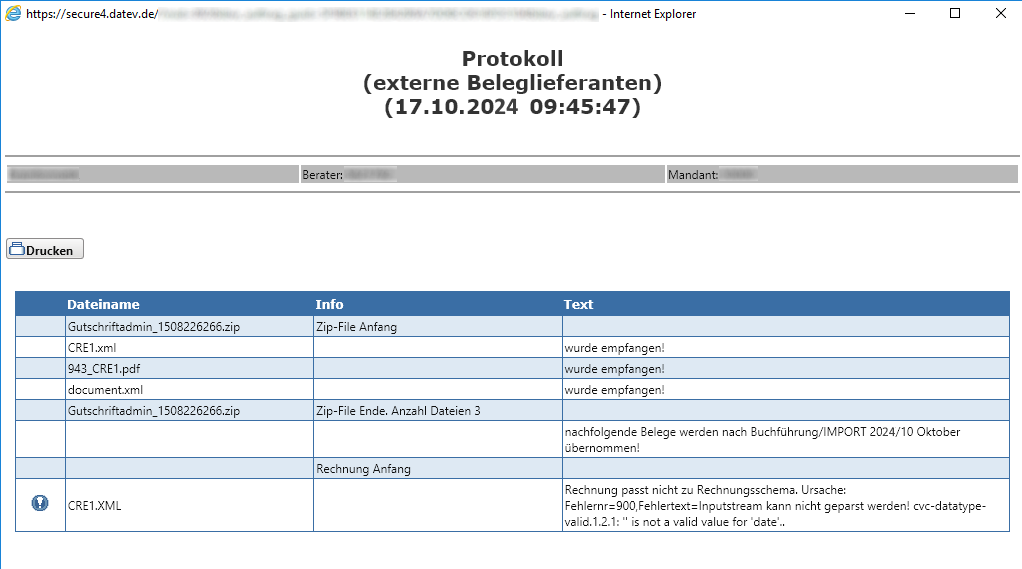 DATEV Unternehmen online - Log
Cause: The XML files generated by brainX are faulty.
Solution: Please contact brainX Support.
b) Error message: “The classification term is not created”:
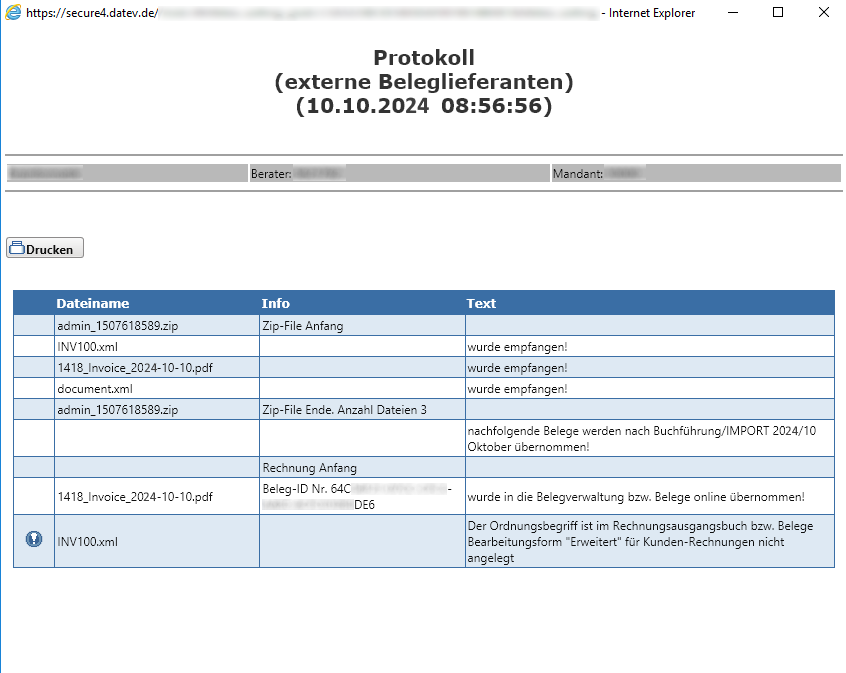 DATEV Unternehmen online - Log
Cause: For example, an invoice with a due date was imported into DATEV for which no fiscal year has yet been created in DATEV.
Solution: Create the corresponding fiscal year in DATEV Unternehmen online.
Should another problem occur, please contact brainX Support.
2.5.4. Limitations
Only records that have not yet been posted (checkbox “DATEV export carried out” in the detail view of the record) and have not been exported before can be exported to DATEV!
Invoices that contain an invoice amount of 0, an adjustment or shipping costs are excluded from the export due to the DATEV guidelines!
3. Practical examples
1 - Month-end close: transfer invoices via DATEV Rechnungsdatenservice
Initial situation: A company creates several outgoing invoices in brainX each month and wants to transfer these collectively to DATEV Unternehmen online at the end of the month, so that the tax advisor can process the posting proposals directly.
Procedure: In the list view of the Invoices module, all invoices of the month that have not yet been exported are selected. The transfer is started via the DATEV Rechnungsdatenservice 1.0 action. After a successful transfer, the records are provided in DATEV Unternehmen online as vouchers with posting proposals.
Result: The tax advisor receives all vouchers structured in DATEV - including general ledger accounts and cost centres. The manual effort for the voucher handover is eliminated.
2 - Export incoming invoices from vendors
Initial situation: A company records incoming invoices from vendors in brainX and wants to transfer these to DATEV as well for the accounting.
Procedure: In the list view of the Incoming Invoices module, the desired records are selected and exported via the DATEV Rechnungsdatenservice 1.0 action. The prerequisite is that a creditor number in the permissible number range (70000–99999) is stored for the respective vendors.
Result: Incoming invoices are transferred to DATEV including creditor data and are available to the tax advisor for further processing.
3 - Set posting voucher automatically via PDF export
Initial situation: A company sends invoices as PDF by email to customers. The field original posting voucher is to be filled automatically with the sent PDF, without manual follow-up effort.
Procedure: In the Invoices module, an automation is set up that automatically stores the PDF attachment as the original posting voucher on the record after the invoice has been sent by email. Alternatively, the option Use as posting voucher can be set active during the manual PDF export.
Result: The posting voucher is always correctly and automatically set - the DATEV export can be carried out without manual preparatory work.
4 - Use DATEV Export (ZIP) for handover without a direct connection
Initial situation: A company wants to hand over invoice data to the tax advisor, who imports the data into DATEV themselves. A direct online transfer via Rechnungsdatenservice is not desired.
Procedure: In the list view of the Invoices module, the desired records are selected and a ZIP file is generated via the DATEV Export action. This is handed over to the tax advisor, who imports it via the DATEV Belegtransfer program.
Result: The voucher handover takes place in a structured and complete manner - without a direct online connection to DATEV Unternehmen online.
4. Frequently asked questions
What is the difference between “DATEV Export” and “DATEV Rechnungsdatenservice 1.0”?
The DATEV Export action generates a ZIP file that must be transferred separately to DATEV via the DATEV Belegtransfer program. The DATEV Rechnungsdatenservice 1.0 action transfers the data directly and online to DATEV Unternehmen online - and additionally enables the transfer of general ledger accounts and cost centres. An active access key (token) is required for the direct transfer.
Which login procedure is required for the DATEV connection?
One of the following procedures is required for logging in to DATEV Unternehmen online: DATEV SmartLogin (smartphone app with QR code), DATEV SmartCard or DATEV mIDentity (USB stick with Windows PC and Edge/Chrome). The brainX export itself is platform-independent and does not depend on a particular browser.
How long is an access key (token) valid?
Two token types are available: the short-term token is valid for 11 hours and loses its validity after a logout. The long-term token is valid for 2 years, but becomes invalid as soon as a short-term token is requested. Tokens are automatically renewed internally every 15 minutes and extended up to the maximum validity period.
Why is an invoice excluded from the export?
Invoices with an invoice amount of 0, with adjustments or with shipping costs are excluded from the export due to the DATEV guidelines. In addition, only records for which the checkbox DATEV export carried out is not yet set can be exported.
What happens if the fiscal year is not created in DATEV?
The export fails with the error message The fiscal year YYYY is not created in DATEV Unternehmen online. In this case, the corresponding fiscal year must be created directly in DATEV Unternehmen online before the export can be carried out again.
Where do I find detailed error messages after a failed export?
Detailed error information is available in DATEV Unternehmen online under Belege → Protokolle → Import. There you can filter by the desired period and view the corresponding import log. In the case of technical errors on the brainX side (e.g. faulty XML files), brainX Support should be contacted.