
Special Module Settings
Package: BASIC SALES
1. General
For the modules
special module settings are available, as these modules have particular functionalities.
2. Deals Module
For the Deals module, in addition to the four standard tabs
the additional tab „Product Block Settings" is available in the module management.
Using the field Expand product block initially (toggle), you define whether the product block is displayed initially expanded or collapsed in the create view. If the toggle is active, the product block is displayed directly expanded when a record is opened.
3. Delivery Notes Module
For the Delivery Notes module, in addition to the four standard tabs
the additional tab „Settings" is available in the module management.
The setting items in the „Settings" tab will be changed shortly in one of the next brainX updates. It is recommended to map the inventory management already now via a corresponding Automation.
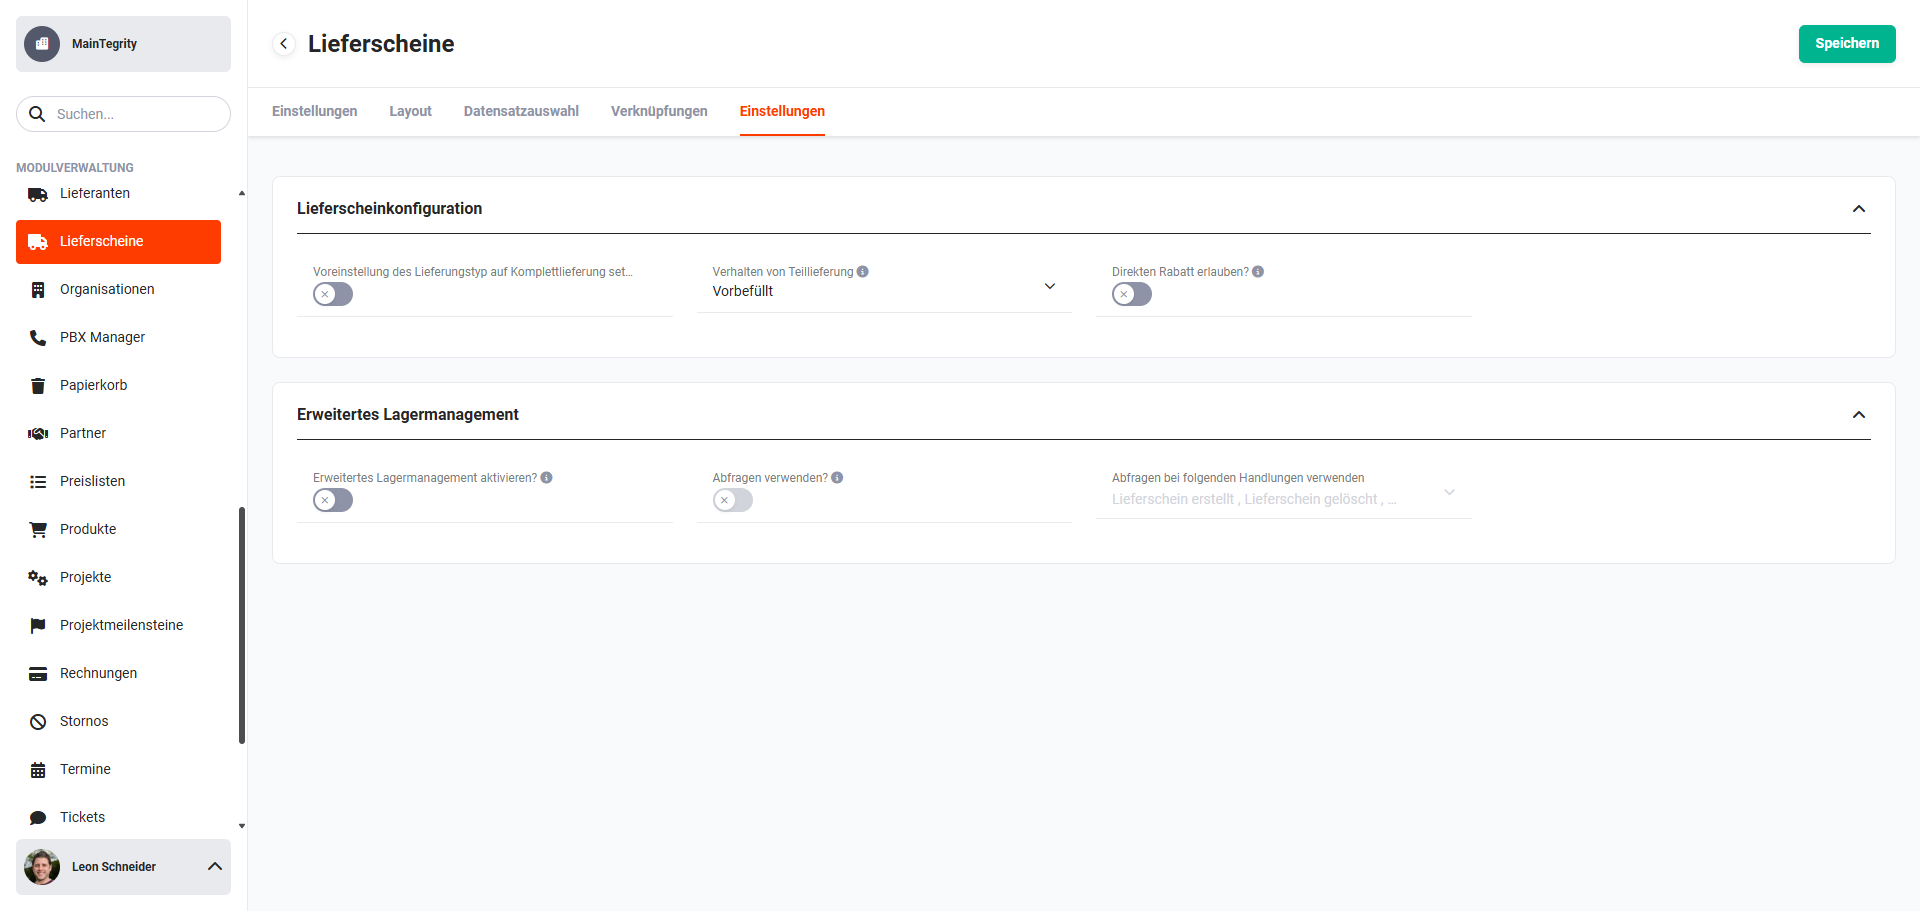 Module Management - Delivery Notes - Settings Tab
The „Settings" tab is divided into two blocks:
- Delivery Note Configuration → Settings for complete/partial delivery and discount
- Advanced Inventory Management → Settings for advanced inventory management
3.1. Delivery Note Configuration
The following fields are available in the „Delivery Note Configuration" block:
- Set default delivery type to complete delivery → sets the delivery type „Complete delivery" as the default value
- Behaviour of partial delivery → picklist with two values:
- Pre-filled → all quantity fields are pre-set to maximum fill
- Not pre-filled → all quantity fields are pre-set to empty
- Allow direct discount? → enables/disables the direct discount in quotes (Deals) and Sales Orders
3.2. Advanced Inventory Management
The advanced inventory management changes the stock quantity per product accordingly when the following actions are carried out: delivery note creation, delivery note deletion, delivery note status change to cancelled or return, and quantity changes in the delivery note itself.
The following fields are available in the „Advanced Inventory Management" block:
- Enable advanced inventory management? → toggle to enable/disable the advanced inventory management.
- Use queries? (field only editable if the „Advanced Inventory Management" has been enabled!) → After the corresponding action, the brainX system asks the user whether the stock quantity of the involved products should change.
- Use queries for the following actions (field only editable if „Use queries?" has been enabled!) → picklist with the following values:
- Delivery note created
- Delivery note deleted
- Status: Cancelled
- Status: Return
- Quantity change delivery note
If the advanced inventory management has been enabled, a popup with the query „By enabling the "Advanced Inventory Management", the task "UpdateInventory" is disabled globally" is displayed.
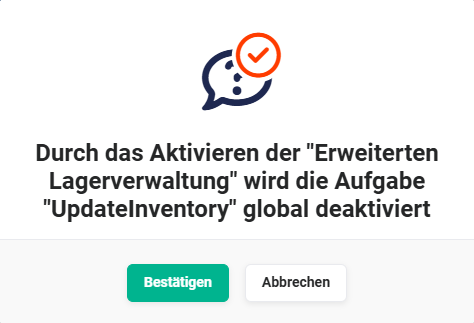 Popup Advanced Inventory Management
3.3. Actions That Change the Stock Quantity
The following actions reduce the stock quantity:
- Delivery note via the action „Create delivery note". After the save process of a record in the Delivery Notes module, the stock quantity is reduced by the quantity in the „Open" field in the product block for the respective product.
- The action „Create delivery note" is used in the following modules:
- Sales Order + More Information
- Deal + More Information
- Delivery Note, after selecting the „related to" field
The following actions increase the stock quantity:
- The status „cancelled" or „Return" is set in the delivery note
- The stock quantity is increased for each product in the delivery note by the quantity in the „open" field
- Delivery note is deleted
The following actions change the stock quantity depending on the quantity:
- Quantity changes to a product in the Delivery Notes module
- The stock quantity is reduced/increased accordingly by the changed value in the „open" or „Quantity" field.
- This check takes place after each save of a record.
- If the quantity of a product is less after editing a record, the quantity in stock increases by the difference between the previous value and the value after saving.
- If the quantity of a product is higher after editing a record, the quantity in stock decreases by the difference between the previous value and the value after saving.
4. Recycle Bin Module
For the Recycle Bin module, the usual module configuration items Settings, Layout, Record Selection and Relationships are not available!
For the Recycle Bin module, however, Deletion Rules can be defined. Using deletion rules, you can define whether and when records are automatically deleted from the Recycle Bin module.
Users who, due to the Rights Management, are „Admin" or „CustomerAdmin" receive the information about automatically performed deletion processes via the system-internal Notifications.
4.1. Deletion Rules
Both a general deletion definition and a deviating deletion definition per module can be configured.
If deletion definitions have been configured, the Background Task „Deletion Routine" must be active! The background task automatically deletes records in the Recycle Bin module at the defined time interval.
When saving the deletion rules, all records that are older than the newly defined value are deleted from the Recycle Bin. The warning notice only appears if a change to a value greater than 0 is saved. If a value is set to 0 or a deletion rule is disabled, no warning notice appears.
4.2. General Deletion Definitions
Field „Delete after days": specification of the number of days after which a record is removed from the Recycle Bin following deletion.
The value 30 is entered in the „Delete after days" field. All records that were deleted in the modules more than 30 days ago are removed from the Recycle Bin when the deletion rules are saved.
To disable the automatic emptying of the Recycle Bin, the value 0 must be entered here.
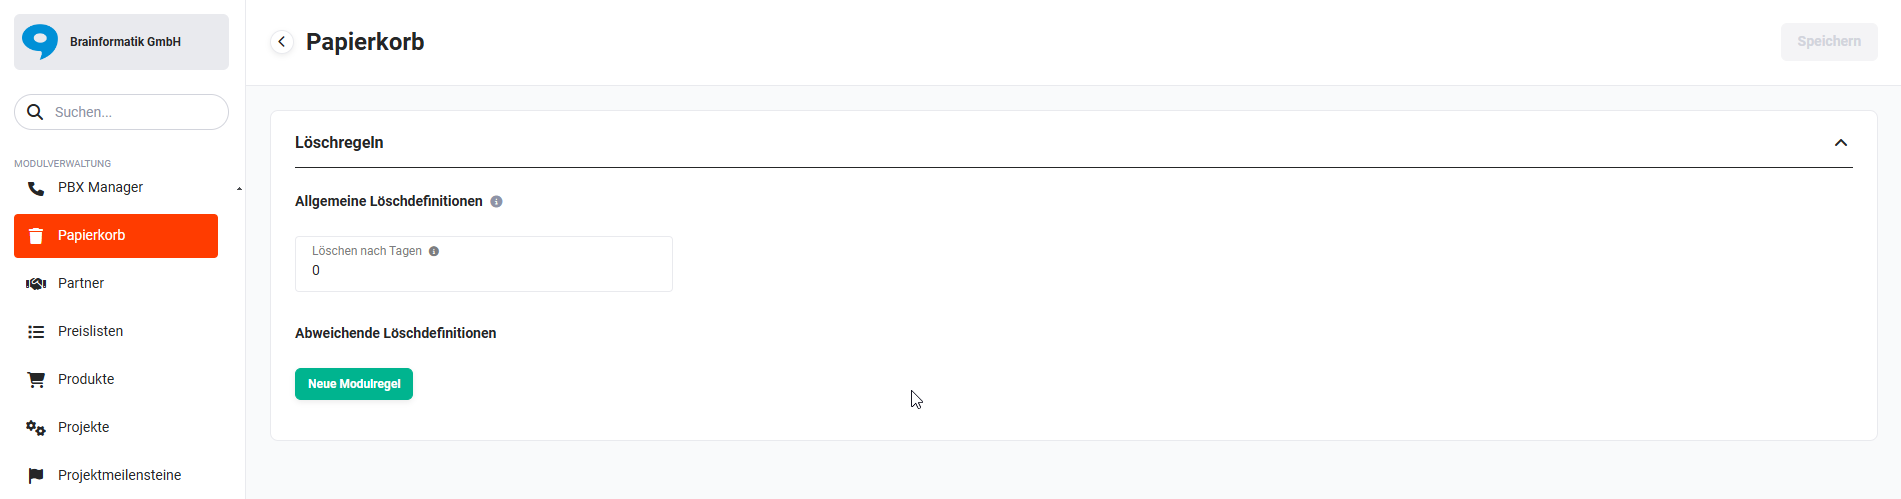 Module Manager - Recycle Bin Deletion Rules
4.3. Deviating Deletion Definitions
In addition to the general deletion definition, deviating deletion definitions can be configured per module, specifying after how many days records are automatically removed from the Recycle Bin.
After clicking the „New module rule" button, the „Module" field (picklist) and the „Delete after days" field are displayed.
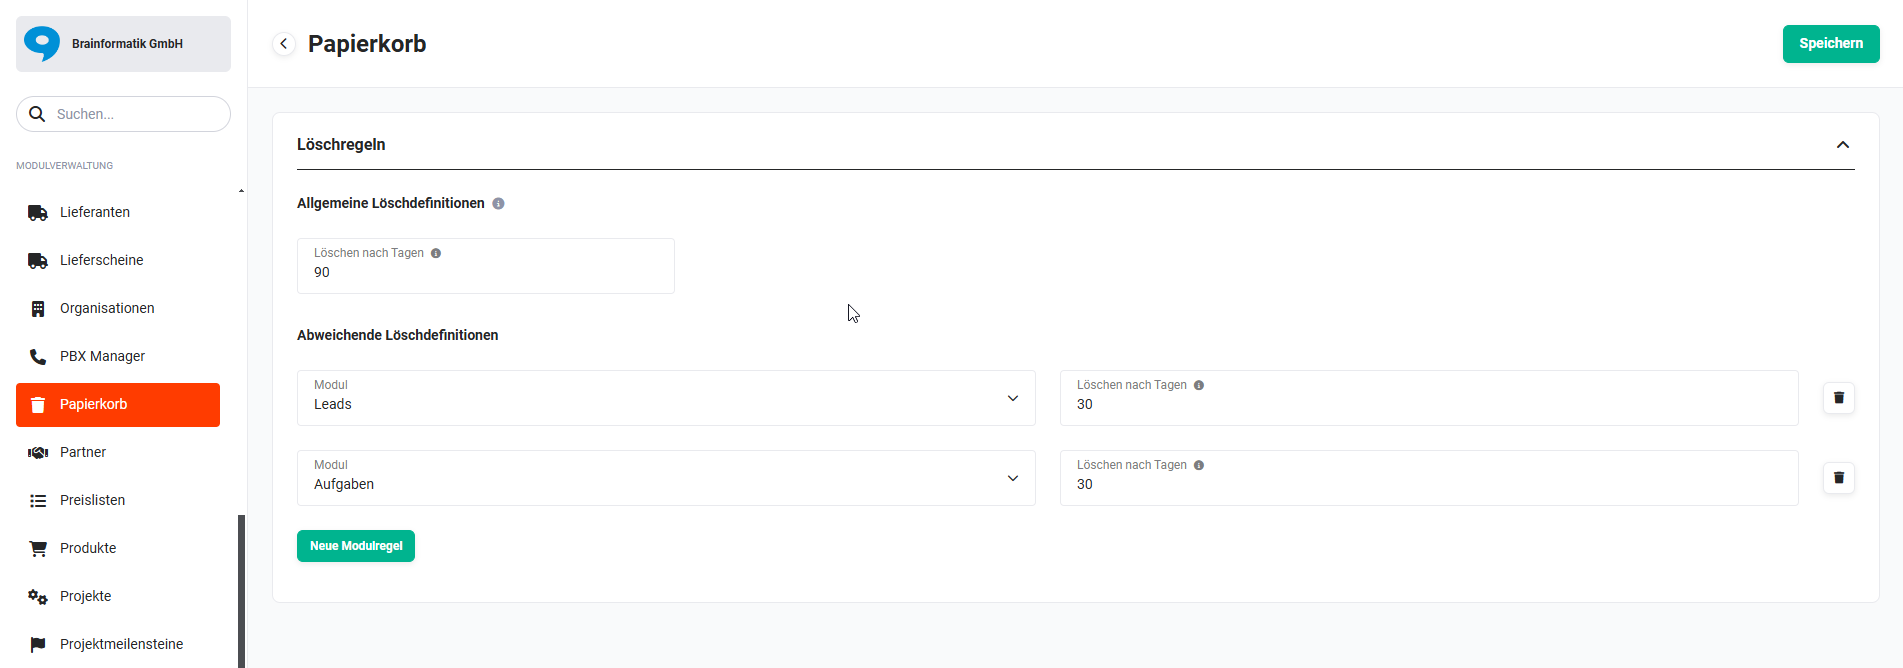 Module Manager - Recycle Bin - deviating deletion definitions
- In the general deletion definitions, the value 90 is entered in the „Delete after days" field. All records for which there are no deviating deletion definitions are automatically removed from the Recycle Bin 90 days after the deletion in a module.
- In the deviating deletion definitions (see screenshot above), the value 30 has been entered in the „Delete after days" field for the Leads and Tasks modules. All records of the Leads and Tasks modules are automatically removed from the Recycle Bin 30 days after the deletion in a module.
A deletion definition can also be configured for individual modules only, without setting a general deletion definition. To do this, simply enter the value 0 in the „Delete after days" field in the general deletion definition.
5. PBX Manager Module
In brainX, a telephony integration can be carried out via Sipgate or Softphone Connector.
After calling up the PBX Manager module in the module management, the tiles Sipgate and Softphone Connector are displayed in the „Telephone provider" block.
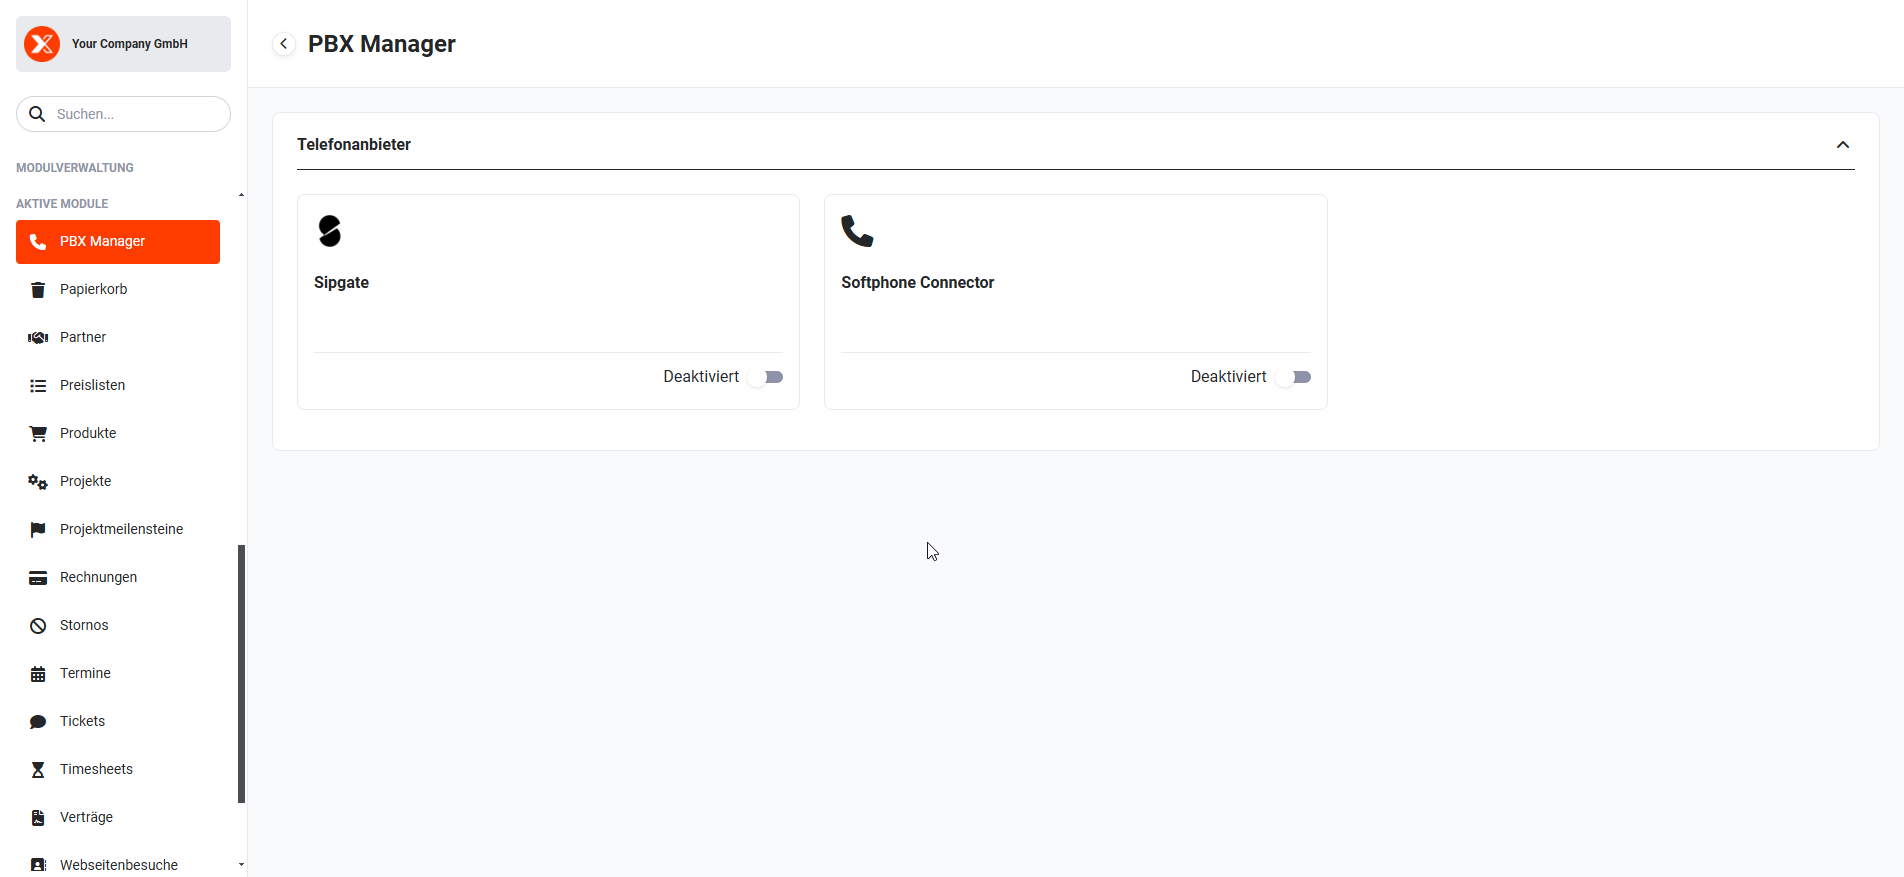 Module Management - PBX Manager
5.1. Sipgate
A user account with Sipgate and Sipgate.io is required for use!
To enable/configure the Sipgate telephone provider, the slider within the tile must be activated.
The popup „brainX Endpoint" now opens, in which the endpoints for incoming and outgoing calls are displayed.
The endpoints must be entered in Sipgate.io.
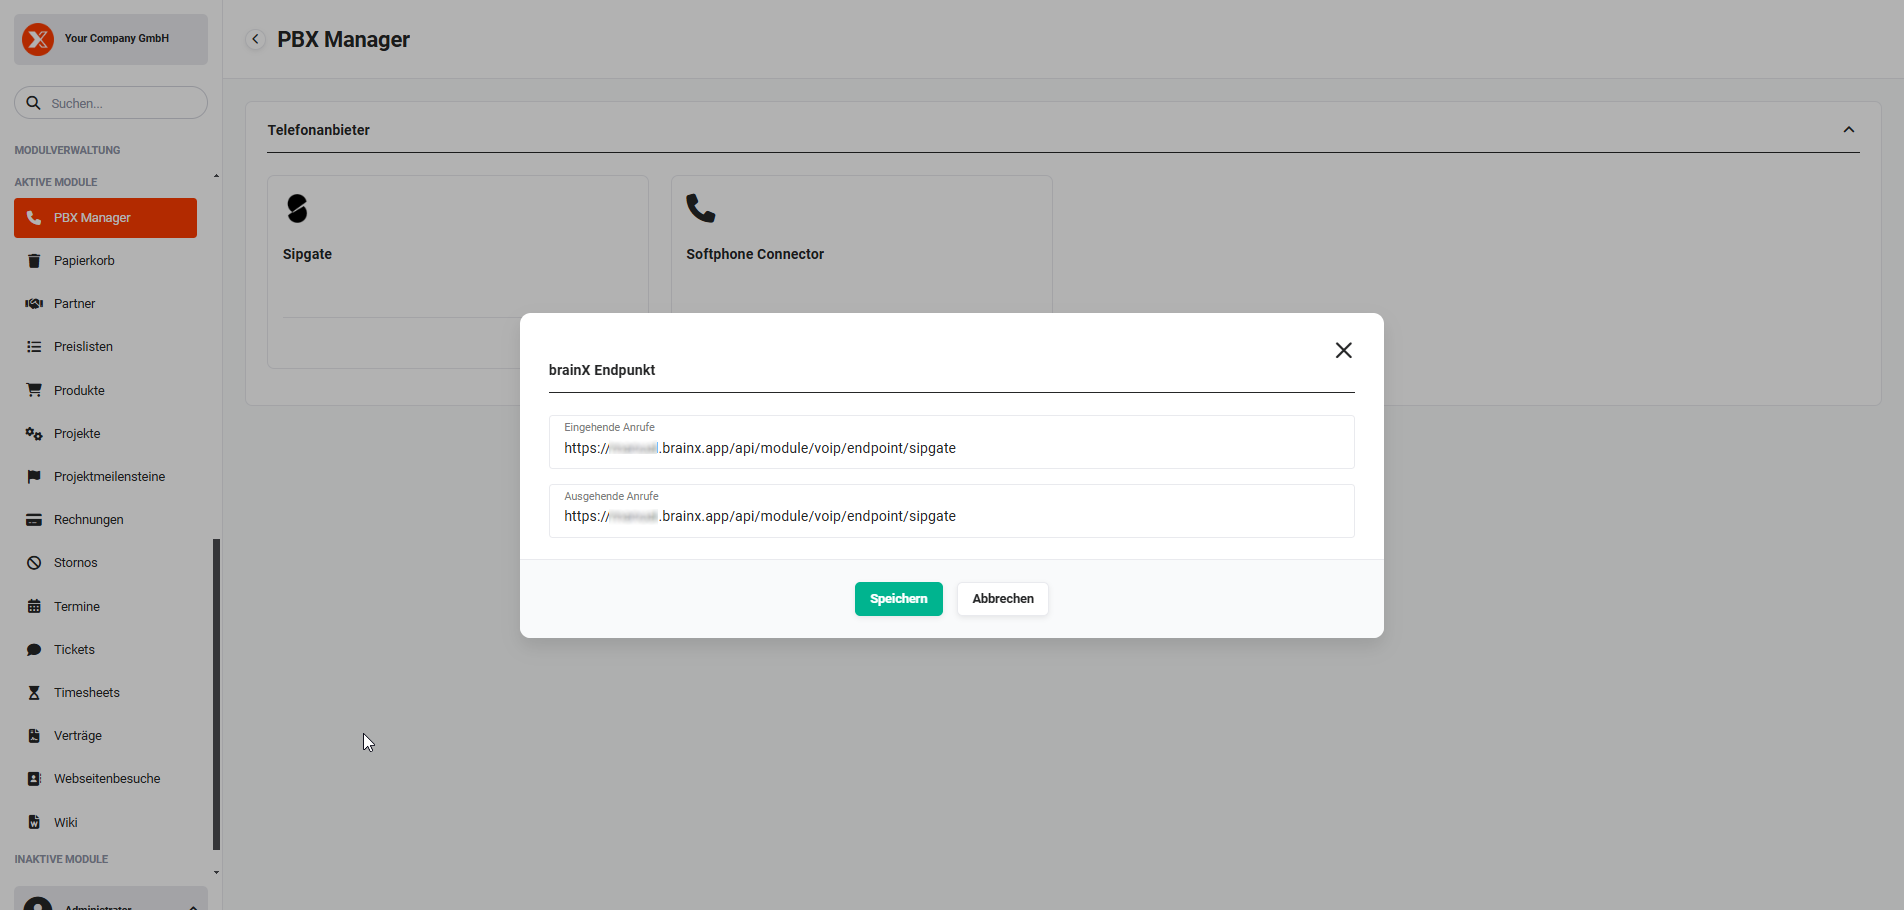 PBX Manager - Popup „brainX Endpoint"
To enable Sipgate in brainX, you simply need to click the „Save" button in the „brainX Endpoint" popup.
The PBX Manager module with the tile view in the module manager is now displayed again. The slider is now set to „Enabled" accordingly.
Every user who wishes to use the telephone integration must enter their Sipgate data in My Settings - Integrations.
The settings can also be made by a user with administrative rights in Global Settings - Users and Rights - Users and Groups.
5.2. Softphone Connector
The following requirements apply for using the Softphone Connector:
- The software client system used (softphone or software telephone) must be able to call a URL.
- Only possible in the desktop version and not with mobile use of brainX.
- The user must be logged in to brainX and the software client must be active.
- Call contacts, organizations, leads, partners or vendors with a single click (outbound).
- Incoming calls are displayed as a popup with the corresponding contact data (inbound).
- Call history with caller, call duration and call status (in- & outbound).
- Comments can be saved directly to the contact person.
- Universally applicable: compatible with almost all telephone clients
To enable/configure the Softphone Connector, the slider within the tile must be activated.
The popup „Softphone Connector" now opens, in which the server settings are configured.
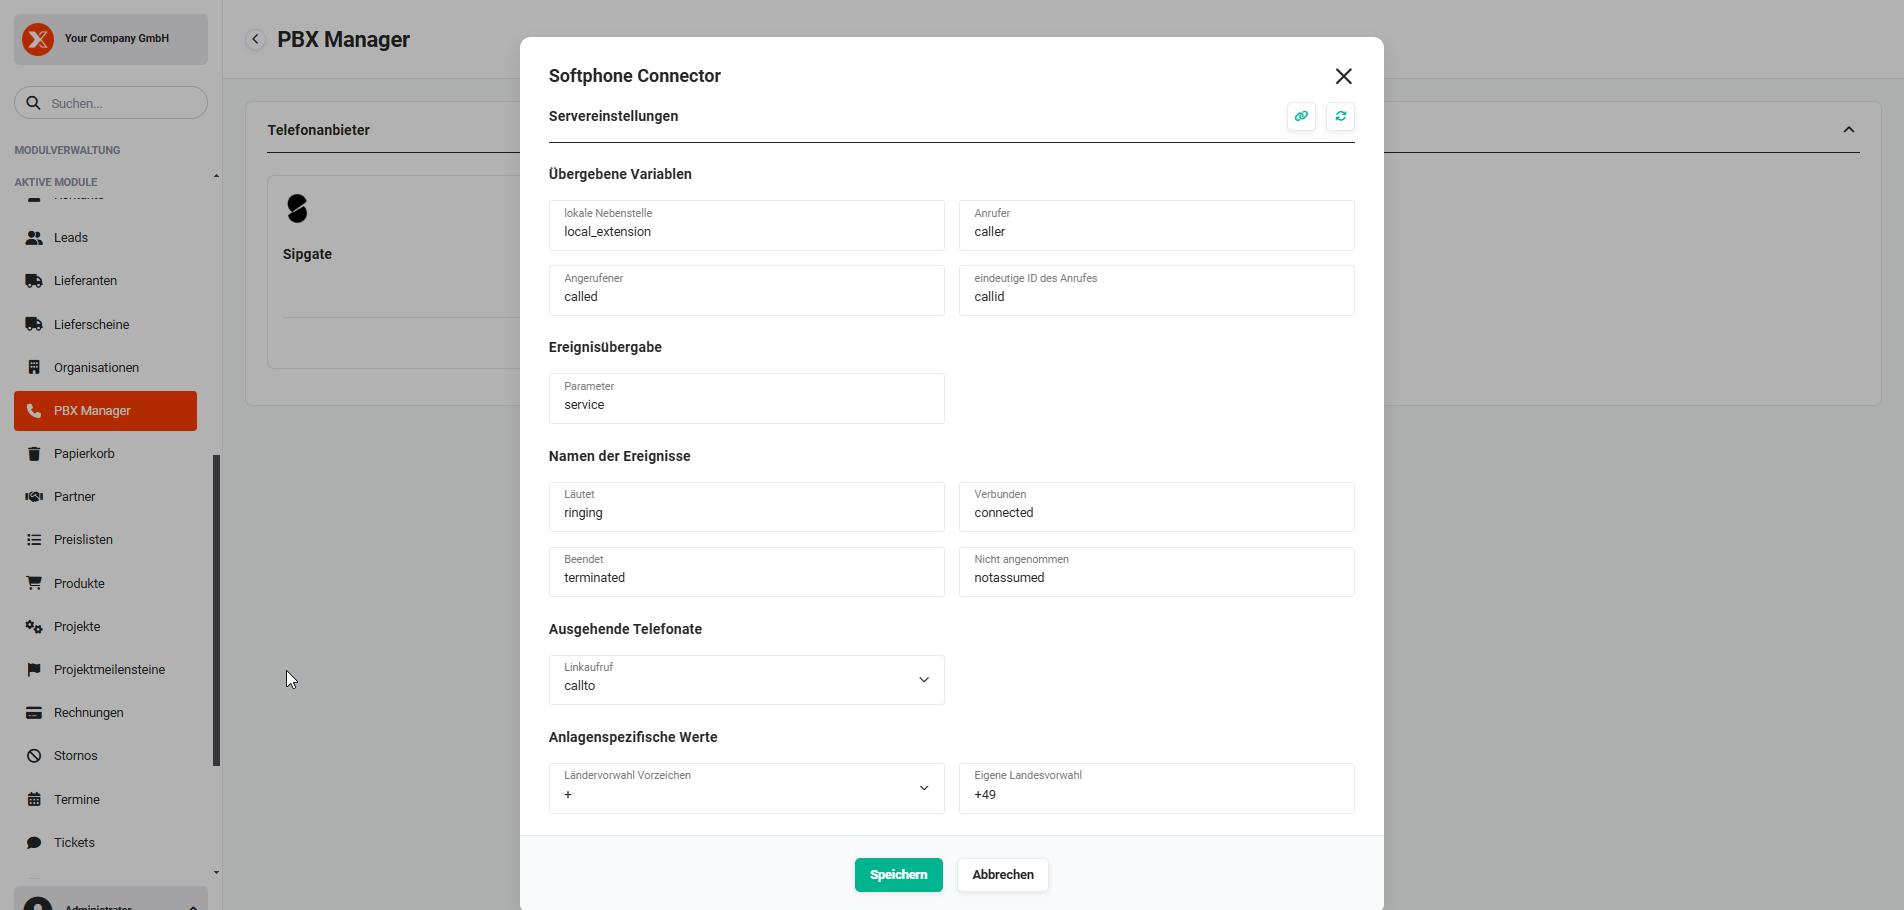 PBX Manager - Popup „Softphone Connector"
The „Softphone Connector" popup is divided into the following areas (incl. the fields):
- Passed variables
- local extension (default value: local_extension)
- Caller (default value: caller)
- Called party (default value: called)
- unique ID of the call (default value: callid)
- Event transfer
- Parameter (default value: service)
- Names of the events
- Ringing (default value: ringing)
- Connected (default value: connected)
- Terminated (default value: terminated)
- Not answered (default value: notassumed)
- Outgoing calls
- Link call (picklist with the values callto and tel, default value: callto)
- System-specific values
- Country code prefix sign (picklist with the values + and 00, default value: +)
- Own country code (default value: +49)
The following is expected as a parameter per endpoint:
- The number of the local extension involved in the call.
- The number of the called person, with the area code for better readability.
- The unique ID of the call.
- The local extension for unique identification is saved in the User Settings of brainX.
In the „Softphone Connector" popup, there are two additional action icons at the top right:
5.2.1. Client URL Examples
After clicking the „Client URL Examples" button (icon „chain links"), the „Client URL Examples" popup opens.
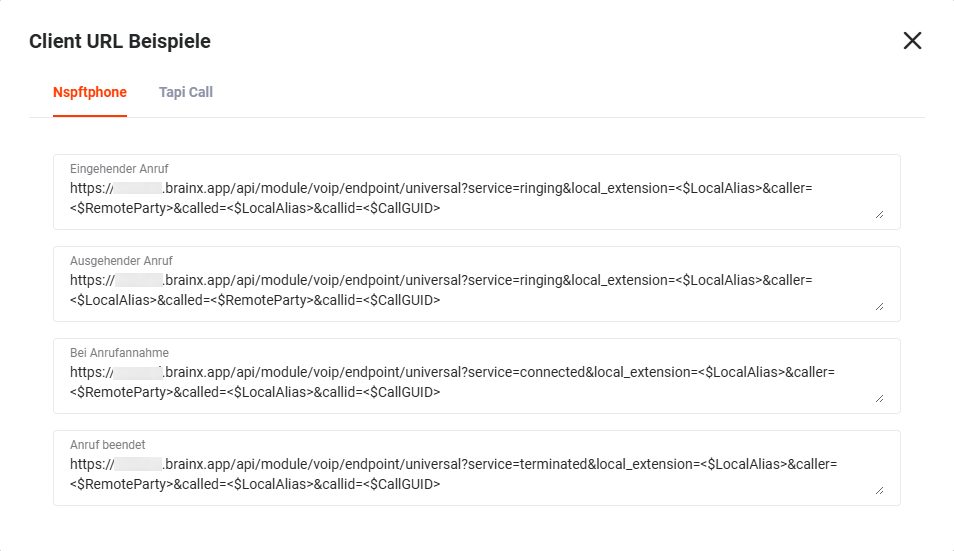 Popup „Client URL Examples"
The popup is divided into the tabs „Nspftphone" and „Tapi Call", each of which contains URL examples for the following events:
- Incoming call
- Outgoing call
- On call answer
- Call terminated
5.2.2. Default Settings
After clicking the „Restore default settings" button (icon „semicircular arrows"), all settings in the „Softphone Connector" popup are reset to the default settings.
5.2.3. Technical Process of the Calls
The integration takes place via telephone software client calls. The user's softphone client must offer the possibility to pass information to a URL upon certain events.
5.2.3.1. Outgoing Calls
The user can initialise a call by clicking on the telephone number in the brainX system. The telephone software client installed on the user's desktop computer must have a function that can react to the transfer value of the browser. The user's telephone software client must report a corresponding status back to the brainX system in order to generate a log entry in the system. If the called party was not reached, or the call ended, a status update must be reported to the brainX system again. In this case too, the information serves to update the log entries in order, for example, to determine the call duration.
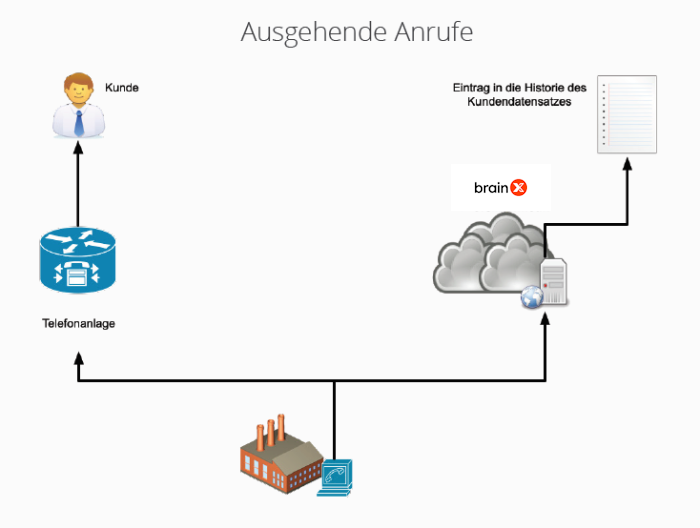 schematic representation outgoing calls
5.2.3.2. Incoming Calls
Caller identification: Incoming calls must trigger a popup in the brainX system in which all records with the corresponding number are displayed.
The user's telephone software client rings. This information is transmitted to the brainX system. In the brainX system, matching leads, contacts, organizations and partners are displayed based on the transmitted phone number.
In this case too, the call is logged. This also happens if the user does not answer the call. After the call ends, a status is sent to the brainX system again. The call log is updated with this data.
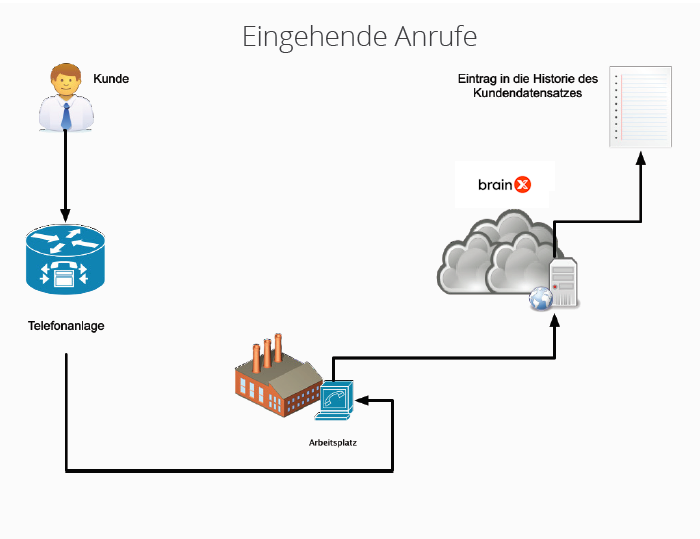 schematic representation incoming calls
5.3. Background Task PBX Clean Up
The Background Task „PBX Clean Up" deletes PBX Manager entries that were initially created by the „Softphone Connector" integration but were never completed (i.e. filled with information). This happens, for example, when the user logs out of brainX before a call is completed.
Since with outgoing calls a record is already created in the PBX Manager module when the telephone number is clicked and only updated at a later point in time, entries may exist that were not maintained further.
In order not to have more and more information-less entries with the status „Initial" over time, or entries which have no call duration, the „PBX Clean Up" background task is executed. This is run once per day and automatically deletes the corresponding records, or moves them to the Recycle Bin.
If the „Softphone Connector" integration has been enabled, the Background Task „PBX Clean Up" must also be active!
The „PBX Clean Up" background task is initially delivered so that it runs once daily at 02:00. The settings of the background task cannot be changed. Instead of a user who deleted the record, the name of the background task is entered.
6. Appointments Module
The configuration settings for the module are described in the section Appointments - Basic Configuration.
7. Templates Module
Two setting areas are available for the Templates module:
- Standard → Configuration of the columns in popups for selecting a template
- Module-specific exceptions → Exceptions to the columns set in the „Standard" block. For the selected modules, the system standard is displayed in popups for selecting a template (columns Name of template, Description and responsible).
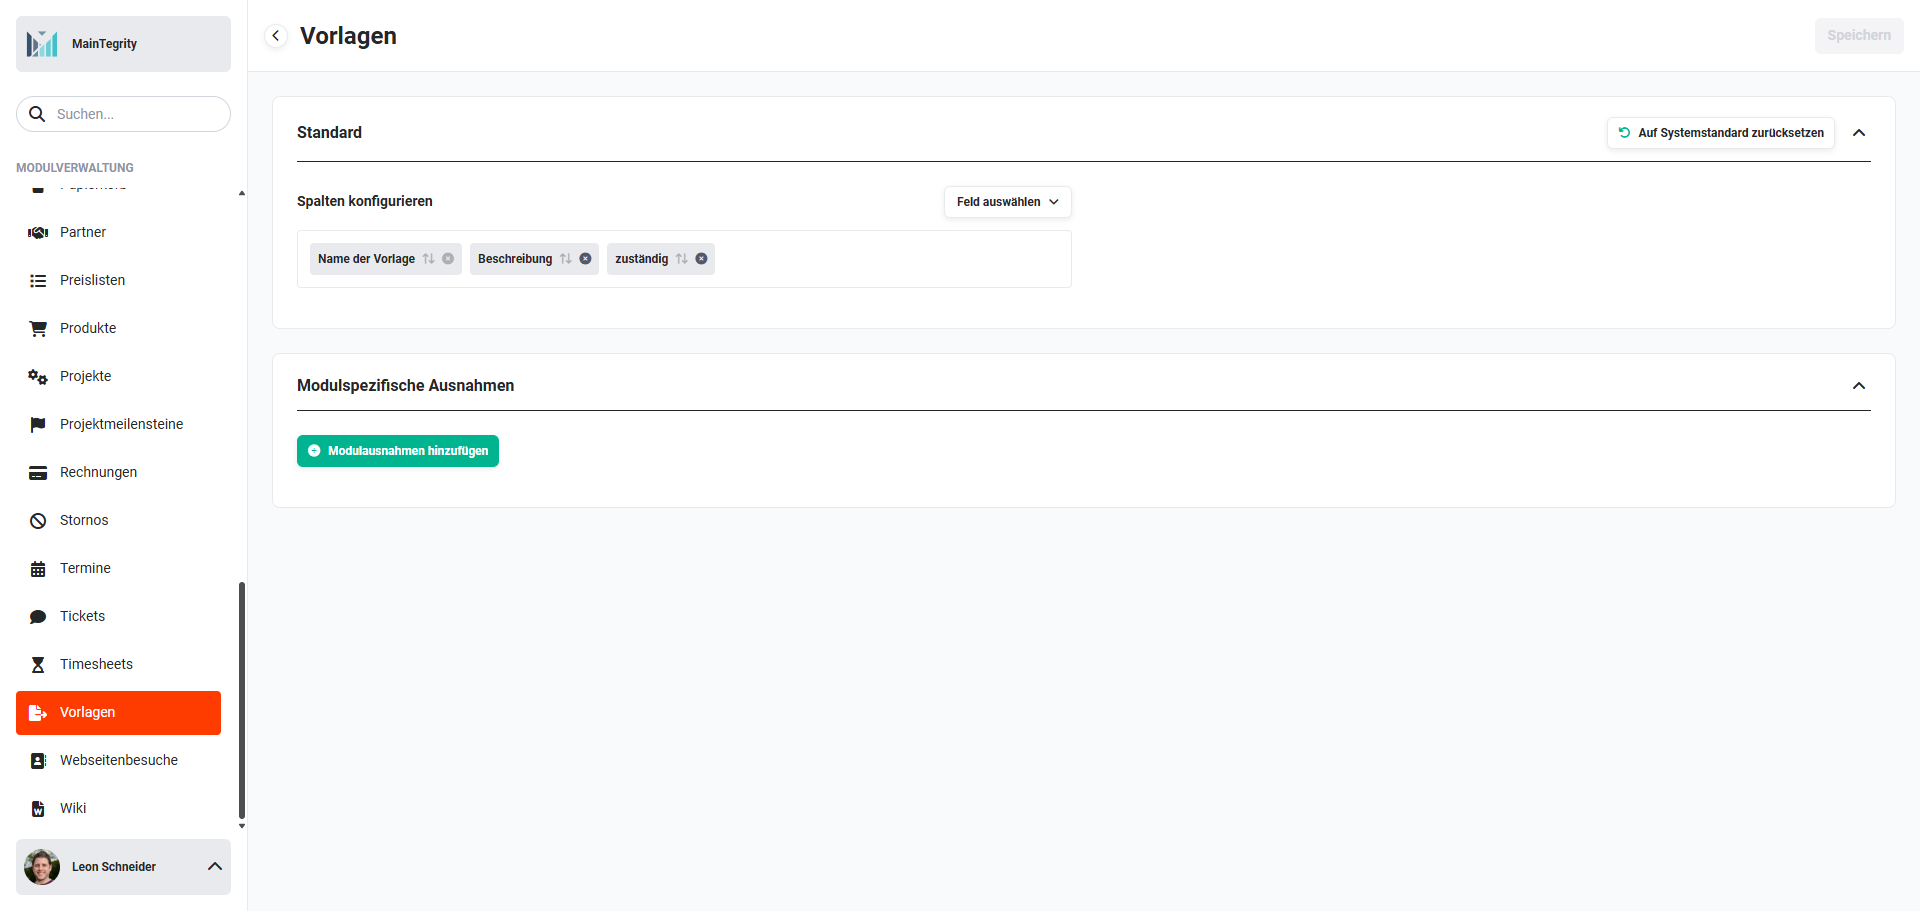 Module Management Templates
8. Practical Examples
1 – Recycle Bin: different retention periods per module
A company wants to keep deleted contacts and organizations for 90 days, but automatically delete leads and tasks permanently after just 30 days. In the general deletion definitions, the value 90 days is entered. Via New module rule, a deviating rule is created for Leads and Tasks respectively with the value 30 days. The Deletion Routine background task is configured for daily execution and is active.
2 – Deals: always show the product block expanded when opening
In sales, the products are to be immediately visible when creating a new deal, without the product block having to be expanded manually first. In the module management of the Deals module, the Product Block Settings tab is called up and the Expand product block initially toggle is activated. From now on, the product block is automatically displayed expanded in the create view.
3 – Delivery Notes: automatically reduce stock quantity
A company wants the stock quantity of the affected products to be automatically reduced when a delivery note is created. In the module management of the Delivery Notes, the advanced inventory management is enabled. The Use queries? option is enabled and Delivery note created is selected as the event. With the next delivery note, the user is asked after saving whether the stock quantity should be adjusted accordingly.
9. Frequently Asked Questions
What happens when saving a deletion rule to records already in the Recycle Bin?
When saving, all records in the Recycle Bin that are older than the newly defined value are deleted immediately and irrevocably. The warning notice only appears for values greater than 0. Records that are more recent than the new value are retained.
Does the „Deletion Routine" background task have to be enabled separately?
Yes. Deletion rules alone have no effect if the Deletion Routine background task is inactive. It must be active and configured to a sensible interval (e.g. daily) so that the automatic cleanup of the Recycle Bin takes place.
What is the difference between general and deviating deletion definition?
The general deletion definition applies to all modules for which no deviating rule is configured. Deviating deletion definitions allow you to set a different retention period for individual modules – e.g. delete leads after 30 days, while all other modules are retained for 90 days.
Can the advanced inventory management be used simultaneously with the „UpdateInventory" background task?
No. When enabling the advanced inventory management, the UpdateInventory background task is automatically disabled globally. Both mechanisms manage the stock quantity and must not be active at the same time.