
Email accounts
Package: BASIC
1. General
The Email accounts module enables the central management of email accounts and communication directly within brainX. It serves the following purposes:
- Central email management: Emails from various email accounts can be retrieved and managed in one place.
- Communication in context: All email interactions with customers and prospects are displayed directly in the context of the respective customer file, making it easier to access the communication history.
- Team collaboration: Several team members can access the same email accounts, work on emails jointly and respond to enquiries.
- Automation: Emails can be automatically assigned to specific team members or automated replies can be sent.
- Logging: All email interactions are logged, so that the complete communication history can be traced at any time.
Incoming mail server
The incoming mail server (IMAP) is used to display the received messages of the email account. When an email is opened in the detail view, there is the option to import the message into brainX and link it to a record.
Outgoing mail server
The outgoing mail server (SMTP) is used to send messages from brainX.
An email account set up in brainX offers a live lookup on the mail server. The displayed emails are not stored in brainX, but are retrieved directly from the mail server.
If emails are referenced to a record in the Email accounts module, a copy of the email is stored in the brainX database and is then available in the Emails module. Depending on the permission settings, these emails can also be accessed by other users.
The range of functions of the IMAP access depends on the technical conditions of the respective mail server. Certain functions – such as synchronising folders, previewing messages or moving emails – are only available if the mail server supports them.
A customer sends an enquiry by email. The responsible employee opens the email directly in the Email accounts module, links it to the corresponding organisation record and replies directly from within brainX. The email is subsequently visible to the entire team in the Emails module and assigned to the customer record.
For an automation of the type Send email, an email account is required for which the Automation allowed toggle is active. The email account is set as the sender in the automation and automatically sends emails, e.g. upon status changes in tickets or after a new lead has been created.
2. Creating an email account
Every user can create any number of email accounts in the Email accounts module. Depending on whether an email account has already been created or not, the procedure differs slightly – the process is, however, identical.
For email accounts, authentication via OAuth access key is possible. The integration currently only covers Microsoft 365 email accounts.
2.1. Creating the first email account
When the module is opened for the first time, the option to create an email account is offered directly.
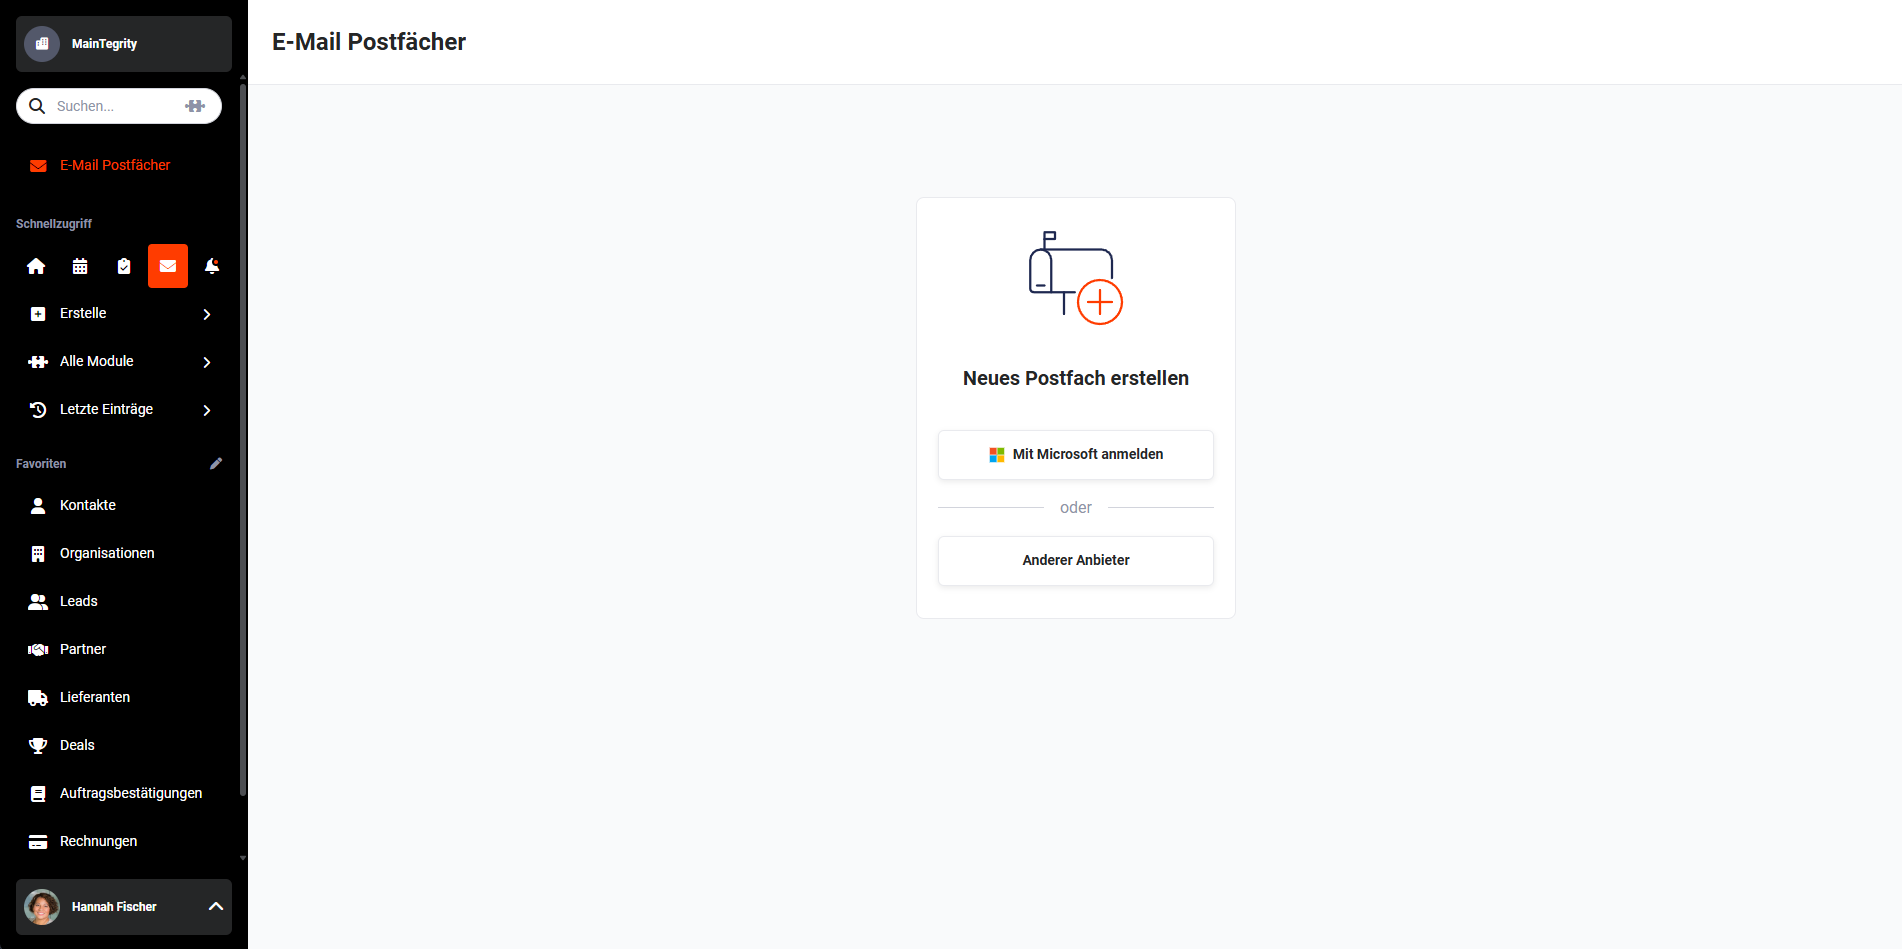 Email accounts module - creating a new email account
Depending on whether a Microsoft or another email account is to be created, the subsequent steps differ:
2.1.1. Microsoft
After clicking the "Sign in with Microsoft" button, a notification window is displayed indicating the redirection to the Microsoft service.
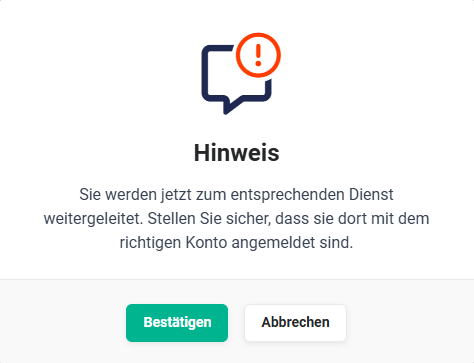 Redirection notice
After clicking the "Confirm" button, a separate browser window opens for signing in to Microsoft.
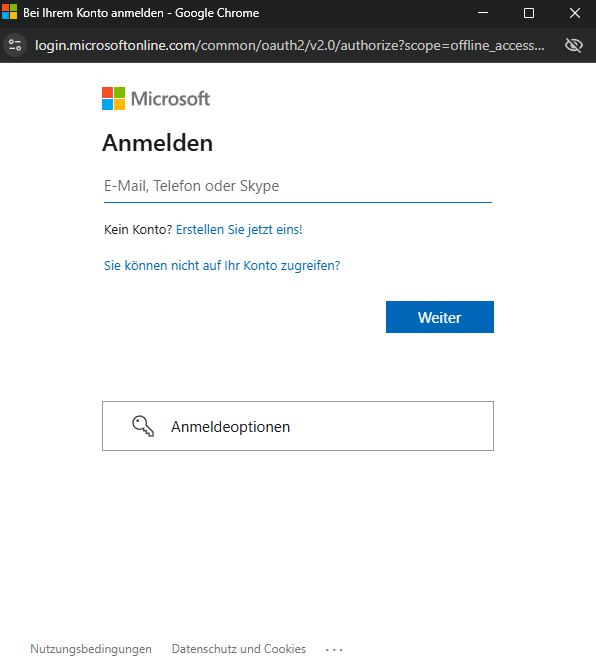 Microsoft sign-in
The sign-in process comprises the following steps:
- Entering the email address
- Entering the password
- Verifying the security information
- Prompt whether the user should remain signed in
- Confirming access for brainX
- Activating notifications for incoming emails
If the user is already signed in to Microsoft on the device, the sign-in window is skipped. In this case, brainX automatically uses the existing Microsoft session and sets up the email account directly.
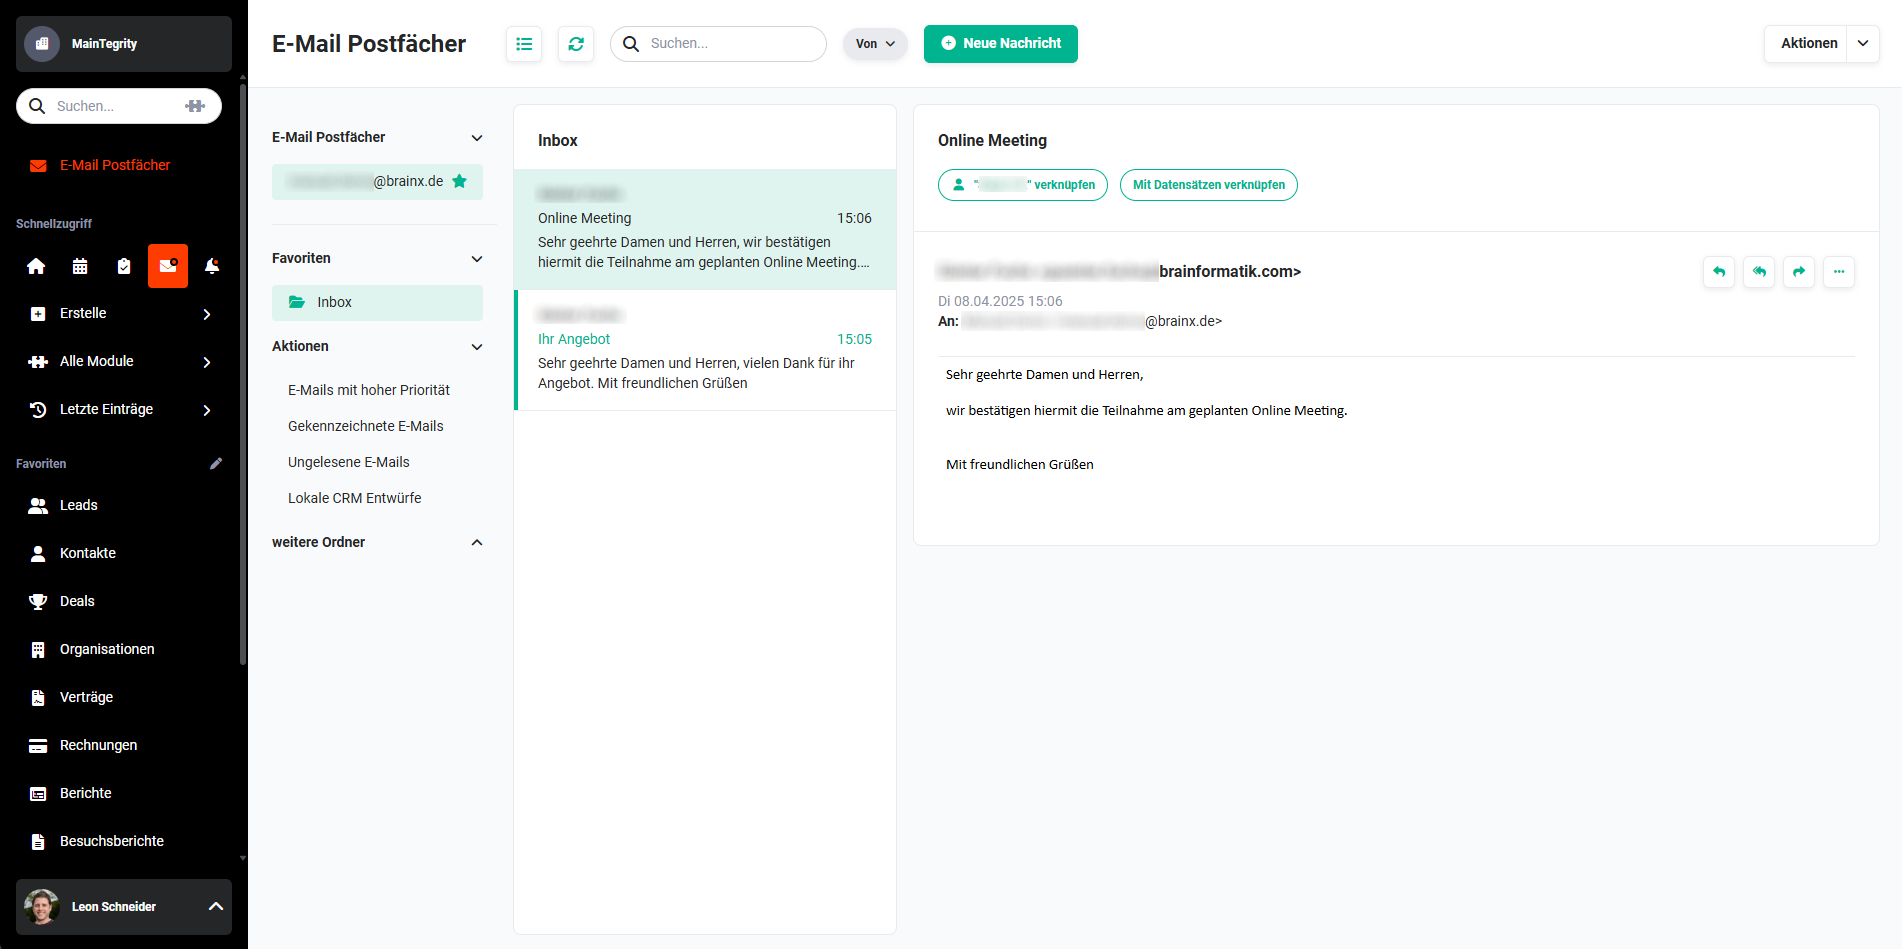 Example view of an email account in the Email accounts module
2.1.2. Other provider
brainX is not verified as an OAuth application with Google. Google restricts unverified apps to a maximum of 100 authentications over the entire project lifetime. Once this limit is reached, further sign-in with a Google account is no longer possible.
For Google Workspace accounts (business accounts), a Google Workspace administrator can mark brainX as trusted in the Google Admin Console – in this case, these accounts do not count against the limit.
For Google Mail accounts, connection via IMAP/SMTP with an app password is recommended.
After clicking the "Other provider" button, the "Create new email account" popup is displayed.
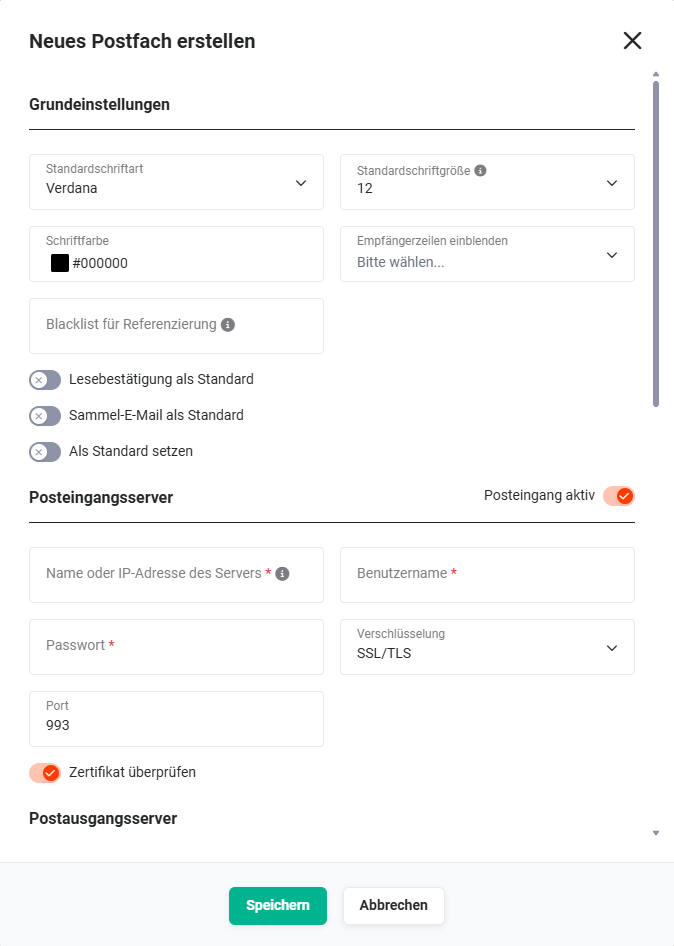 "Create new email account" popup - basic settings and incoming mail server
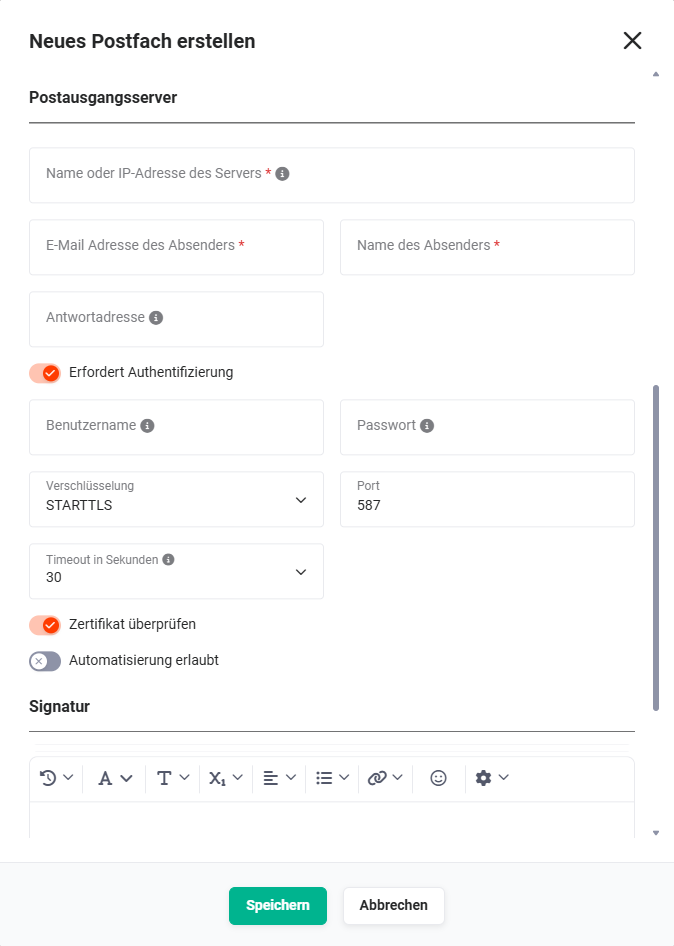 "Create new email account" popup - outgoing mail server and signature
The popup is divided into four sections:
2.1.2.1. Basic settings
The following table describes fields with non-obvious functions. All other fields are self-explanatory.
| Field | Description |
|---|---|
| Show recipient line | Determines whether the recipient lines CC and/or BCC are shown by default when creating an email |
| Blacklist for referencing | Comma-separated list of top-level domains whose email addresses are ignored in the record search during referencing (e.g. example.com ignores the address info@example.com) |
| Read receipt as default | When activated, a read receipt is requested by default for every email |
| Bulk email as default | When activated, every new email is marked as a bulk email by default |
| Set as default | Sets the email account as the default email account. The first email account created is automatically set as the default. Only one email account can ever be defined as the default. If the default email account is deleted, the next email account in the list is automatically set as the default. |
| Notifications | When activated, new emails are shown in the Notifications |
| Show conversation | When activated, conversations (a message with all replies made to it) are displayed grouped |
2.1.2.2. Incoming mail server
The following table describes mandatory fields as well as fields with non-obvious functions. All other fields are self-explanatory.
| Field | Description |
|---|---|
| Inbox active | Activates the receipt of incoming emails and the associated notifications |
| Encryption |
|
| Port | The port is entered automatically after selecting the encryption; it can be changed manually |
| Verify certificate | Can be deactivated if the server uses a self-signed certificate |
2.1.2.3. Outgoing mail server
The following table describes mandatory fields as well as fields with non-obvious functions. All other fields are self-explanatory.
| Field | Description |
|---|---|
| Reply address | Defines the default reply address; the recipient automatically replies to this email address instead of the sender address |
| Requires authentication | Indicates whether the outgoing server requires a sign-in |
| Username | Can be left empty to use the credentials of the incoming mail server |
| Password | Can be left empty to use the credentials of the incoming mail server |
| Encryption |
|
| Port | The port is entered automatically after selecting the encryption; it can be changed manually |
| Timeout in seconds | Time span until the connection is terminated; default value: 30 seconds |
| Verify certificate | Can be deactivated if the server uses a self-signed certificate |
| Automation allowed | When activated, the email account can be used as the sender in Automations of the type Send email |
*Mandatory fields: Name or IP address of the server, Email address of the sender, Name of the sender
2.1.2.4. Signature
The Signature section provides an editor for creating an email signature. The signature is inserted automatically when creating an email.
2.1.2.5. Additional settings
For security reasons, the use of an encrypted connection is recommended – both for the incoming mail server and for the outgoing mail server.
Depending on the provider, the following additional details must be provided after saving:
| Field | Description |
|---|---|
| Sent folder * | Is usually determined automatically; in rare cases a manual selection is required |
| Deleted folder * | Is usually determined automatically; in rare cases a manual selection is required |
| Keep copy | When activated, a copy of every sent email is placed in the Sent folder. Note: Some providers automatically place a copy – in this case a second copy would be generated. |
*Mandatory field
2.2. Creating further email accounts
Via the "Actions" button at the top right of the module, a flyout menu opens with the action "Create new email account".
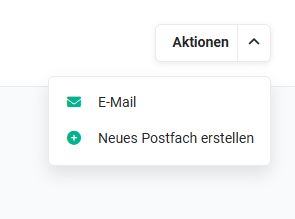 Actions button
After clicking, the "Connect account" popup opens.
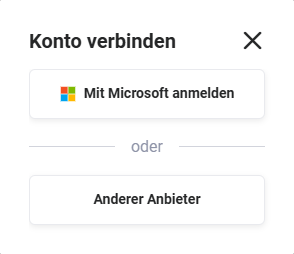 Connect account popup
The subsequent steps are identical to those in the Creating the first email account section.
3. Email account settings
3.1. Opening the email account settings
On mouseover of an email account in the side navigation, the following action icons are displayed:
- Settings (icon "cog") → opens the popup of the email account settings
- Delete (icon "bin") → deletes the email account
- Default email account (icon "star") → sets the email account as the default email account
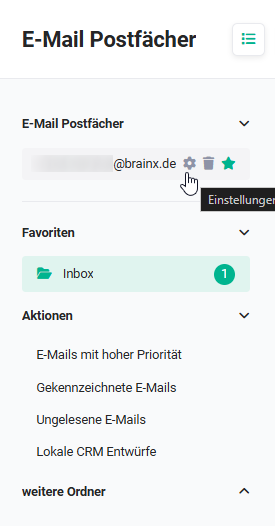 Opening the email account settings
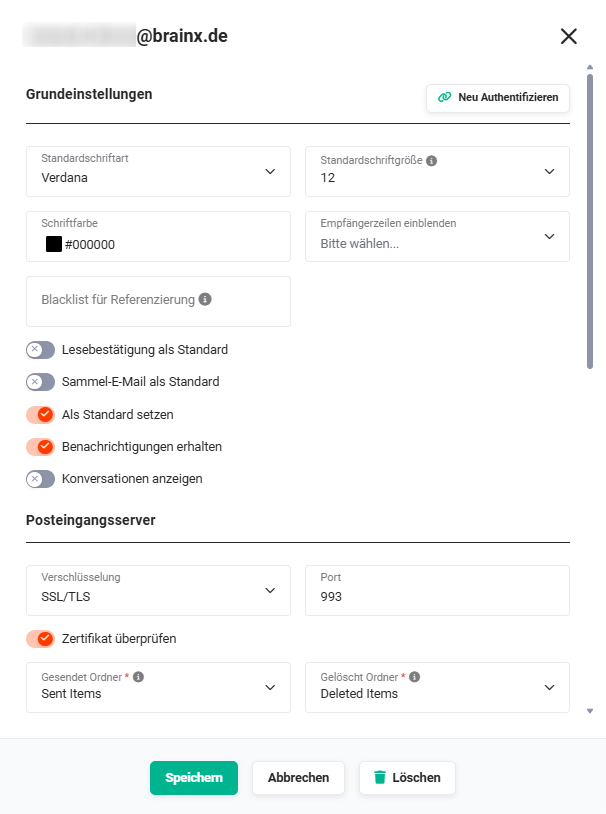 Email account settings popup - basic settings and incoming mail server
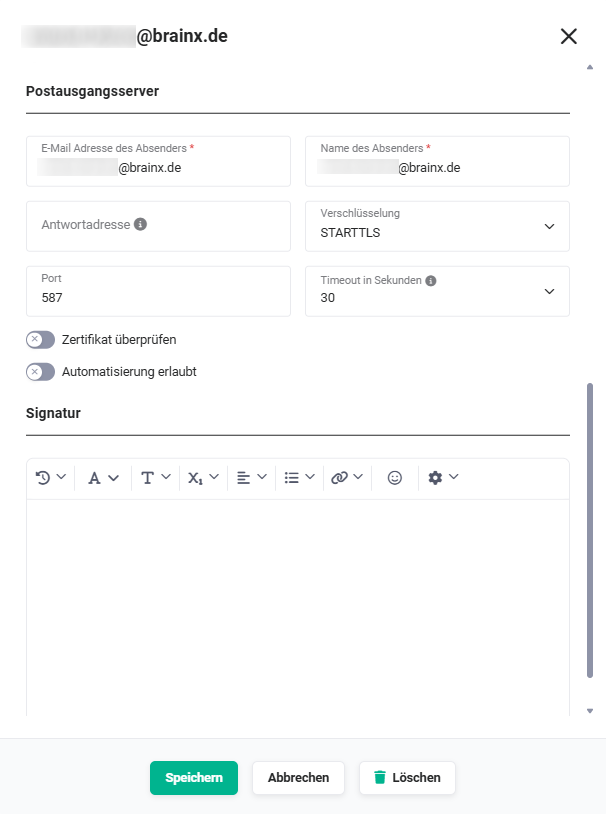 Email account settings popup - outgoing mail server and signature
3.2. Setting items for an email account
The popup with the setting items of an email account is divided into four sections:
The fields correspond to those during creation – see the Other provider section.
3.2.1. Basic settings
In the Basic settings section there is additionally the "Re-authenticate" button. Via this button, a renewed authentication can be carried out for already created email accounts – e.g. after a password change.
3.2.2. Incoming mail server
The fields correspond to those during creation – see section 2.1.2.2. The following fields are additionally available:
| Field | Description |
|---|---|
| Sent folder * | Is usually determined automatically; in rare cases a manual selection is required |
| Deleted folder * | Is usually determined automatically; in rare cases a manual selection is required |
| Keep copy | When activated, a copy of every sent email is placed in the Sent folder. Note: Some providers automatically place a copy – in this case a second copy would be generated. |
*Mandatory field
3.2.3. Outgoing mail server
The fields correspond to those during creation – see section 2.1.2.3.
3.2.4. Signature
The fields correspond to those during creation – see section 2.1.2.4.
4. Deleting an email account
Deleting an email account is done via the "bin" icon on mouseover in the side navigation or via the "Delete" button in the popup of the email account settings.
After clicking, a confirmation popup appears. After clicking the "Confirm" button, the email account is permanently deleted.
If an email account that is used as a sender in Automations is deleted, a popup appears with the names of the affected automations. Before deletion, another email account with an activated Automation allowed toggle must be set as the sender in these automations.
Emails that were sent or received via the deleted email account and are located in the Emails module are not deleted when the email account is deleted.
5. Usage
The Email accounts module is divided into four functional areas:
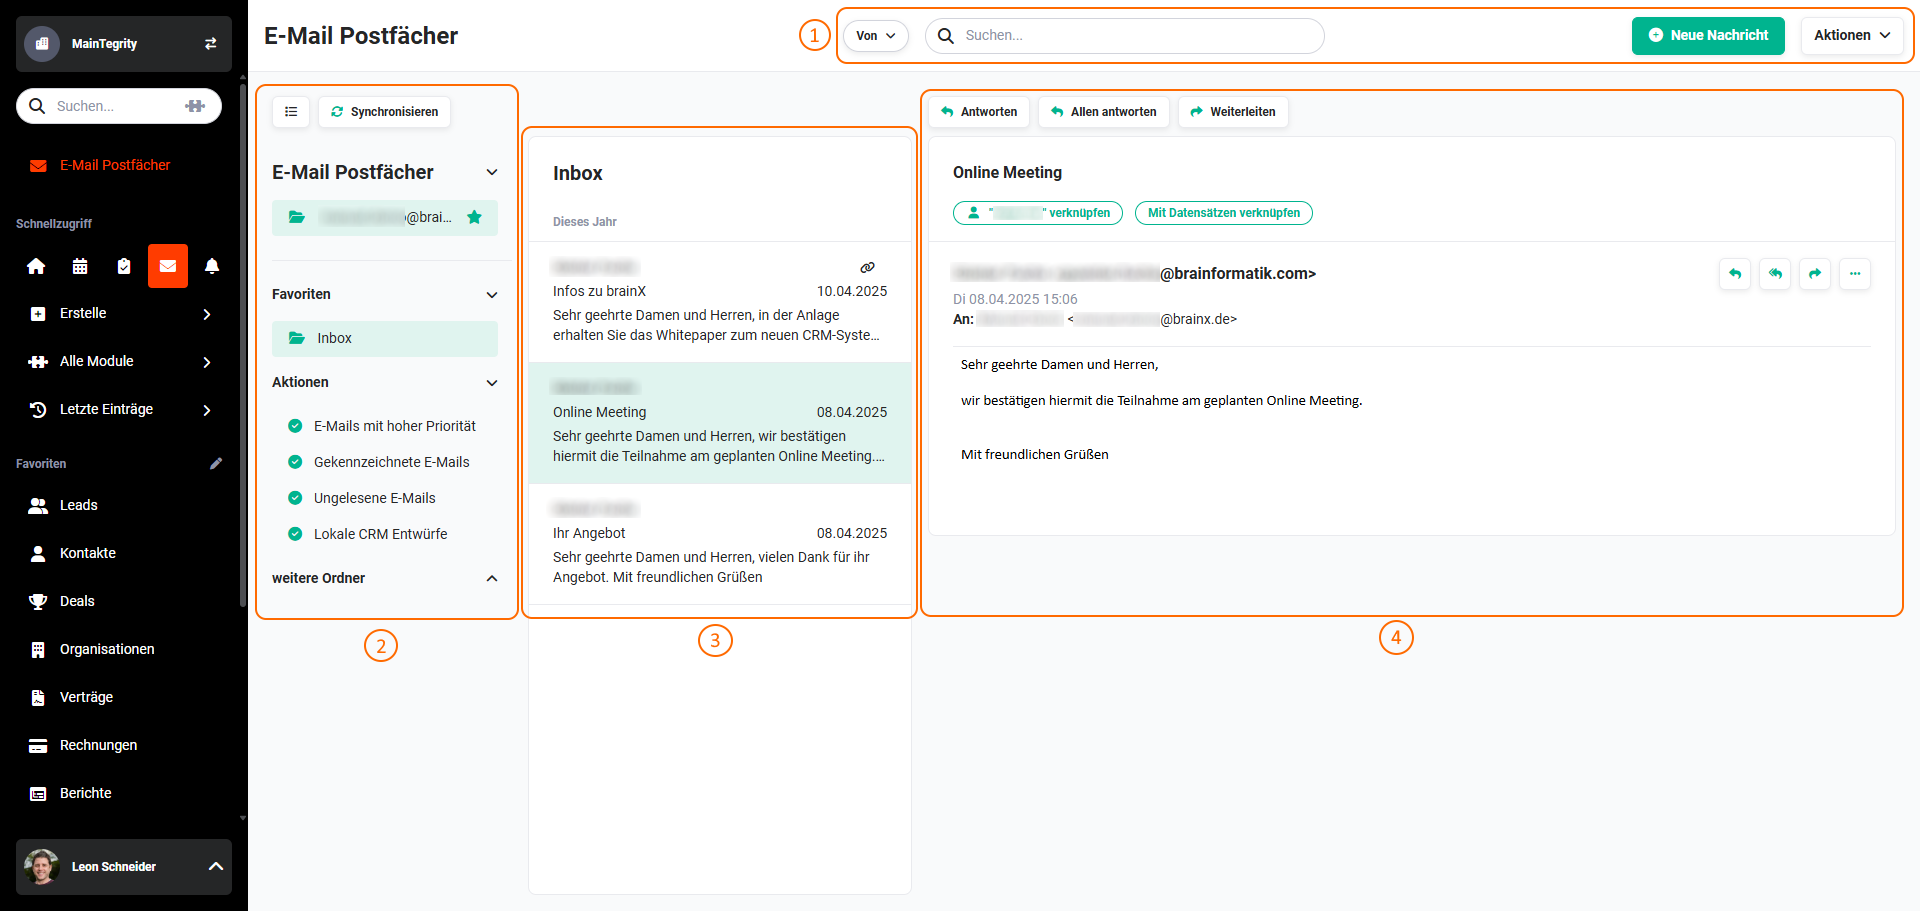 Functional areas of the Email accounts module
5.1. Functions
In the Functions area the following elements are available:
- Picklist "Search criterion" → select a search criterion: From, To, Subject, Content, Copy
- Input field "Search" → free-text search in the selected criterion
When searching in the email account, the "Clear search" button is available, with which the search can be reset. - Button "New message" → opens a popup for creating a new email
- Button "Actions" → opens a flyout menu with the actions
- Email → opening the Emails module
- Create new email account → creating a new/further email account
5.2. Side navigation
The side navigation is divided into the following areas:
Each area can be expanded and collapsed separately via the "angle bracket" symbol.
5.2.1. Email accounts
All created email accounts are listed. The active email account is highlighted in bold. On mouseover, three action icons are displayed:
- Settings (icon "cog") → opens the email account settings
- Delete (icon "bin") → deletes the email account
- Default email account (icon "star") → Sets the email account as the default email account. If only one email account is present, it is automatically marked as the default email account.
5.2.2. Favourites
Folders can be moved from the "Further folders" area to the "Favourites" area and vice versa via drag & drop. If a folder contains unread emails, the number is displayed after the folder name.
Folders can be completely emptied via right-click and the action "Empty folder". The emails are moved to the email account's recycle bin. The process runs in the background and may take some time depending on the number of emails.
5.2.3. Actions
Via Actions, the emails of the opened folder can be filtered. The following filters are available:
- High-priority emails → shows all high-priority emails
- Flagged emails → shows all flagged emails
- Unread emails → shows all unread emails
- Local CRM drafts → shows all local CRM drafts
An active filter is removed again via the x icon.
Which filters are available depends on the email account's provider and the authentication method.
5.2.4. Further folders
In the "Further folders" area, all email account folders that have not been moved to the "Favourites" are listed. If a folder contains unread emails, the number is displayed after the folder name. Folders can be emptied via right-click and "Empty folder".
5.3. Email account list view
In the list view, all emails of the selected folder are displayed. The following functions are available:
- Emails can be moved into folders via drag & drop.
- With the Ctrl key (Windows/Linux) or Cmd key (Mac), several emails can be selected and moved together or have actions applied to them.
- A right-click opens a context menu with actions that correspond to those in the email reading area.
- When bulk-linking emails, "further references" can be set directly.
5.4. Email reading area
In the email reading area, the email selected in the list view is displayed – including the email header, email body and actions.
5.4.1. Actions in the email reading area
| Action | Functionality |
|---|---|
| Reply | Replies to the sender of the email |
| Reply all | Replies to the sender and all recipients |
| Forward | Forwards the email |
| Flag | Flags the email (the flag icon turns red); flagged emails can be retrieved via the Flagged emails filter |
| Opens the operating system's print dialog | |
| Link to records | Opens the Link to records popup for referencing the email |
| Reload from server | Reloads the email from the server in case of display issues |
| Delete | Moves the email to the email account's Recycle Bin folder |
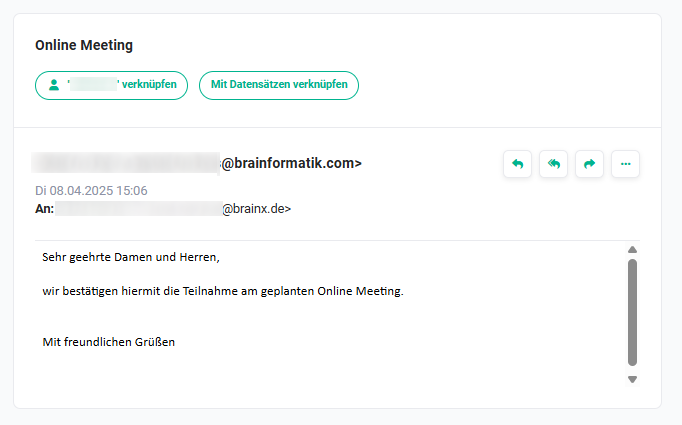 Actions in the email reading area
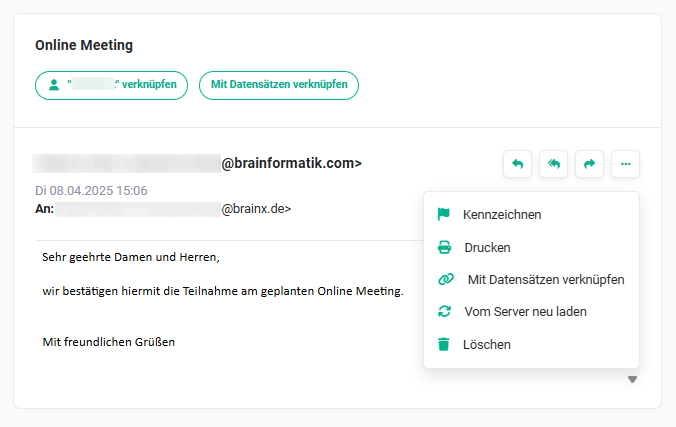 Actions flyout menu
5.4.2. Email attachments
If an email contains attachments, this is displayed in the email header.
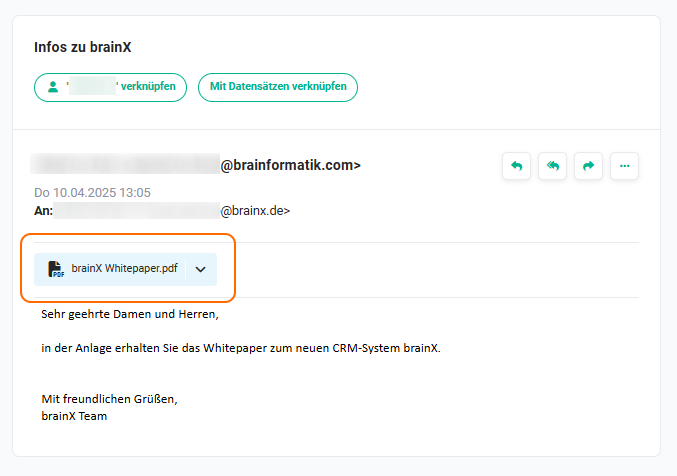 Email with attachment
Attachments can be downloaded individually or collectively (the "Download all" action creates a zip file).
After clicking the "angle bracket" icon, a flyout menu opens. The available actions depend on whether the email has already been referenced:
Non-referenced emails
- Preview → shows a preview of the attachment in a popup (image attachments in the SVG and WebP formats can also be displayed in the preview)
- Download → downloads the file to the operating system's download folder
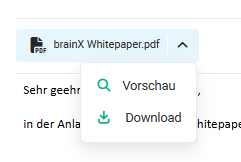 Actions of an attachment for non-referenced emails
Referenced emails
- Preview → shows a preview of the attachment in a popup (image attachments in the SVG and WebP formats can also be displayed in the preview)
- Create new document → opens the Convert attachment into document popup, in which it is determined which records the document should be linked to
- Download → downloads the file to the operating system's download folder
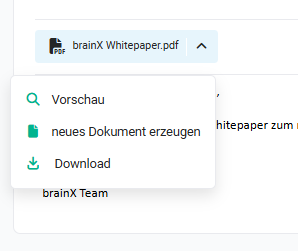 Actions of an attachment for referenced emails
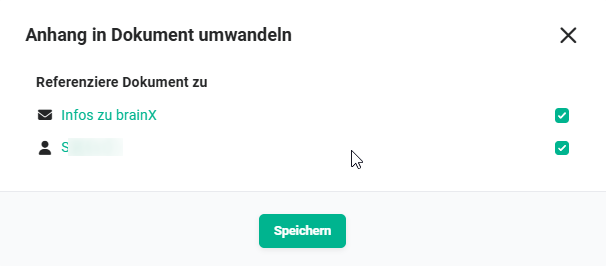 "Convert attachment into document" popup
5.4.3. Blocked content
If an email contains external images or content that is not loaded automatically for data protection reasons, brainX displays a corresponding note in the email reading area. Via the "Show images" button, the external content can be reloaded manually.
The reloading of the content remains active as long as the email is held in the cache (usually one day). After a manual refresh of the email from the server or after the cache expires, the original state without external content is displayed again.
6. Practical examples
1 – Processing and referencing a customer enquiry in context
A customer sends an enquiry by email to the company. The responsible employee opens the Email accounts module, opens the inbox and finds the email in the list view. In the email reading area, the message is opened and referenced with the corresponding organisation and contact record via the Link to records action.
From this moment on, the email is stored as a copy in brainX and is visible to the entire team in the Emails module. The employee replies directly from within the Email accounts module via the Reply action – the reply is also logged. The complete communication history with the customer can thus be traced at the record at any time.
2 – Setting up an email account for automated email sending
The company wants to automatically send an email to the customer upon every status change of a ticket. For this purpose, a dedicated email account – e.g. support@firma.de – is created in the Email accounts module.
When creating the email account, the incoming and outgoing mail servers are configured with the provider's IMAP and SMTP credentials. In the outgoing mail server area, the Automation allowed toggle is activated. Subsequently, this email account is set as the sender in the corresponding automation of the type Send email.
From this point on, brainX automatically sends an email via the configured email account upon every configured status change – without manual intervention.
3 – Adopting an email attachment directly as a document in brainX
A vendor sends a signed contract document as a PDF attachment by email. The employee opens the email in the Email accounts module, first references it with the vendor record via Link to records, and then clicks the angle bracket icon on the PDF attachment.
The Create new document action is now available in the flyout menu. In the Convert attachment into document popup, it is determined which records the new document should be linked to. After saving, the contract attachment is stored as an independent record in the Documents module and can be retrieved directly at the vendor record – without manual intermediate storage.
7. Frequently asked questions
Are emails that I see in the Email accounts module stored in brainX?
No. The Email accounts module offers a live lookup on the mail server – the displayed emails are retrieved directly from the server and not stored in brainX. Only when an email is referenced via Link to records is a copy stored in the brainX database and made available in the Emails module.
Can I set up a Google Mail account as an email account?
In principle yes, but with limitations. Since brainX is not verified as an OAuth application with Google, a limit of a maximum of 100 authentications over the entire project lifetime applies. For Google Mail accounts, connection via IMAP/SMTP with an app password is recommended. For Google Workspace business accounts, an administrator can mark brainX as trusted in the Google Admin Console, whereby these accounts do not count against the limit.
What do I need to consider if I want to delete an email account that is used in an automation?
When attempting to delete such an email account, a popup appears with the names of the affected automations. Before deletion, another email account with an activated Automation allowed toggle must be set as the sender in each of these automations. Already sent or received emails in the Emails module remain intact when the email account is deleted.
How can I link several emails to a record at the same time?
In the email account's list view, several emails can be selected simultaneously with the Ctrl key (Windows/Linux) or Cmd key (Mac). The bulk-linking can then be started, in which further references can also be set directly.
What is the difference between the Email accounts module and the Emails module?
The Email accounts module offers direct live access to the email accounts and enables the reading, writing and managing of emails. The Emails module contains exclusively emails that have already been referenced and stored in brainX – that is, copies of emails that have been assigned to a record.
Can I store an email signature in brainX?
Yes. In the Signature section of the email account settings, an editor is available for creating an email signature. The signature is inserted automatically when creating a new email.