
Automations - Triggers
Package: BASIC
1. Trigger Configuration
The trigger defines when a specific part of the automation should be started.
On our YouTube channel there is a video on record triggers that explains the individual trigger types, their particularities and common sources of error step by step.
After clicking a trigger in the editor, the "Trigger" sidebar opens.
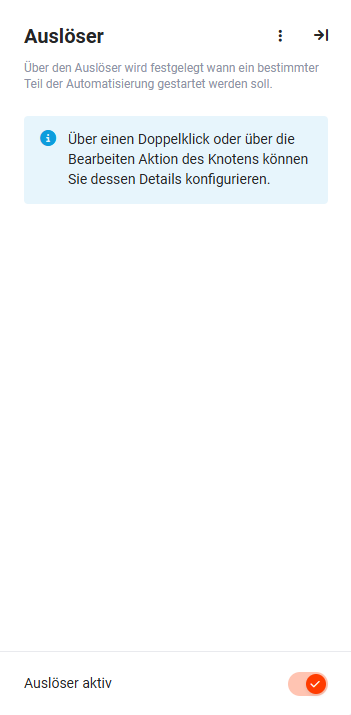 Trigger sidebar
In the top right of the trigger sidebar there are two action icons, as well as a toggle at the bottom:
- Show actions (the "three dots" icon) → after clicking, a flyout menu with the following actions is displayed:
- Edit → After clicking the "Edit" action, the "Trigger" popup opens, in which the name, the event, a module and the description can be entered or changed.
- Delete → After clicking the "Delete" action, an unconfigured trigger is deleted without further confirmation.
For already configured triggers: After clicking the "Delete" action, a confirmation ("Do you really want to delete this node? Subsequent nodes may thereby be reset if they lose the module binding of a trigger.") appears asking whether the trigger should really be deleted. After clicking the "Confirm" button, the trigger is deleted.
- Show/hide sidebar → the sidebar can be shown/hidden by clicking the "arrow with a vertical line" action icon
- Automation active/inactive toggle → the trigger can be set to active/inactive using the toggle
1.1. Trigger Step 1 - Select event and module
After double-clicking a trigger in the editor - alternatively via the "Edit" action in the trigger sidebar - the "Trigger" popup opens.
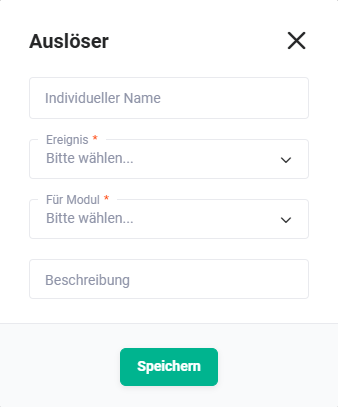 Trigger popup
The following fields are available in the "Trigger" popup:
- Individual name → Enter an individual name for the trigger (optional). If no name is entered, the selected event is used as the name for the trigger.
- Event
* → The following events are available as triggers in the picklist:
-
Attachment added → An attachment was added to a record in a system-integrated upload area.
Note: This trigger relates exclusively to system-integrated upload areas, such as those present in the Wiki module, for example. Custom upload fields as well as regular file fields in a record do not fire this trigger. For file changes in such fields, the triggers "Record saved" or "Record changed" should be used.In the condition configuration, this trigger provides, in addition to the fields of the triggering record, properties of the file attachment itself, including file name, file size and file extension (e.g. PDF, DOCX, XLSX). This allows conditions to be formulated that only apply to certain file types.
-
Record created → The record was created (saved for the first time).
-
Record exported → The record was exported (PDF export).
-
Record deleted → The record was deleted.
-
Record saved → The record was saved (even without a change).
Note: The trigger "Record saved" fires on every save – regardless of whether a change took place, and regardless of whether it is an initial creation or an update. Please note: The comparison operator "was changed" is not available in conditions that are evaluated in the context of an initial creation. Careful condition configuration is therefore mandatory in order to avoid unwanted cycles.It is recommended to use the triggers "Record created" and "Record changed" in a targeted manner instead of using "Record saved", provided a clear distinction between initial creation and change is required.
Note: In Billing modules (e.g. Invoices, Deals), the condition configuration provides, in addition to the fields of the triggering record and its references, the fields of the item groups (e.g. product or service name). This allows conditions to be formulated that respond to the content of individual items.
-
Record changed → The record was changed and saved.
Note: In Billing modules (e.g. Invoices, Deals), the condition configuration provides, in addition to the fields of the triggering record and its references, the fields of the item groups (e.g. product or service name). This allows conditions to be formulated that respond to the content of individual items. -
Record opened → The record was opened (detail view).
-
Record converted from → The record was converted (e.g. lead conversion).
-
Record converted to → The record was converted to a record in another module (e.g. lead conversion).
-
DocuSign: Signature received → The recipient of a DocuSign envelope has signed and the signature was received.
Note: Only available if the DocuSign integration is active. -
DocuSeal: Signature received → The recipient of a DocuSeal envelope has signed and the signature was received.
Note: Only available if the DocuSeal integration is active. -
Email scanned → Emails from a definable email account (optionally including a selected folder) were scanned.
Note: Tickets created by the email scanner adopt the priority of the scanned email.
Note: In order for an email account to be selectable in the Email scanned trigger, it must be enabled for use in automations in the email account configuration. This setting needs to be set once. -
Billing: Item inserted → An item was inserted in the product block in a record of a Billing module.
Note: The trigger allows conditions on items:- For positive comparisons, at least one item must have the desired value.
- For negative comparisons, no item may have the comparison value.
-
Billing: Item removed → An item was removed from the product block in a record of a Billing module.
Note: The trigger allows conditions on items:- For positive comparisons, at least one item must have the desired value.
- For negative comparisons, no item may have the comparison value.
-
Billing: Item changed → An item was changed in the product block in a record of a Billing module.
Note: The trigger allows conditions on items:- For positive comparisons, at least one item must have the desired value.
- For negative comparisons, no item may have the comparison value.
-
Jira: Push received → The CRM received a push in connection with the Jira integration.
Note: This trigger relates exclusively to pushes from Jira Software, not from Jira Service Management. Jira Service Management is fully integrated into the ticket management of brainX and therefore has no separate push trigger.The Tickets module is available in the module selection, since Jira Software tasks can be stored there. Typically, however, this trigger is used with the Projects or Tasks modules.
-
Mandate requested/granted/revoked → Trigger for the payment processing integration
Note: Only available in the brainX APP version if the payment processing integration is configured and enabled.- Mandate requested → A mandate request was triggered via the configured payment provider.
- Mandate granted → The customer confirmed the requested mandate.
- Mandate revoked → The customer revoked an existing mandate.
Note: All three mandate triggers are triggered externally: brainX provides a webhook endpoint for each trigger, via which the payment provider transmits status information. The revocation link for mandates can, for example, be embedded in automatically sent emails – as soon as the customer opens this link and revokes the mandate, the corresponding webhook is triggered and the automation is started. The current mandate status can be viewed in the Contracts module in the mandate management (values: open, confirmed, revoked).
-
Ticket: external comment → An external comment was entered in a record in the Tickets module.
Note: An "external comment" is any comment created outside the internal comment area – regardless of whether it comes from a customer (e.g. by email) or from a user in the system (e.g. in support). The trigger fires in both cases.In the condition configuration, in addition to the fields of the ticket, the content of the comment as well as its source are available. The source can be used to distinguish whether the comment was created externally (e.g. received by email) or internally (e.g. entered by a user in support). This allows subsequent actions to be configured specifically for the respective case – for example, a notification to the support team for an incoming customer request, or an automatic email dispatch for an internally recorded response.
-
Link added → A link (reference) was added to a record.
-
- For module * → Picklist of the modules in which the configured trigger applies.
- Description → Brief description of the trigger (optional)
- Also for changes via → Multi-select picklist with the values "API" and "Import/Update" → Configuration of whether the trigger should also apply when the record was changed via API or CSV update. By default, a trigger is only fired by manual actions in the interface.
This setting serves to specifically exclude certain automations for external connections (e.g. so that no unwanted follow-up actions are triggered on API calls) or to improve processing speed during large imports when the automation is not needed in this context.
Note: If triggers are to be initiated by external services that communicate via the brainX API (e.g. DocuSeal ), the value "API" must be enabled on all involved triggers - including chained follow-up triggers. Otherwise, these triggers will not be fired by the external push.
The field is only shown if the event "Record changed", "Billing: Item changed" or "Link added" is selected. The field is only shown after a module has been selected. - Target module → Module in which a record was created after the conversion (e.g. lead conversion).
The field is only shown if the event "Record converted from" is selected. - Source module → Module in which a record was selected for a conversion (e.g. lead conversion).
The field is only shown if the event "Record converted to" is selected. - Email accounts → Selection of the email account (optionally the folder) that should be scanned.
The field is only shown if the event "Email scanned" is selected. - Search for → Multi-select picklist with the values "read" and "unread" → Configuration of whether read and/or unread emails should be scanned.
The field is only shown if the event "Email scanned" is selected. - After the scan → Picklist with the values "no change", "read" and "unread" → Configuration of whether a positively scanned email should be marked as read or unread after the scan, or whether no change should be made.
The field is only shown if the event "Email scanned" is selected. - Linked module → Picklist of the modules that were selected as the target module of a link (reference).
The field is only shown if the event "Link added" is selected.
*Mandatory field
A trigger can be connected to a preceding action, so that it is only executed when that action has been run beforehand. To do this, the trigger is linked to the corresponding action in the editor via a connection arrow.
The following applies:
- Only certain combinations of action and follow-up trigger are permitted. brainX automatically checks the validity of the connection.
- Once a trigger is connected to a preceding action, it is exclusively initiated by that action. All other events that would fire the trigger in its non-chained state are ignored.
Example: A trigger for "Record saved" is linked to a preceding "Update record" action. If a user saves the record manually via the interface, this trigger does not apply - because the preceding update action was not executed in the process.
Note on API source: If a chained trigger is part of a strand that is initiated via the API (e.g. by DocuSeal), the value "API" must also be enabled in the "Also for changes via" field for this follow-up trigger.
If several conditions are assigned to a trigger, the order of their execution can be set individually in the trigger sidebar under Connections via drag & drop. The conditions are processed from top to bottom in the order defined there.
Values in the "Event" and "For module" fields cannot be changed after the first save as long as connections to subsequent nodes exist!
1.2. Trigger Step 2 - Save trigger
After clicking the "Save" button in the "Trigger" popup, the trigger is saved and displayed in the editor.
1.3. Delete trigger
By selecting a trigger (by clicking it, the frame is shown thick) and pressing the "Del key", a trigger can be deleted again in the automation editor.
If the trigger is connected to other configured nodes, a popup with the text "Do you really want to delete this node? Subsequent nodes may thereby be reset if they lose the module binding of a trigger." is displayed.
2. Practical examples
1 – Trigger "Record created" for an automatic task on a new lead
In the Leads module, a task for the responsible sales representative should be created automatically for every newly created lead. Record created for the Leads module is selected as the trigger. Since the action should only apply on initial creation, this trigger is preferable to the Record saved trigger – the latter would fire again on every save of the lead.
2 – Trigger "Record changed" with API activation for DocuSeal
An automation should set the status of a deal to won after a digital signature is received via DocuSeal. Since DocuSeal transmits the status change via the brainX API, the Also for changes via field is set to API in the Record changed trigger for the Deals module. Without this setting, the trigger would ignore the external push.
3 – Trigger "Email scanned" for automatic ticket creation
Incoming support emails to a dedicated email account should be automatically created as tickets. Email scanned is selected as the trigger and the corresponding email account is chosen. In the Search for field, unread is selected so that only new emails are processed. In the After the scan field, read is set in order to mark processed emails and avoid double processing.
4 – Chained trigger after an automatically created invoice
After automatically creating an invoice (action Create record), the invoice title should be updated with the assigned invoice number. Since the number is only available after the first save, a further trigger Record saved for the Invoices module is connected directly to the creation action. This chained trigger is initiated exclusively by the preceding action – a manual save by the user does not fire it.
3. Frequently asked questions
What is the difference between "Record saved", "Record created" and "Record changed"?
Record saved fires on every save – regardless of whether a change took place. Record created only applies on the initial creation of a record. Record changed is only fired when the record was actually changed and saved. For precise automations, it is recommended to use created and changed in a targeted manner in order to avoid unwanted cycles.
When do I have to set the "Also for changes via" field to "API"?
Whenever the trigger should be initiated by an external service that communicates via the brainX API – e.g. DocuSeal or DocuSign. Without this activation, brainX ignores the external push. For chained triggers, the API activation must also be set on all follow-up triggers of the same strand.
Can I use the same trigger for multiple modules?
No. Each trigger is bound to exactly one module, which is defined in the For module field. If the same logic is to apply for multiple modules, separate automations (or chained strands) are necessary.
What happens if I want to change the event or module of a saved trigger?
As long as the trigger is connected to subsequent nodes, Event and For module cannot be changed. First, all connections to subsequent nodes must be removed before the fields become editable.
What does the "active/inactive" toggle on the trigger do?
It allows a single trigger within an automation to be deactivated without switching off the entire automation. The trigger is then skipped; all other strands of the automation continue to run.