
Digital Signature
Package: SALES BILLING PROJECTS
1. General
Digital signatures streamline the closing of contracts. Customers, partners and vendors are offered the option of conveniently signing digitally on any device in order to increase the efficiency of business processes.
Advantages of the digital signature:
- Business process optimisation: Digital signatures can be integrated seamlessly into existing business processes and enable a more efficient and automated workflow control.
- Sustainability: Doing without paper reduces resource consumption and makes a contribution to environmental protection.
- Effective document management: Digital signatures enable efficient organisation and archiving of documents, as they are less susceptible to damage or loss.
- Legal certainty: Digital signatures are legally binding and can serve as evidence in court.
- Security and integrity: Digital signatures offer a high level of security through encryption and authentication procedures, thereby ensuring the integrity of the document.
- Improved collaboration: Digital signatures enable smooth collaboration between different parties, regardless of their location.
In brainX you can choose between two providers/software solutions in order to be able to use the digital signature:
- DocuSign → established market leader with a broad range of functions, used by many companies worldwide
- DocuSeal → an open-source alternative that can be self-hosted and is known for its ease of use and user-friendliness
DocuSign and DocuSeal are both software solutions for electronic signatures that enable users to sign and manage documents online.
The range of functions and the operation within brainX are almost identical here.
2. DocuSign
A prerequisite for using the DocuSign integration is an active, full account with DocuSign.
A trial/test account with DocuSign is not sufficient!
The DocuSign integration enables the use of a digital signature in PDF files that are generated by means of PDF templates.
The DocuSign integration can be used in all modules in which a PDF export is possible. In particular the modules Sales Orders, Deals, Documents, Credits, Invoices, Cancellations and Contracts (only in the CRM version "brainX.app") are ideally suited for the use of a digital signature.
2.1. DocuSign Configuration
2.1.1. Authentication
If several clients exist and the digital signature is to be used in several or all clients, the authentication must be carried out for each client!
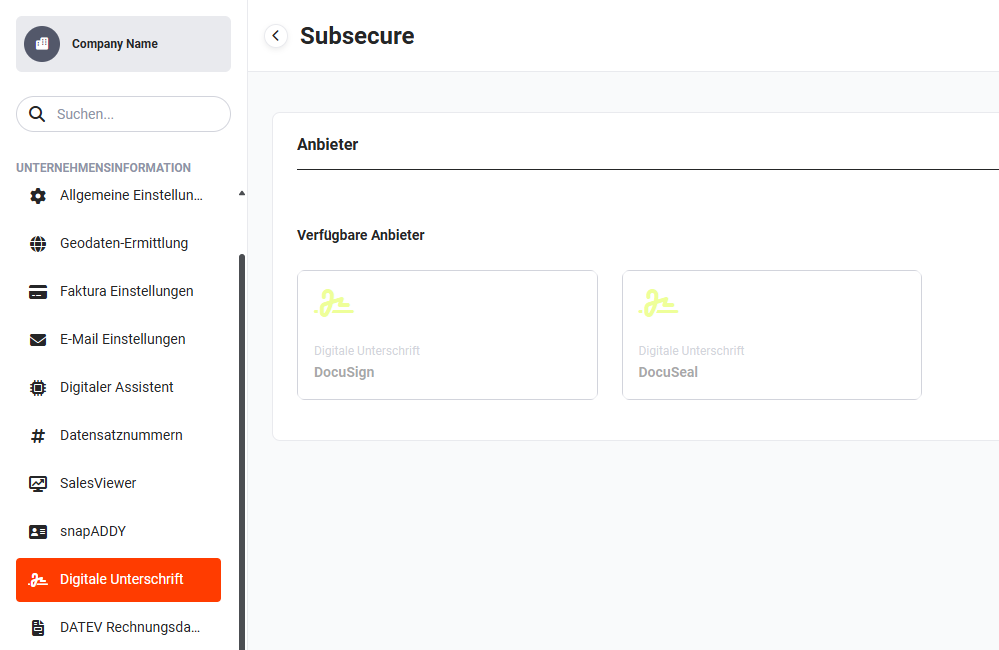 Digital Signature - available providers
After clicking the "DocuSign" tile, a note is displayed indicating that you are now being forwarded to the relevant service.
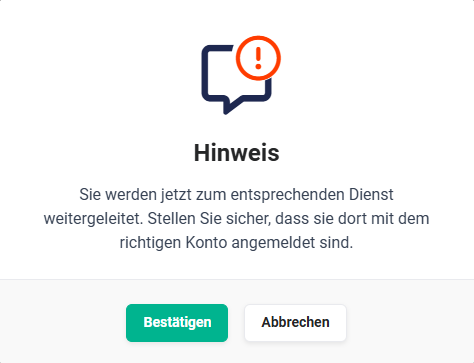 Note Forwarding
After clicking the "Confirm" button, a new browser window opens with the login page at DocuSign.
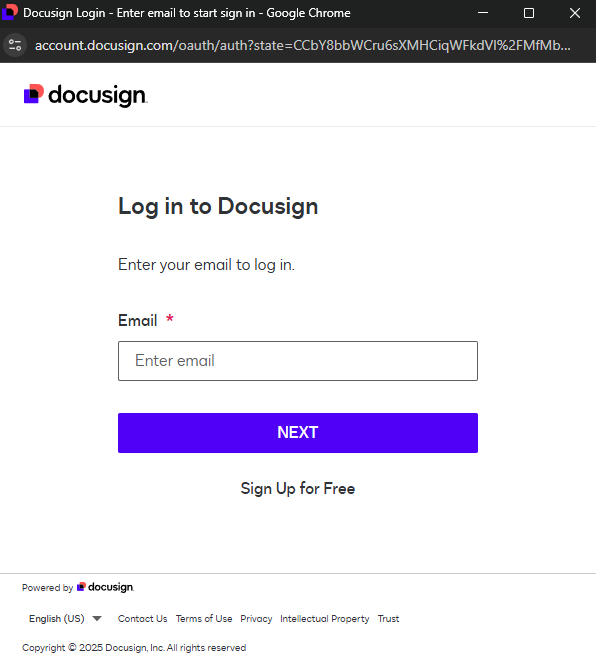 DocuSign Login
If the browser window is accidentally closed, the "DocuSign Authentication" popup is displayed in brainX, by means of which it is possible to log in to DocuSign again.
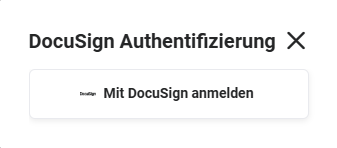 Popup DocuSign Authentication
After a successful login, the "DocuSign" integration is authenticated. The authentication is carried out by means of OAuth (token-based authorisation and authentication)!
After clicking the "DocuSign" tile, the "Configure provider" popup opens:
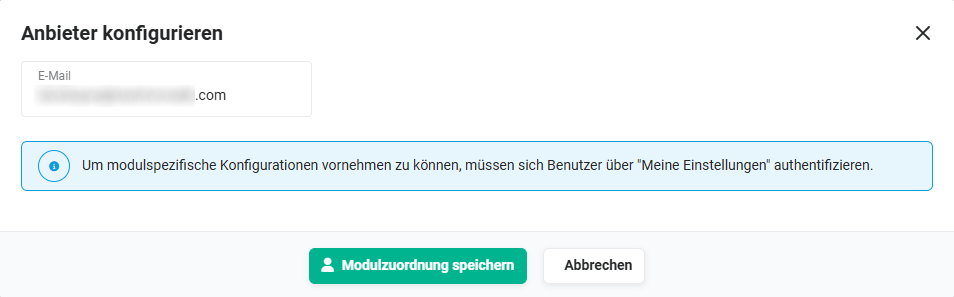 Popup Configure provider
The popup displays the email address of the account that was used for authentication.
In order to be able to make module-specific configurations, users must authenticate themselves via My Settings.
If one or more users have authenticated themselves, a module assignment can be carried out in the "Configure provider" popup, in order to optionally assign the DocuSign templates to specific users on a module basis (see section Module assignment).
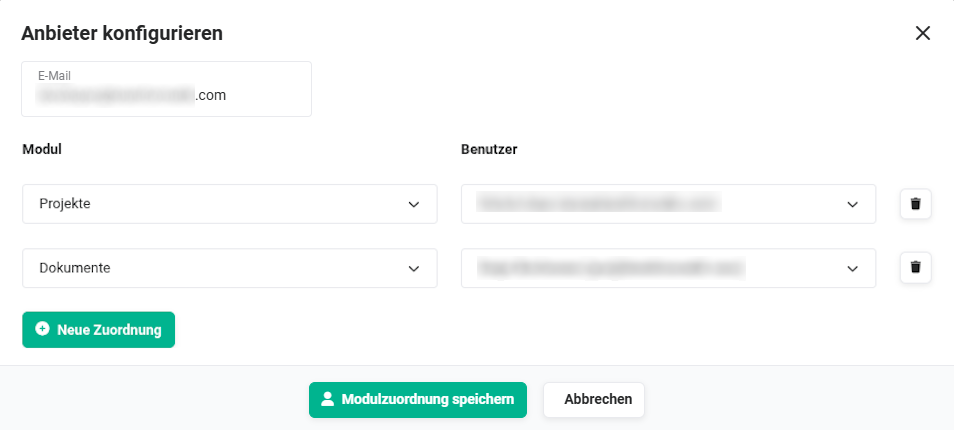 Popup Configure provider - Module assignment
2.1.1.1. User authentication
brainX users who wish to send an envelope for a digital signature from within brainX do not require any additional authentication!
Further authentications by brainX users are, however, possible, in order to optionally be able to assign the DocuSign templates to specific users on a module basis. For further information see section Module assignment.
In My Settings - Integrations tab users can authenticate themselves with DocuSign.
After clicking the "DocuSign" tile in the "Available integrations" area, a note is displayed indicating that you are now being forwarded to the relevant service.
After clicking the "Confirm" button in the note popup, a new browser window opens with the login page at DocuSign. After a successful login, the user is authenticated and the "DocuSign" tile is now located in the "Active integrations" area.
After clicking the "DocuSign" tile again, the "DocuSign" popup is displayed.
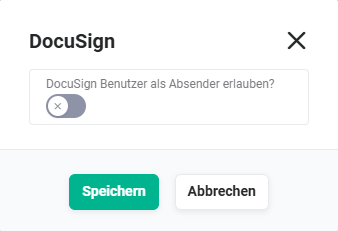 Popup Allow DocuSign user as sender
After the switch has been set to "active" and the "Save" button has been clicked, the user is selectable in the Module assignment under the users.
2.1.1.2. Verify and renew authentication
After successful authentication, two additional buttons are available in the DocuSign tile:
- Verify authentication -> checks whether the stored authentication is still valid and displays the result of the check.
- Renew authentication -> carries out the authentication process again, analogous to the initial setup. This is required, for example, in the case of expired or invalidated tokens.
2.1.1.3. Remove authentication
To remove the authentication, or to deactivate the integration, the "X" action icon that is displayed on mouseover must be clicked in the "Digital Signature - DocuSign" tile.
After clicking the action icon, a popup is displayed in which the deactivation of the integration must be confirmed.
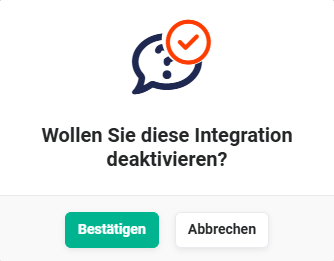 Popup Deactivate integration
2.1.2. Module assignment
brainX users who wish to send an envelope for a digital signature from within brainX generally do not require any additional or own authentication. However, if users additionally authenticate themselves, this offers the option of assigning these users to selected modules.
In detail this means: If a user has authenticated themselves via DocuSign in the user settings (see User authentication) and set the switch "Allow DocuSign user as sender?" to "active", they can then be selected in the settings and assigned to a module.
Only users who have authenticated themselves with DocuSign are available for selection in the module assignment!
For the authentication of users in "My Settings", a different DocuSign account must be used than in "Company Information - Digital Signature - DocuSign".
After clicking the "New assignment" button, a row with the picklists "Module" and "User" is displayed.
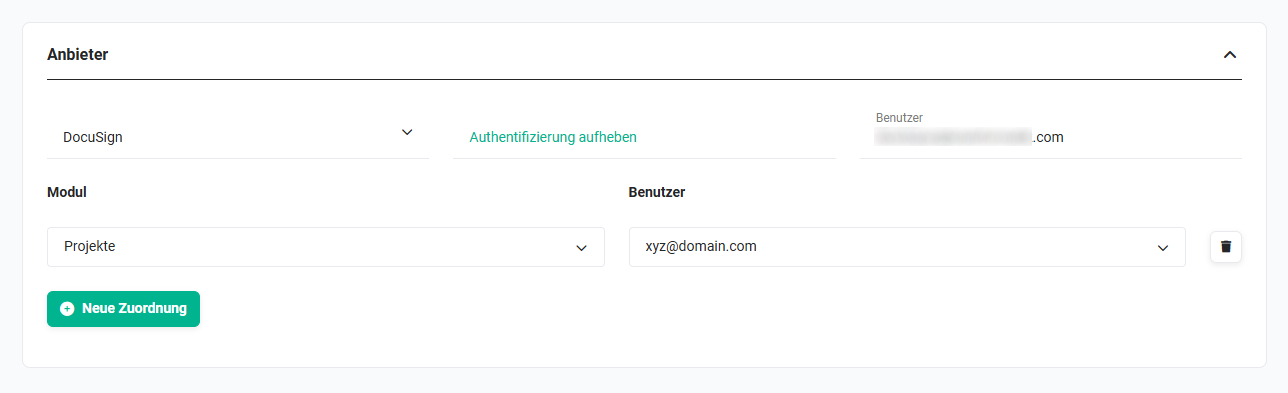 Example DocuSign module assignment
In the "Module" picklist, all modules in which a PDF export is possible are available.
In the "User" picklist, all users who have authenticated themselves with DocuSign are available.
By clicking the "New assignment" button again, further modules/users can be configured.
Once the module assignment has been carried out, the "Save" button must be clicked at the end in order to apply the changes.
If DocuSign envelopes are now sent from the selected modules, then - regardless of which user triggers the sending (see also the section Creation and sending) - the configured users/email addresses are always used.
If one of the assigned (user) accounts does not work for technical reasons (e.g. the user has removed the authentication, set the switch "Allow DocuSign user as sender?" to "inactive", or no connection can be established to this DocuSign account), then the "Default Account", which was initially used for authentication, serves as a fallback.
2.1.3. Email template
With the activation of the "DocuSign" integration, the email template "DocuSign signature request" is activated, which contains a standard text (subject) that is used in the email when a PDF file (envelope) is sent.
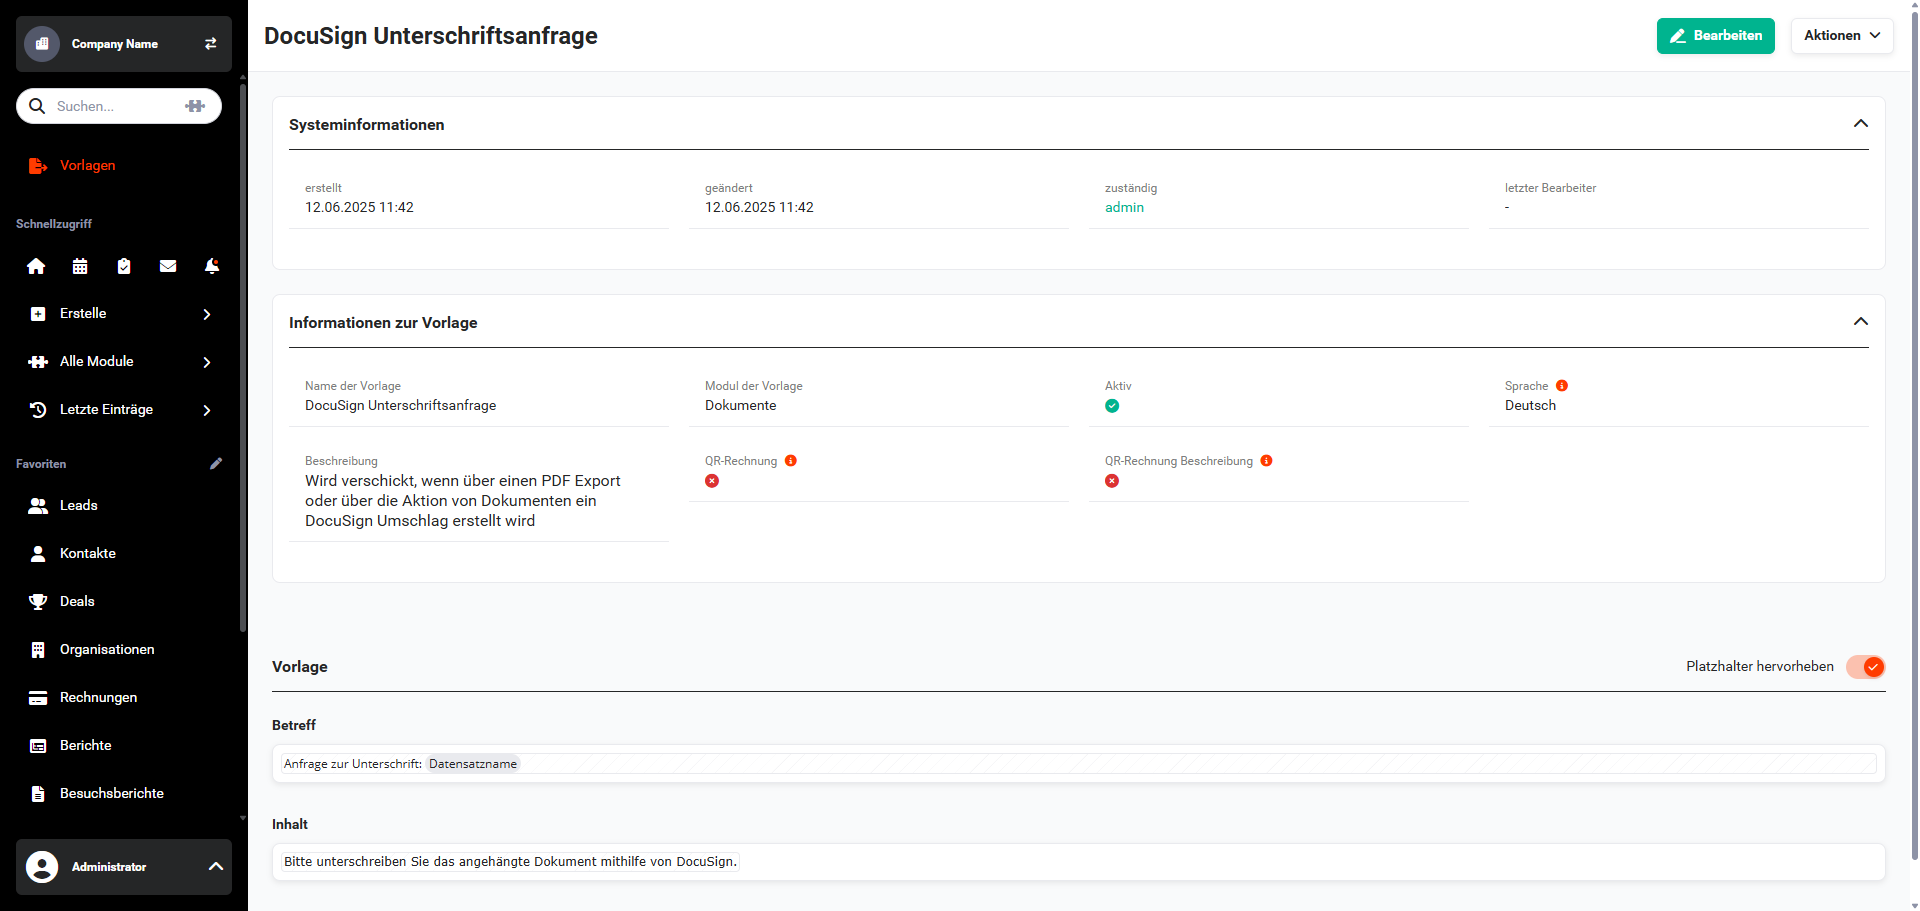 Templates module - DocuSign signature request
The subject in the template is structured as follows on delivery:
Request for signature: Datensatzname
The placeholder Datensatzname here stands for the title of the document and is replaced accordingly with the respective title of the document when the PDF file is generated.
The subject can - as with all templates - be edited. It should be noted here that the pre-selected module "Documents" in the template must not be changed.
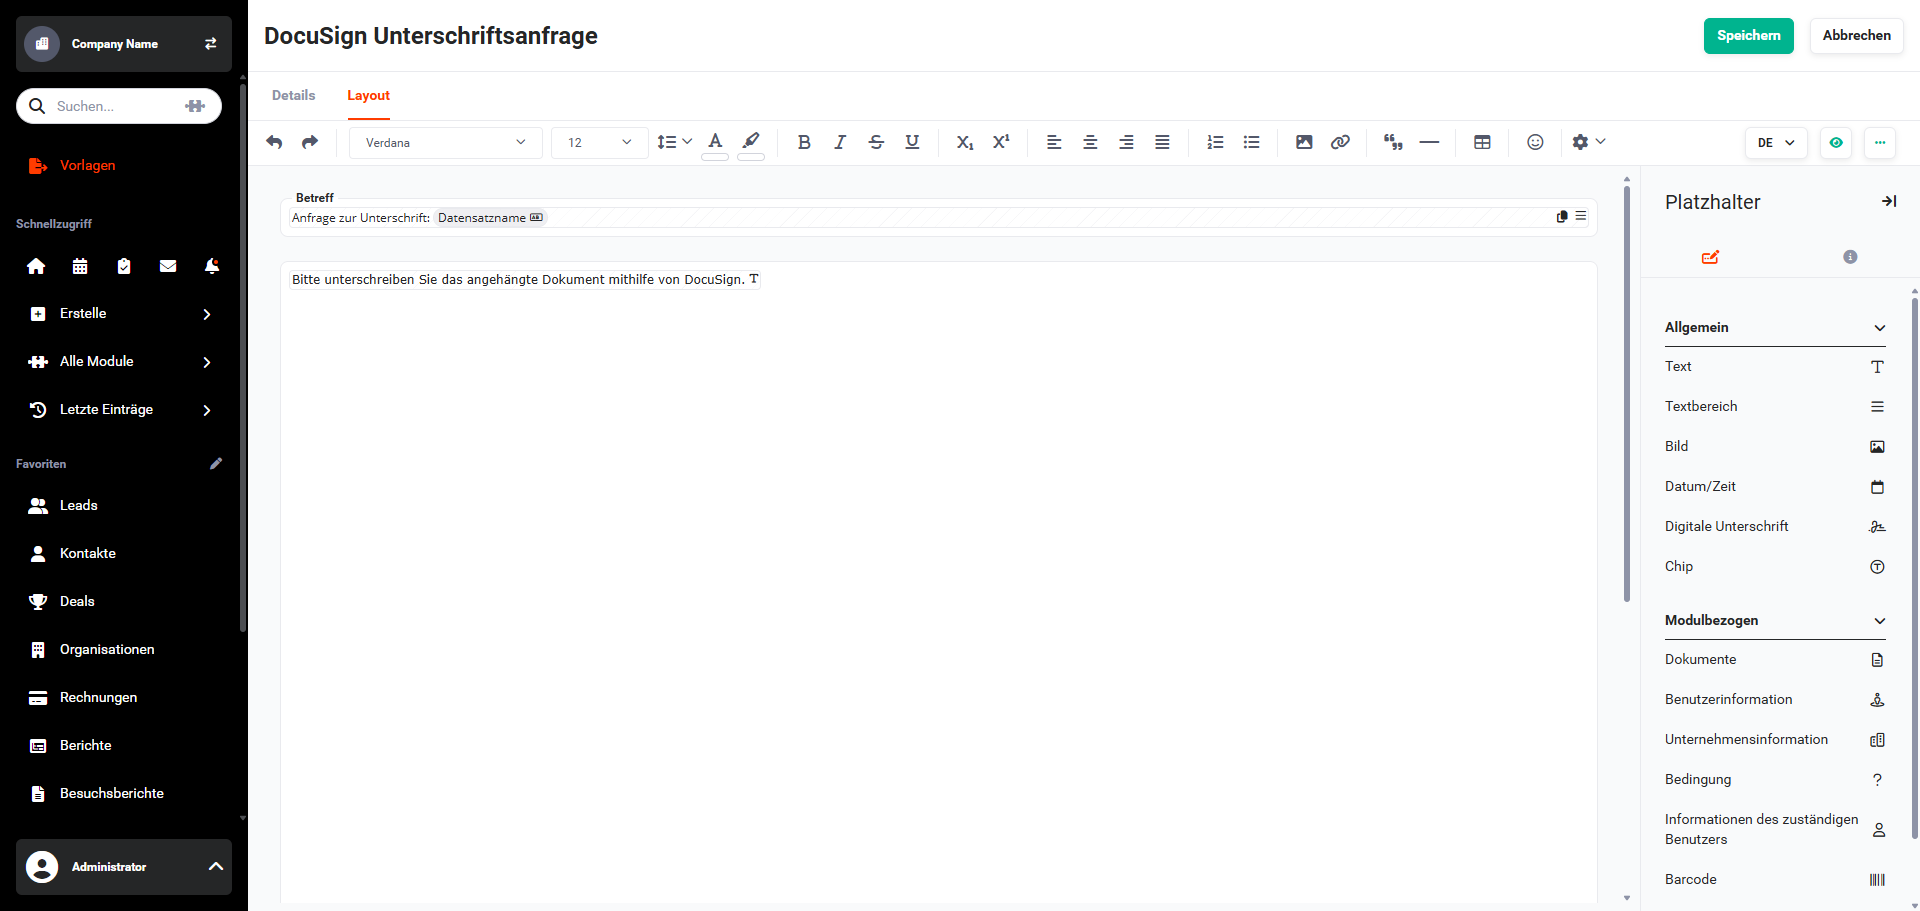 Templates module - Edit DocuSign signature request
For general information on PDF templates, see section PDF templates.
2.2. Using DocuSign
2.2.1. General
In principle, the "DocuSign" integration enables the generation of a PDF file directly from a record in the modules Sales Orders, Deals, Documents, Credits, Invoices, Cancellations and Contracts, which is then sent directly by email to the customers as a so-called "envelope".
In DocuSign eSignature, an envelope consists of the documents that you send for signing, as well as the recipient information and other details that you associate with the document.
The PDF file generated in brainX is sent as an "envelope" by email and can then be signed digitally by the customer. Before the envelope is sent, it is determined whether one or more recipients are to receive the envelope (the PDF file) and which recipients must sign or are to receive a copy.
Any existing template of the respective modules can be used as a PDF template, or further PDF templates are created that contain the special placeholder "Signature".
The difference then lies solely in the process of how the PDF file is signed digitally. See also the section Sign documents digitally.
2.2.2. PDF templates
With the activation of the "DocuSign" integration, the placeholder "Digital Signature" is available in the editing mode of PDF templates.
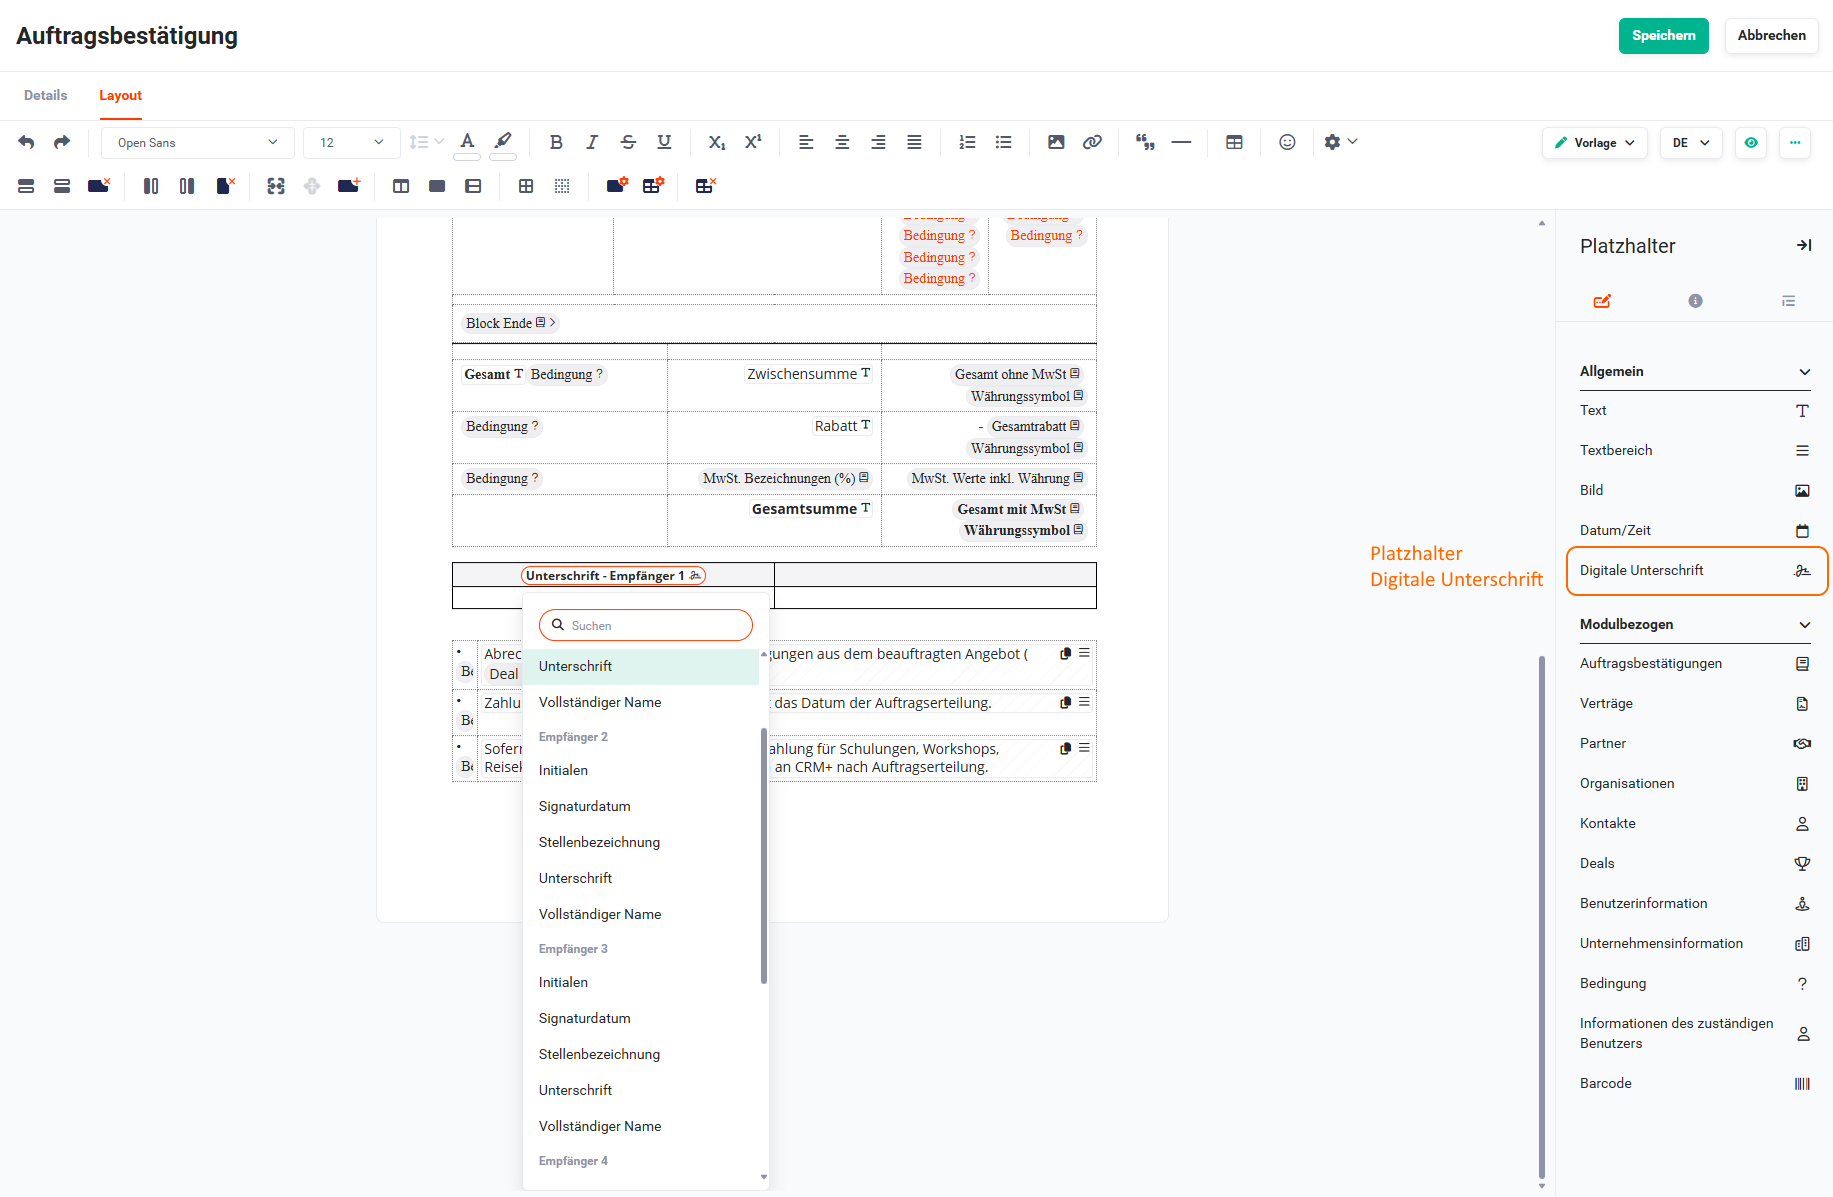 PDF template - Digital Signature placeholder
After inserting the "Digital Signature" placeholder into a PDF template, you can choose between the following placeholders via a flyout menu - which opens after clicking the placeholder:
Each of the placeholders is available for up to five recipients.
In addition, the following placeholder is also of significance:
- Checkbox (for optional line items for signing)
2.2.2.1. Initials placeholder
If the "Initials" placeholder is contained in a PDF template and this file is opened by the customer after sending, a corresponding "Initials" symbol is displayed in the file.
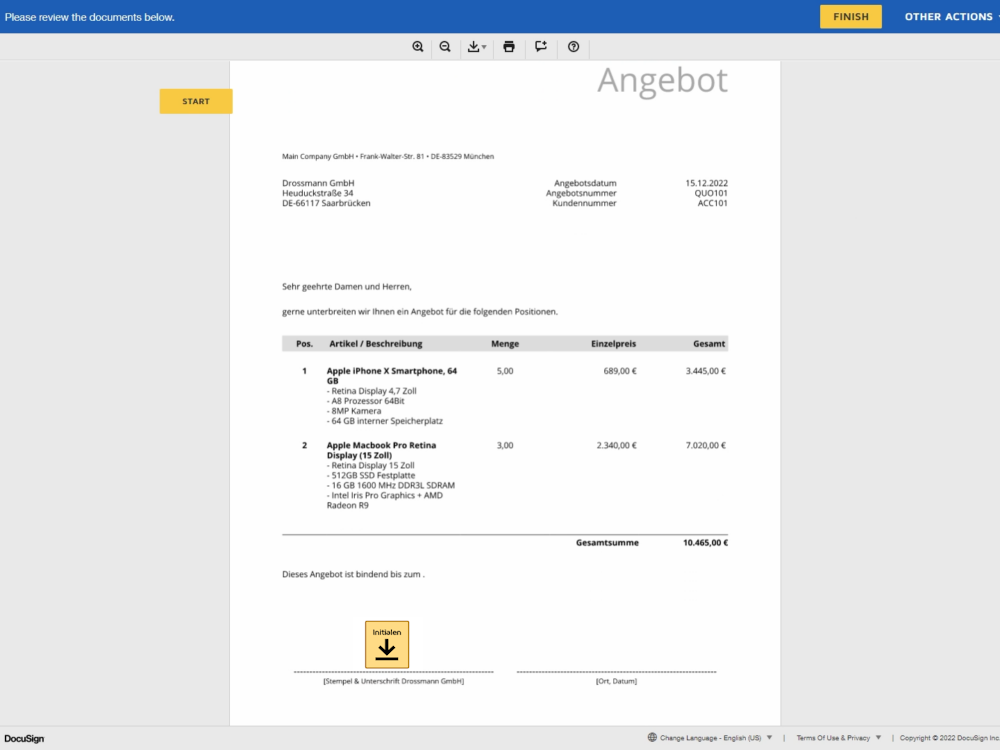 DocuSign Initials
One - or several - "Initials" placeholders, as well as other placeholders, can be inserted into a PDF template. This depends on how many people are to sign the document digitally.
See also the section Create PDF file/envelope with DocuSign PDF template.
If no "Initials" placeholder has been inserted into a PDF template, a sent DocuSign envelope can also be digitally provided with initials. See also the section Create PDF file/envelope without DocuSign PDF template.
2.2.2.2. Signature date placeholder
If the "Signature date" placeholder is contained in a PDF template and this file is opened by the customer after sending, a corresponding "Signature date" symbol is displayed in the file.
One - or several - "Signature date" placeholders, as well as other placeholders, can be inserted into a PDF template. This depends on how many people are to sign the document digitally.
See also the section Create PDF file/envelope with DocuSign PDF template.
If no "Signature date" placeholder has been inserted into a PDF template, a sent DocuSign envelope can also be digitally provided with a signature date. See also the section Create PDF file/envelope without DocuSign PDF template.
2.2.2.3. Job title placeholder
If the "Job title" placeholder is contained in a PDF template and this file is opened by the customer after sending, a corresponding "Job title" (German "Stellenbezeichnung") symbol is displayed in the file.
One - or several - "Job title" placeholders, as well as other placeholders, can be inserted into a PDF template. This depends on how many people are to sign the document digitally.
See also the section Create PDF file/envelope with DocuSign PDF template.
If no "Job title" placeholder has been inserted into a PDF template, a sent DocuSign envelope can also be digitally provided with a job title. See also the section Create PDF file/envelope without DocuSign PDF template.
2.2.2.4. Signature placeholder
If the "Signature" placeholder is contained in a PDF template and this file is opened by the customer after sending, a corresponding "Sign" symbol is displayed in the file.
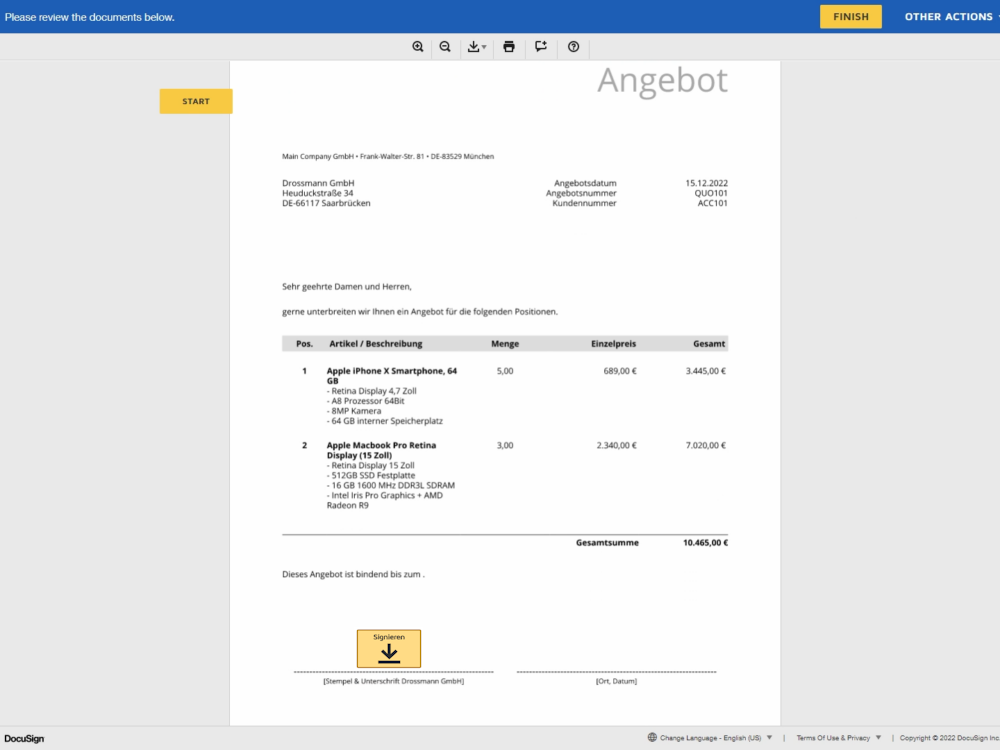 DocuSign Signature/Sign
One - or several - "Signature" placeholders, as well as other placeholders, can be inserted into a PDF template. This depends on how many people are to sign the document digitally.
See also the section Create PDF file/envelope with DocuSign PDF template.
If no "Signature" placeholder has been inserted into a PDF template, a sent DocuSign envelope can also be digitally provided with a signature. See also the section Create PDF file/envelope without DocuSign PDF template.
2.2.2.5. Full name placeholder
If the "Full name" placeholder is contained in a PDF template and this file is opened by the customer after sending, a corresponding "Full name" symbol is displayed in the file.
One - or several - "Full name" placeholders, as well as other placeholders, can be inserted into a PDF template. This depends on how many people are to sign the document digitally.
See also the section Create PDF file/envelope with DocuSign PDF template.
If no "Job title" placeholder has been inserted into a PDF template, a sent DocuSign envelope can also be digitally provided with a job title. See also the section Create PDF file/envelope without DocuSign PDF template.
2.2.2.6. Checkbox placeholder
In order, for example, not to have to send a Deal with optional line items for signing multiple times, the "Order via digital signature" placeholder can be used.
A customer can thus select which line items are to be accepted.
2.2.3. Creation and sending
2.2.3.1. Create PDF file/envelope
2.2.3.1.1. Create PDF file/envelope with DocuSign PDF template
In a record of the modules Sales Orders, Deals, Documents, Credits, Invoices, Cancellations or Contracts for which an envelope is to be created, in the first step the action icon "PDF Export" must be clicked.
The "PDF Export" popup now opens. In addition to the standard selection fields and checkboxes (see also the section PDF templates) in the popup, the switch "Use for DocuSign envelope" is additionally available here.
If the switch is set to "active", the "Email" button is hidden. For the "Export" button, only "Export as reference" is available.
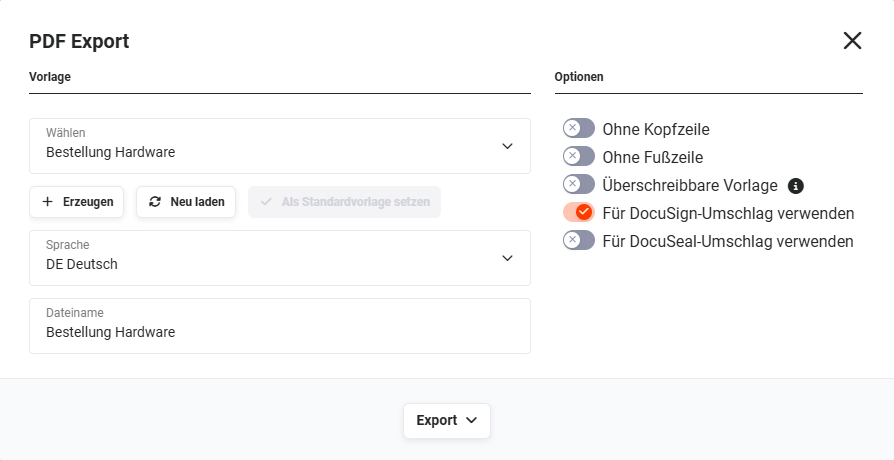 Popup PDF Export
After clicking the "Export as reference" action, the "Edit DocuSign envelope" popup opens.
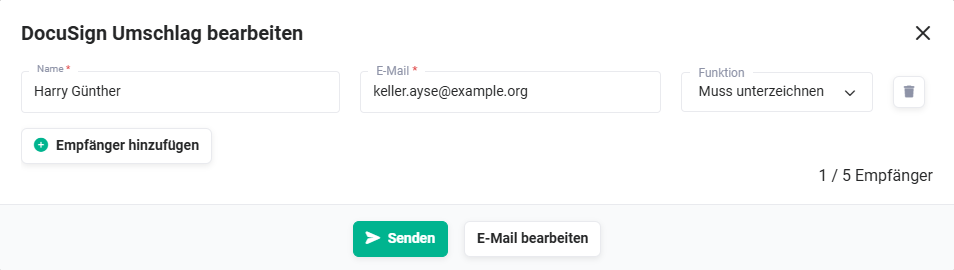 Popup Edit DocuSign envelope
Here the name and the email address of the recipient are displayed. The name and the email address of the recipient are filled automatically if a corresponding record is referenced in the "Contact" field in the source record (e.g. Deal).
If no contact is referenced, the Name field must be filled manually. The Name field has an autocomplete function. If part of a name is entered here, the matching hits are displayed and can be selected by clicking.
In the "Role" column, a picklist can be used to determine whether the recipient must sign the envelope or - in the case of several recipients - only receives a copy. The values "Must sign" or "Receives a copy" are available for selection here.
Further recipients can be added by means of the "Add recipient" button. The "Name" field has an autocomplete function. If part of a name is entered here, the matching hits are displayed and can be selected by clicking.
In the lower part of the "Edit DocuSign envelope" popup, the buttons "Edit email" and "Send" are available.
- "Edit email" button: After clicking, the "Edit DocuSign envelope" popup opens, in which the email subject and the email message can be edited manually once more. See also the section Email template.
- "Send" button: The DocuSign envelope is sent to the recipients by email. See also the section Send PDF file/envelope.
Optionally, an expiry date for the envelope can be set before sending. The corresponding block in the popup can be used to specify by when the envelope can be signed digitally. For records from the Deals module, the field is pre-selected with the stored binding period of the deal. The expiry date is transmitted both to DocuSign and to DocuSeal when sending.
2.2.3.1.2. Create file/envelope without DocuSign PDF template
In order to be able to use an envelope without the "Signature" and "Initials" placeholders, the action "Create DocuSign envelope" must be clicked in the detail view of a record in the Documents module.
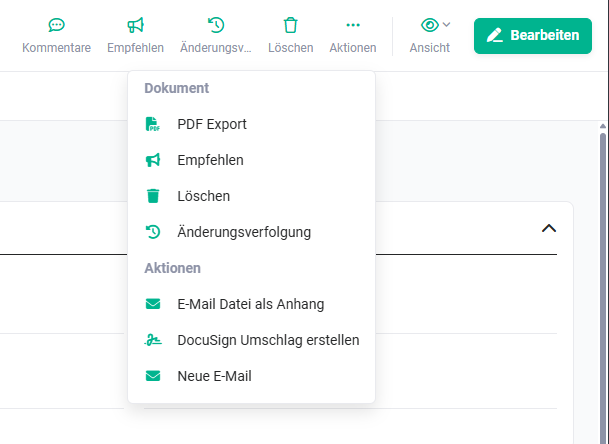 Documents module - Create DocuSign envelope action
After clicking the action, the "Edit DocuSign envelope" popup opens.
After clicking the "Send" button, the document is uploaded to DocuSign. The fields for the signature or the initials must now be inserted manually into the document.
Both fields can be inserted, as can only the Signature or Initials field.
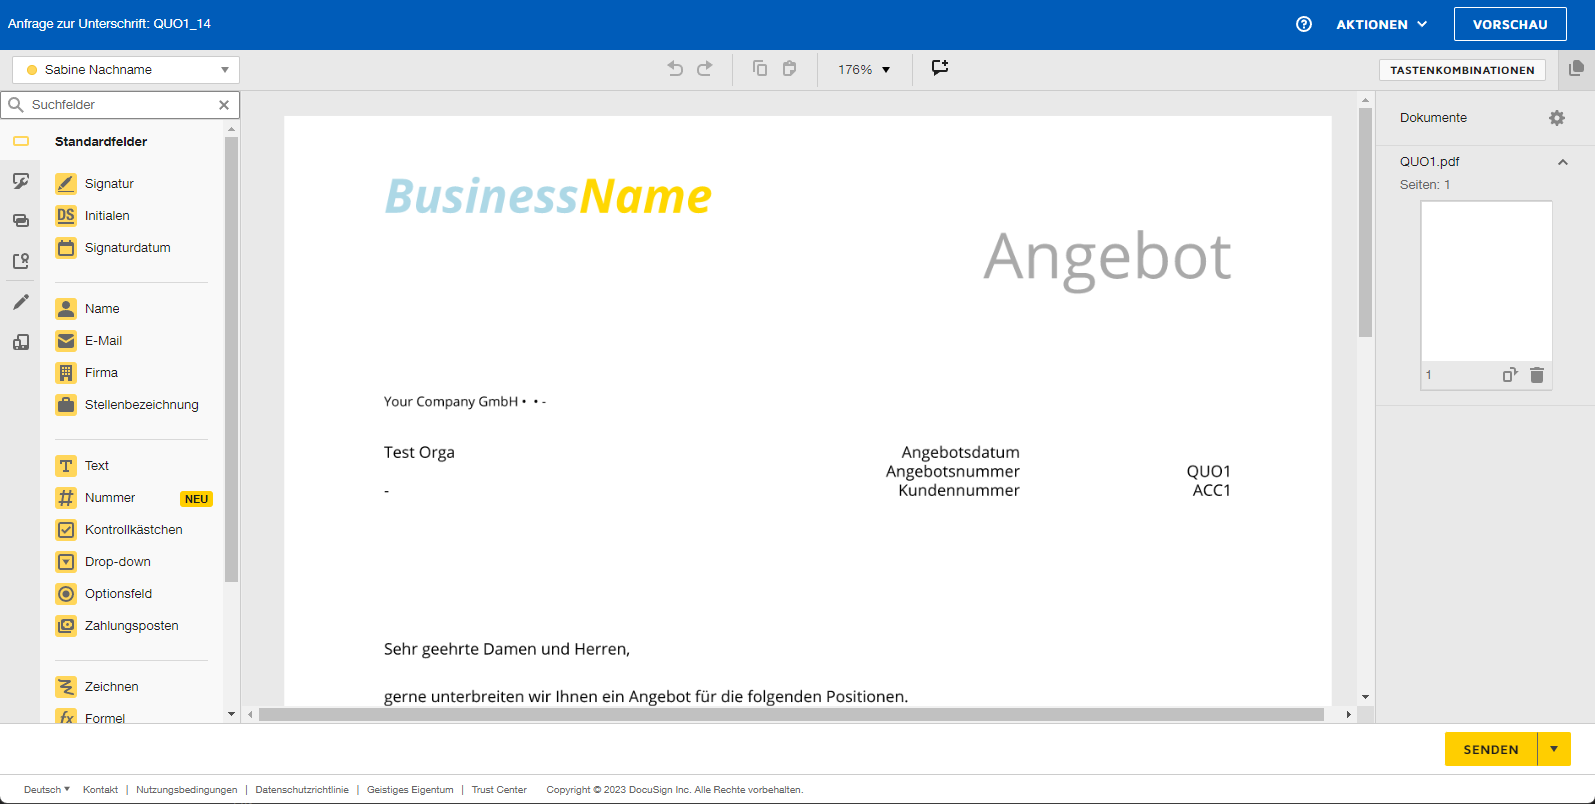 Editing template in DocuSign
The "Signature" and "Initials" fields are placed in the document by means of Drag & Drop. By way of example, the insertion of the "Signature" field is described below. The insertion of the "Initials" field works analogously.
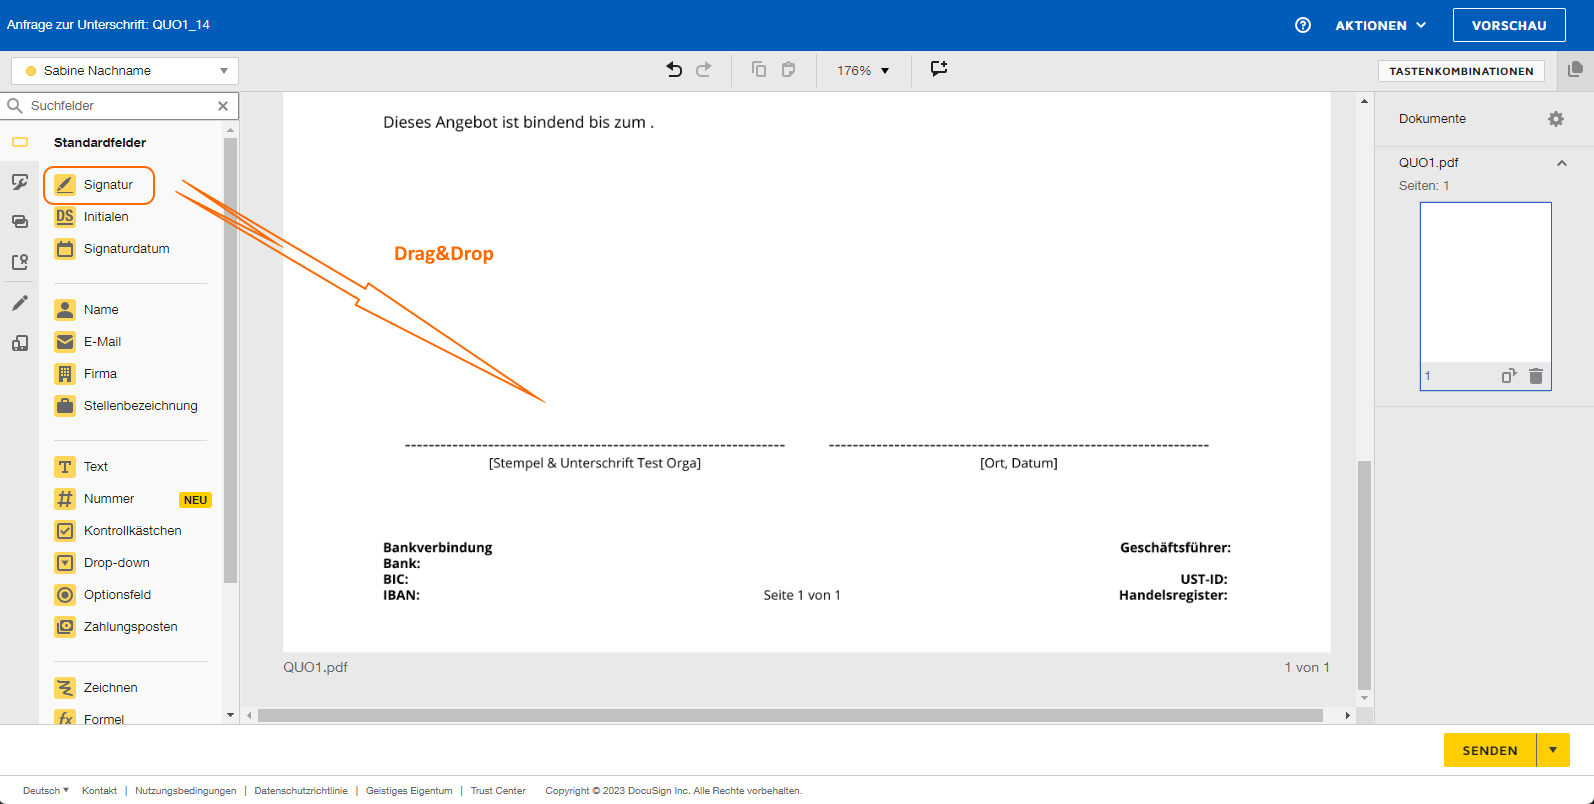 Insert signature via Drag & Drop
After inserting the "Signature" field, the document is presented as follows:
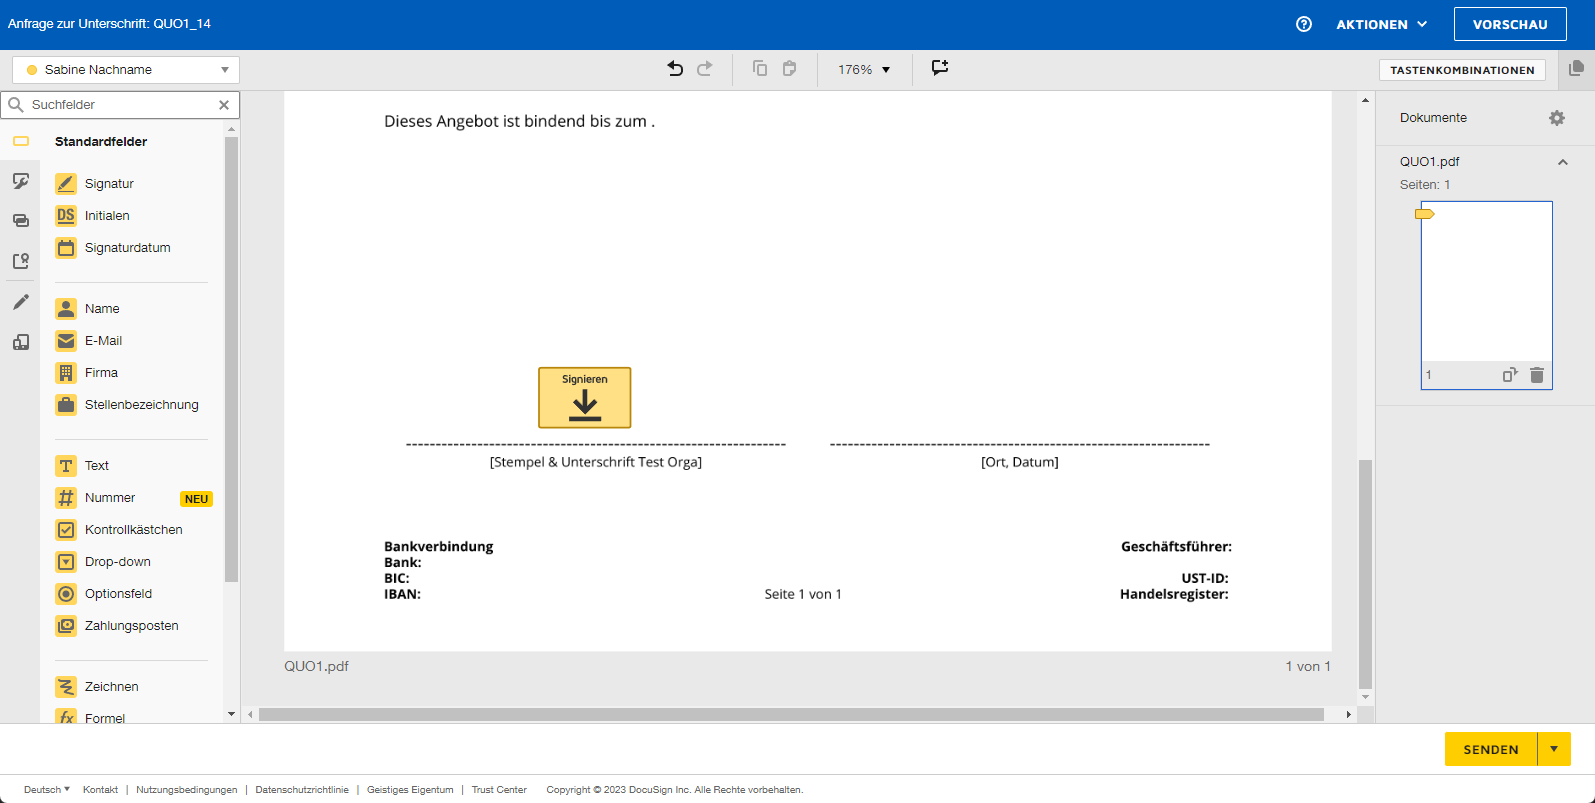 Template with inserted signature
Finally, the "Send" button must be clicked. The DocuSign envelope is now sent to the recipients by email. See also the section Send PDF file/envelope.
2.2.3.2. Send PDF file/envelope
After clicking the "Send" button, the envelope is sent to the recipients by email. Subsequently, a corresponding note is displayed that informs whether the envelope was sent successfully or (in exceptional cases) could not be sent.
The envelope is sent to the recipients by email via DocuSign! Neither the central mail server nor an email account of a brainX user is required!
After sending, the envelope (PDF file) generated in brainX is stored in the Documents module and is referenced in the source record (e.g. in a Deal) in the detail view in the Relations tab.
In the source record, the "DocuSign envelope" block is additionally available in the detail view. See also the section Info in the "Info for digital signature" block.
2.2.3.3. Sign documents digitally
Recipients of a DocuSign envelope who are to sign a document digitally do not need to have an active account with DocuSign!
In this case, however, there is the restriction that the recipient cannot archive the DocuSign envelope at DocuSign themselves.
After sending, the recipients receive an email for review and signature.
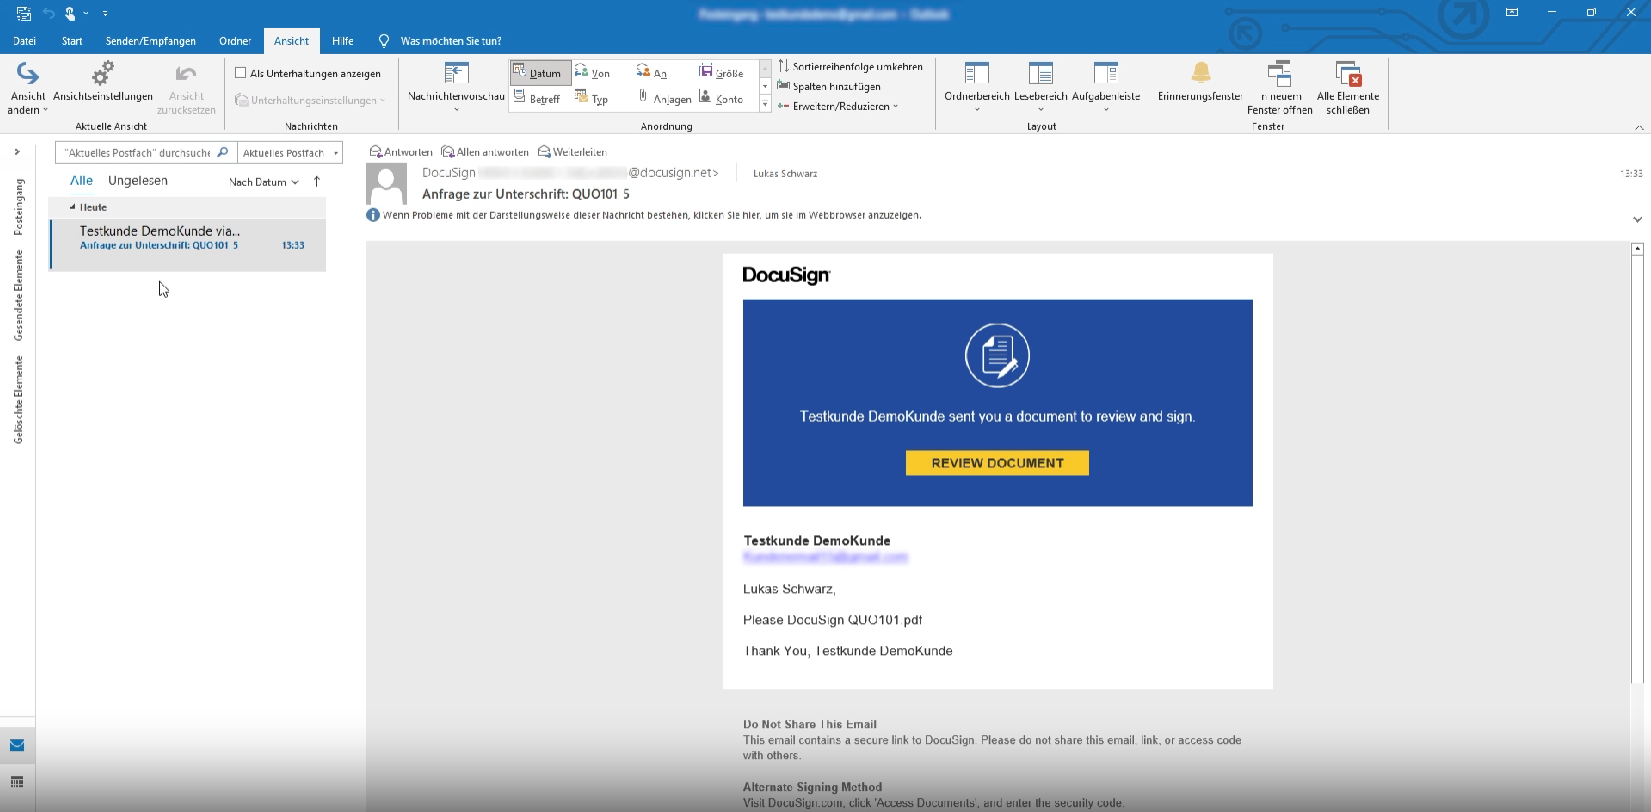 DocuSign Email Review Document
After clicking the link in the email, the customer is forwarded to DocuSign in order to review the document.
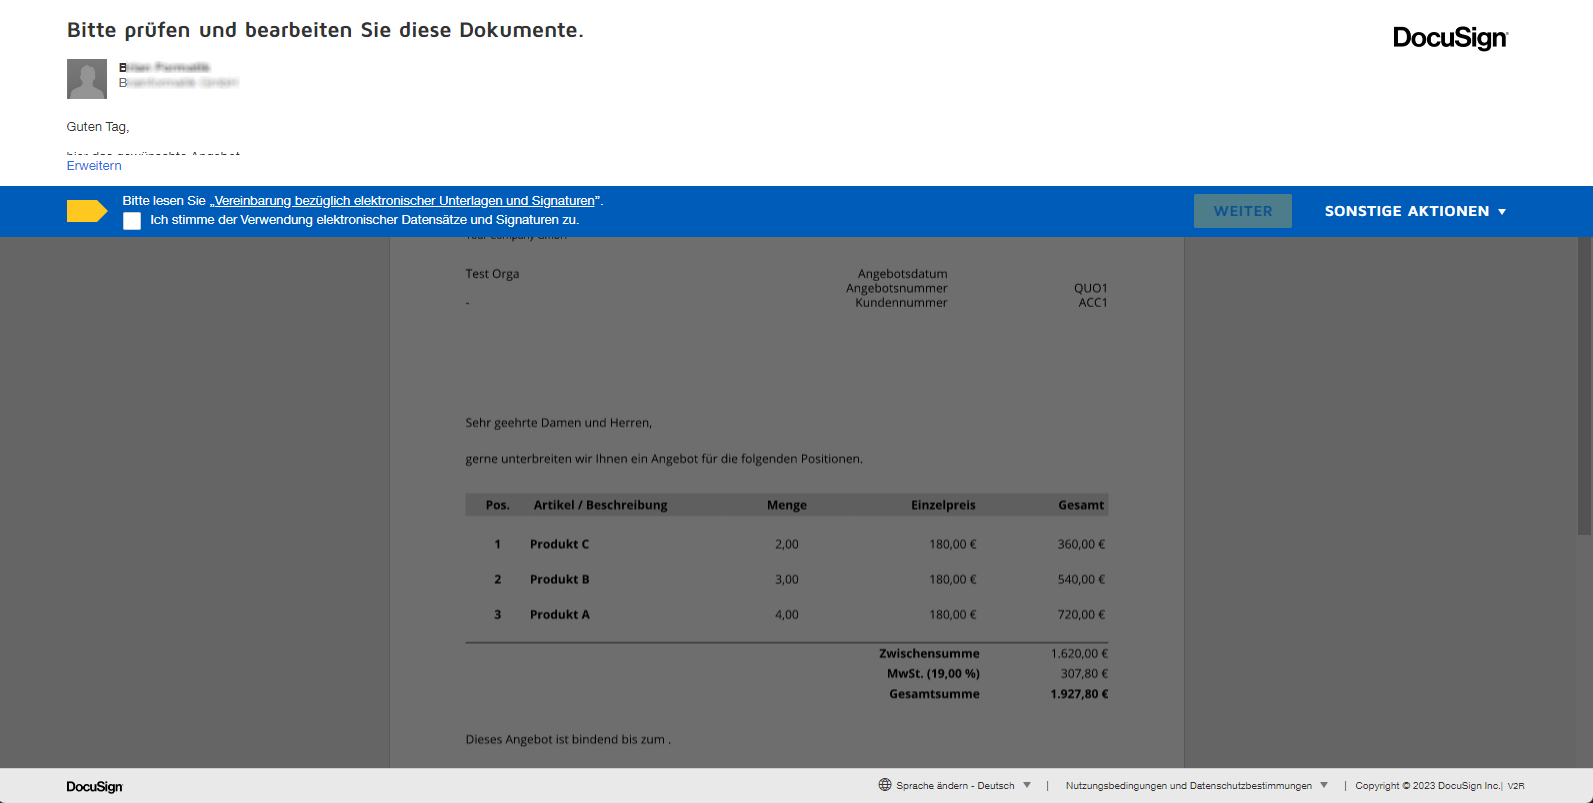 Reviewing and editing the document
After agreeing to the use of electronic records and signatures, the document is ready to be signed digitally.
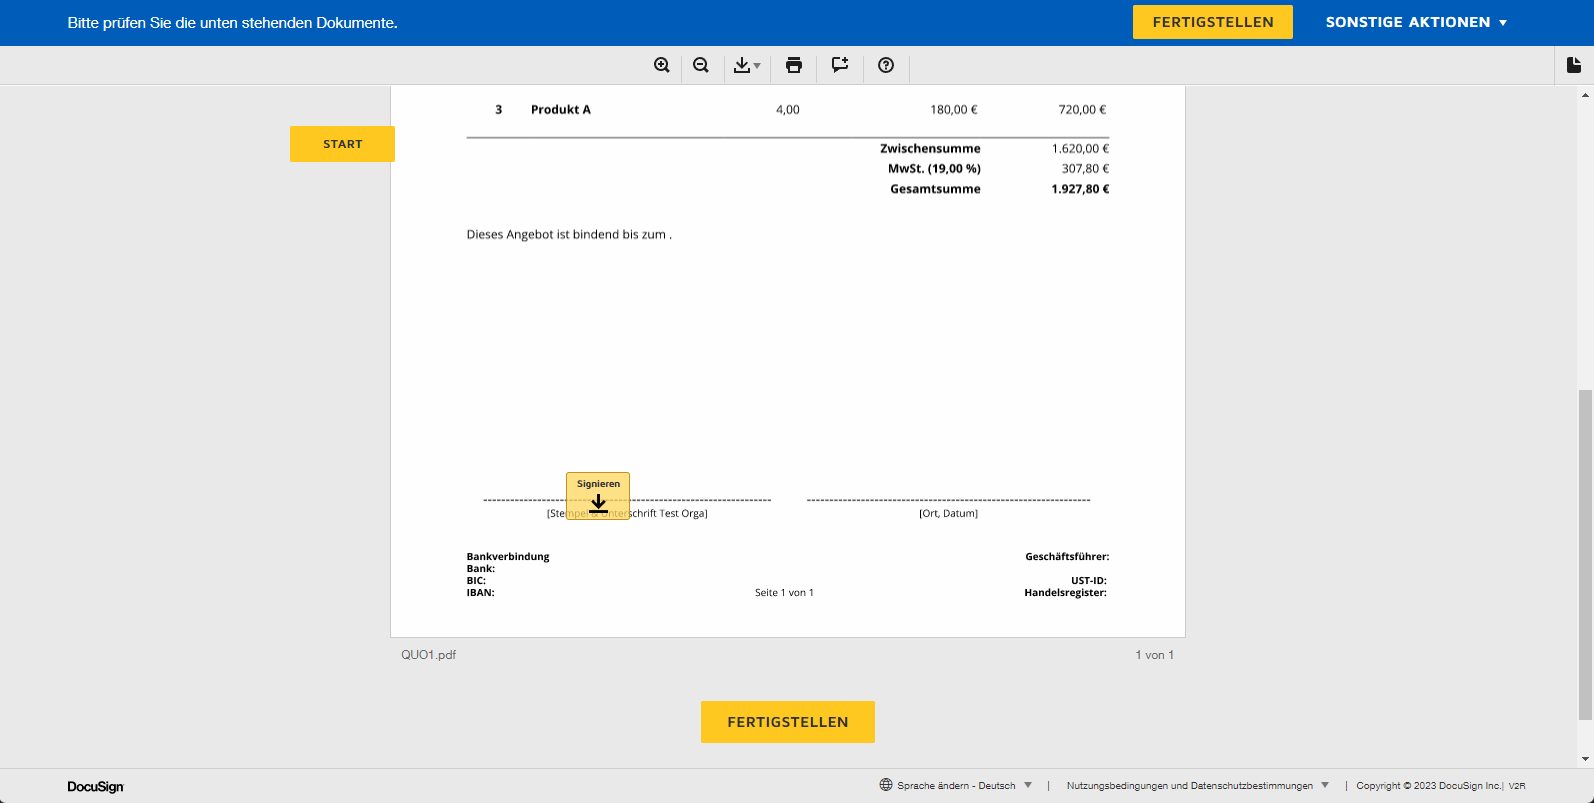 Placeholder Sign document digitally
Finally, the document can be signed by clicking the placeholders "Sign" and/or "Initials".
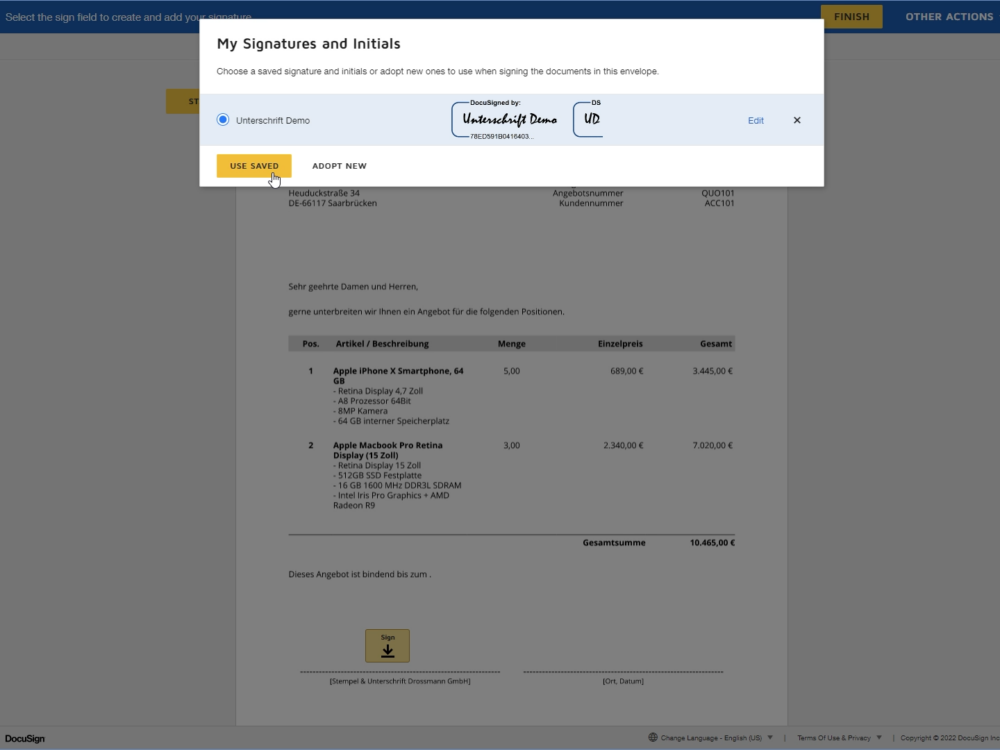 Sign document digitally
A signature, or the initials, can be set either by selecting a signature/the initials - which are generated by DocuSign - or by manually signing by means of a stylus/finger on a corresponding device (e.g. tablet or smartphone).
After the document has been signed digitally, a note is displayed indicating that the signing is complete.
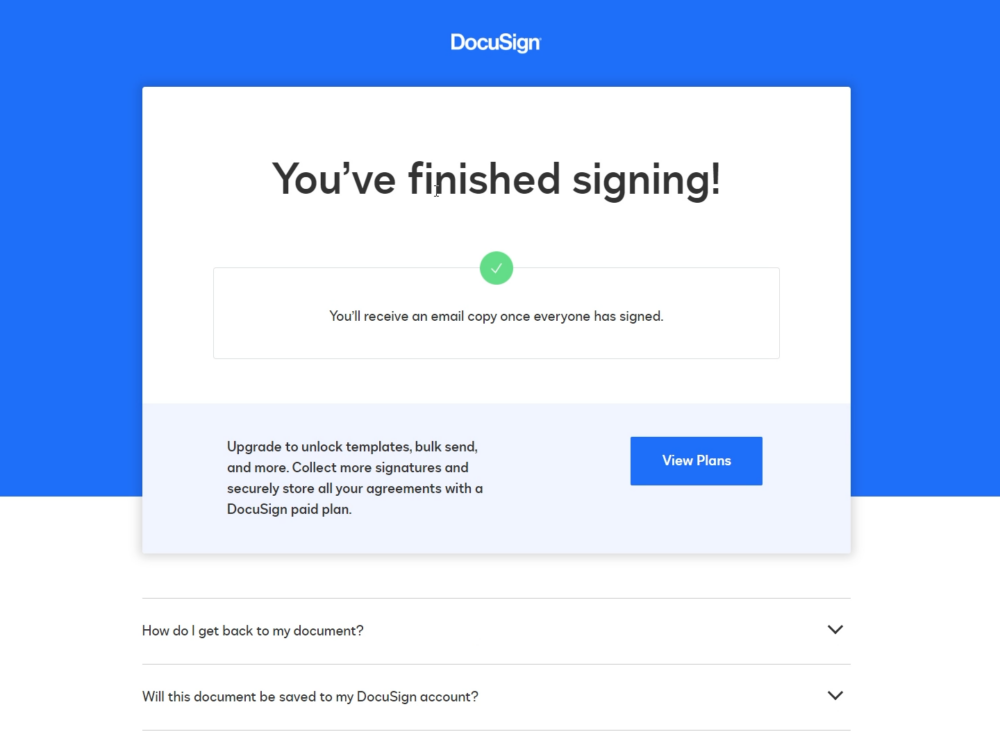 Note Signing complete
Signing a document can - for whatever reason - also be declined. In DocuSign a corresponding reason for the decline can be entered.
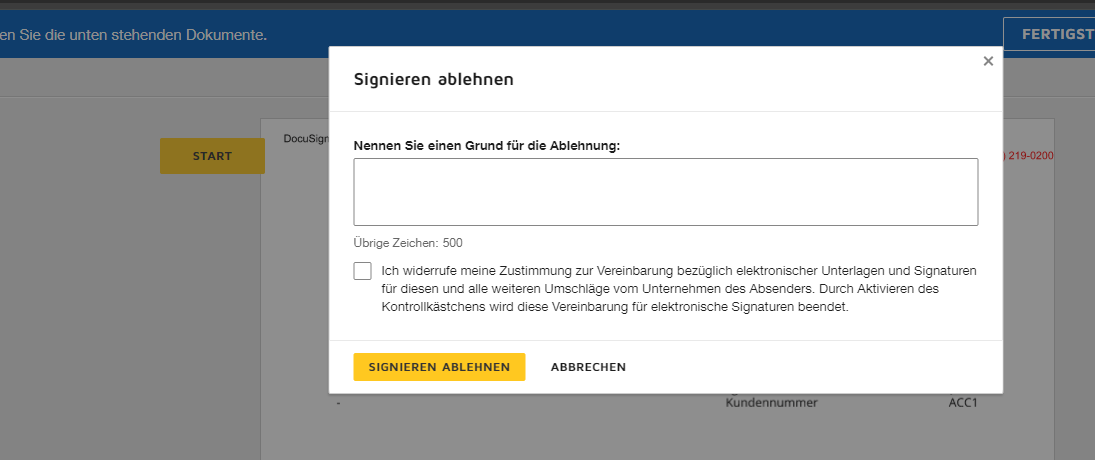 Decline signing
If the signing was declined and a reason was entered, this is displayed accordingly in the detail view of the record in the "DocuSign envelope" block in the "Reason for decline" field.
2.2.3.4. Info in notifications
If an envelope has been viewed, signed or declined by the recipient, a corresponding notification is automatically displayed in brainX. This applies both to DocuSign and to DocuSeal.
2.2.3.5. Info in the "Envelope for digital signature" block
In the modules Sales Orders, Deals, Documents, Credits, Invoices, Cancellations, Contracts and Documents, various pieces of information about the DocuSign envelope are displayed in the detail view of a record in the "Envelope for digital signature" block.
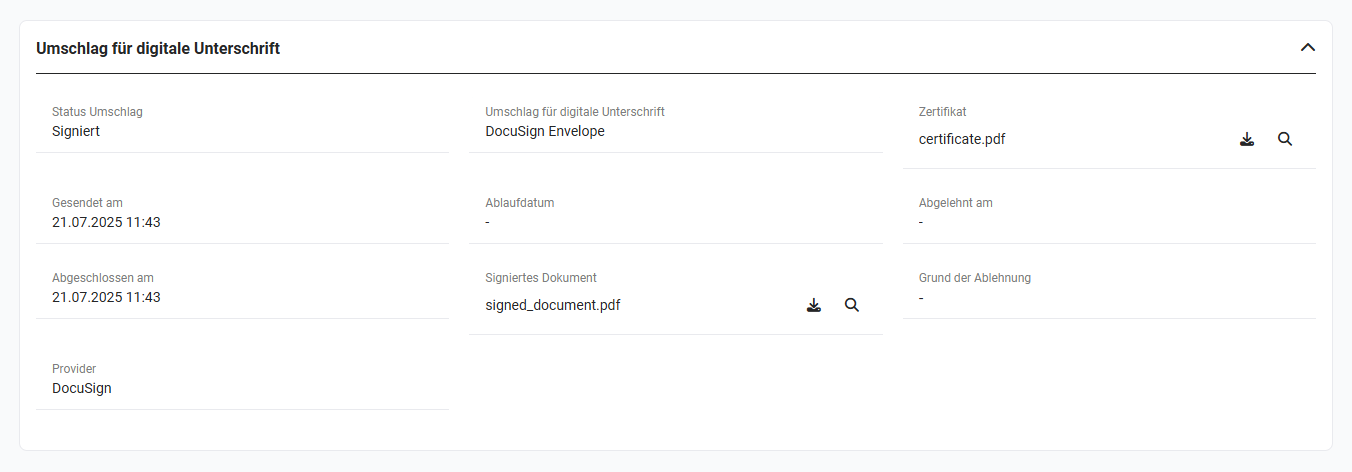 Block Envelope for digital signature
| Field | Description |
|---|---|
| Envelope status |
|
| Envelope for digital signature | Name of the envelope
After clicking the name, the "Envelope for digital signature" popup opens (see screenshot below), in which all recipients, their role ("Must sign" or "Receives a copy") and the status are displayed. |
| Certificate | The field offers the option - provided the envelope has been signed digitally - either to download the generated certificate (PDF file) (icon "Download") or to view the certificate in the file preview in a separate popup (icons "Magnifier"). |
| Sent on | Display of the date when the envelope was sent |
| Expiry date | Display of the expiry date up to which the envelope can be signed digitally. The date can be set manually when creating the envelope; for Deals the stored binding period is pre-selected. If no date is set, the default value configured in the provider's account applies. |
| Declined on | If an envelope was declined by the recipient, the date on which the decline took place is displayed here. |
| Completed on | Display of the date when the envelope was signed digitally. |
| Signed document | The field offers the option - provided the envelope has been signed digitally - either to download the generated document (PDF file) (icon "Download") or to view the document in the file preview in a separate popup (icons "Magnifier"). |
| Reason for decline | If an envelope - or the signing - was declined by the recipient and a reason for the decline was given, the reason why the decline took place is displayed here. |
| Provider | Display of the provider (DocuSign or DocuSeal) |
 Popup Envelope for digital signature
In Automations, conditions and the time delay of actions based on the fields of the "Envelope for digital signature" block are possible. In doing so, the most recently sent envelope of a record is always taken into account.
2.2.3.6. Automations
In interaction with the digital signature, there are two special features in the Automations:
2.2.3.6.1. Send PDF files/envelopes by means of an automation
PDF files/envelopes can be sent not only manually, but also automatically by means of an automation.
Here, a separate trigger including a corresponding action must be created for each module for which an envelope is to be sent automatically.
In the "Frequency" setting of an action, the "Every time" option must not be used for actions that send envelopes! Otherwise unintended repetitions with regard to the sending of envelopes in automations can occur!
It is advisable to define rather restrictive conditions in automations, in order to avoid the unintended sending of an envelope. Example: In the "Deals" module, a new field "send envelope automatically" (type Checkbox) is created by means of the Module management. If the checkbox is ticked when creating or editing the quote and the record is saved, the envelope is sent automatically. Tip: Permissions for fields (visibility, read and write access or read access only) can be defined separately for the brainX users by means of the Profiles.
An action of an automation offers, in interaction with the digital signature, the option of using a linked PDF template as an envelope.
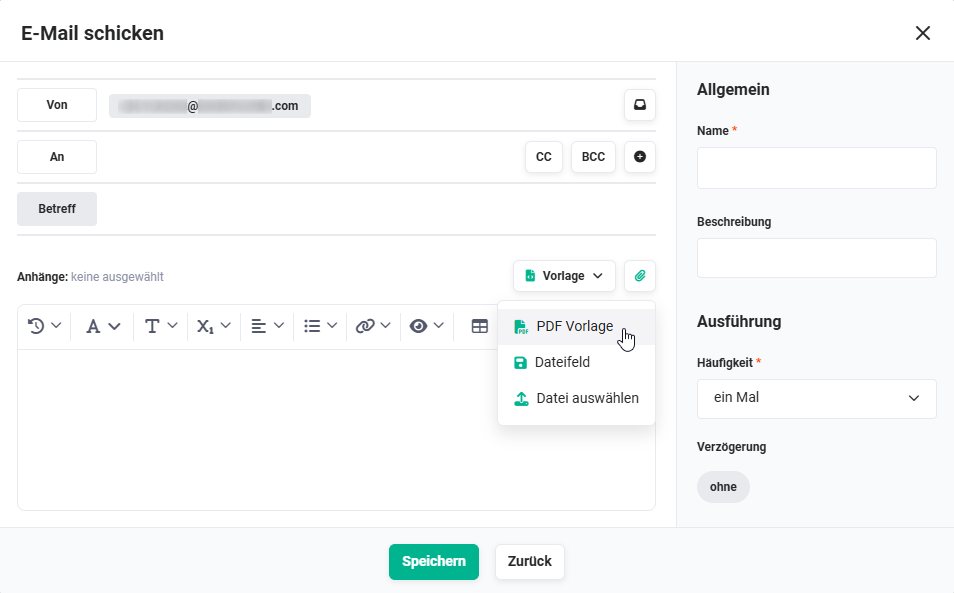 Send email action - Add attachment
After clicking the "Add attachment" action icon, a flyout menu opens in which the item "PDF template" must be selected.
After clicking the "PDF template" item, the "Load template" popup opens.
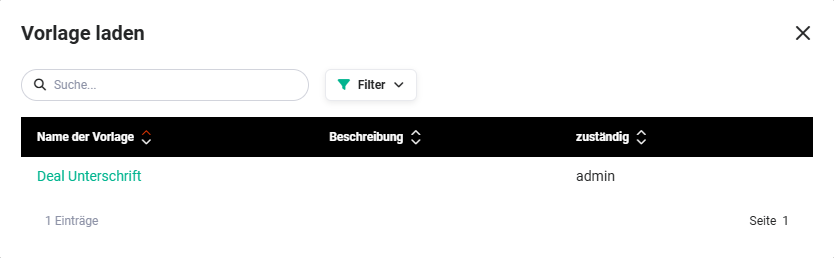 Popup Load template
Once a template has been selected by clicking, it is displayed as an attachment in the "Send email" popup.
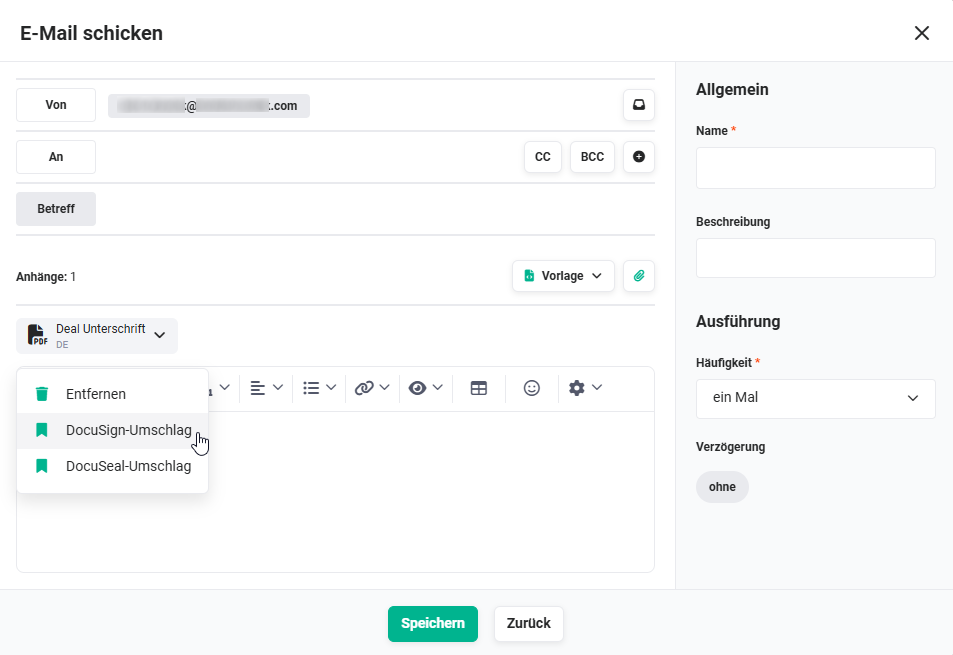 Send email action - Select envelope
After clicking the attachment, a flyout menu opens in which the envelope can be selected, or if required the attachment can also be removed again.
Once an envelope has been selected by clicking, it is displayed as an attachment in the "Send email" popup.
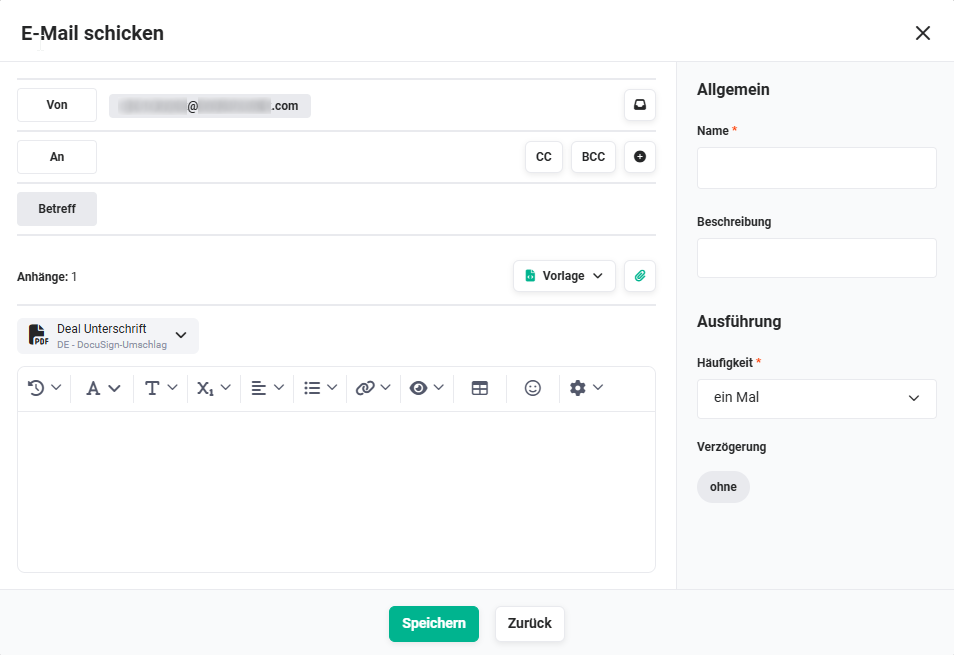 Send email action - Envelope selected
In the "To" field, the recipients who are to sign the envelope digitally must now be selected.
If the "Signature" placeholder was used in the PDF template, the number of recipients ("To" field) must necessarily match the number of "Signature" placeholders!
In the "CC" field, the recipients who are only to view the envelope are selected.
The "Subject" field is a mandatory field and must also be filled. In the "Subject" field, variables/field placeholders can be used - as in the email body.
2.2.3.6.2. Execute action after signing of envelope
When creating an automation, the event "DocuSign: Signature received" or "DocuSeal: Signature received" is available for triggers - depending on which provider is used for the digital signature.
The event "Signature received" offers the option, after the signing of the envelope, of, for example, automatically sending emails, or creating a record in the Tasks module.
For triggers for digital signatures, conditions on line items of Billing records (e.g. Invoices, Sales Orders) can be defined. In this way, the further course of an automation can be controlled depending on fields or values of individual line items of the associated record.
DocuSeal communicates with brainX via a push mechanism that internally uses the brainX API. In order for triggers related to DocuSeal to be addressed correctly, the value "API" must be activated in the "Also for changes via" field for every affected trigger - including all chained follow-up triggers.
If this setting is not set, the trigger is not triggered by the DocuSeal push, even though the event (e.g. "DocuSeal: Signature received") has arrived correctly.
Detailed information on the configuration options of triggers, conditions and actions is available in the section Automations.
3. DocuSeal
A prerequisite for using the DocuSeal integration is an active, full account with DocuSeal.
A trial/test account with DocuSeal is not sufficient!
The DocuSeal integration enables the use of a digital signature in PDF files that are generated by means of PDF templates.
The DocuSeal integration can be used in all modules in which a PDF export is possible. In particular the modules Sales Orders, Deals, Documents, Credits, Invoices, Cancellations and Contracts are ideally suited for the use of a digital signature.
3.1. DocuSeal Configuration
3.1.1. Authentication
If several clients exist and the digital signature is to be used in several or all clients, the authentication must be carried out for each client!
Digital Signature - available providers
After clicking the "DocuSeal" tile, the "Authentication" popup is displayed.
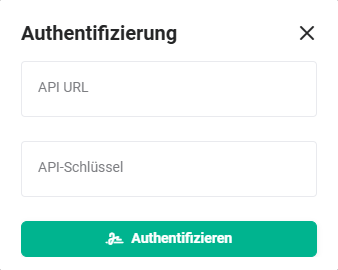 Popup Authentication DocuSeal
After entering the API URL and the API key as well as clicking the "Authenticate" button, the "DocuSeal" integration is authenticated and ready for use.
3.1.1.1. User authentication
brainX users who wish to send an envelope for a digital signature from within brainX do not require any additional authentication!
Further authentications by brainX users are, however, possible, in order to optionally be able to assign the DocuSeal templates to specific users on a module basis. For further information see section Module assignment.
In My Settings - Integrations tab users can authenticate themselves with DocuSign.
After clicking the "DocuSeal" tile in the "Available integrations" area, the "DocuSeal Authentication" popup is displayed.
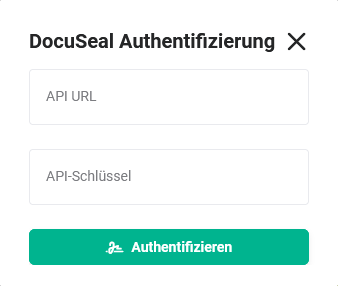 Popup DocuSeal Authentication
After entering the API URL and the API key as well as clicking the "Authenticate" button, the user is authenticated and the "DocuSeal" tile is now located in the "Active integrations" area.
After clicking the "DocuSeal" tile again, the "DocuSeal" popup is displayed.
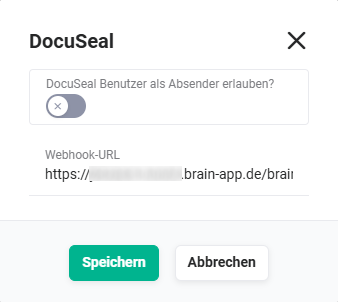 Popup Allow DocuSeal user as sender
After the switch has been set to "active" and the "Save" button has been clicked, the user is selectable in the Module assignment under the users.
3.1.2. Module assignment
brainX users who wish to send an envelope for a digital signature from within brainX generally do not require any additional or own authentication. However, if users additionally authenticate themselves, this offers the option of assigning these users to selected modules.
The module assignment of the DocuSeal integration is identical to the module assignment of the DocuSign integration.
For detailed information on the module assignment of DocuSeal, see section DocuSign - Module assignment.
3.2. Using DocuSeal
3.2.1. General
In principle, the "DocuSeal" integration enables the generation of a PDF file directly from a record in the modules Sales Orders, Deals, Documents, Credits, Invoices, Cancellations and Contracts, which is then sent directly by email to the customers as a so-called "envelope".
The use of the DocuSeal integration is identical to the use of the DocuSign integration.
For detailed information on the use of the DocuSeal integration, see section DocuSign - Use.
3.2.2. PDF templates
With the activation of the "DocuSeal" integration, the placeholder "Digital Signature" is available in the editing mode of PDF templates.
The use of the PDF templates of the DocuSeal integration is identical to the use of the PDF templates of the DocuSign integration.
For detailed information on the use of the PDF templates of the DocuSeal integration, see section DocuSign - PDF templates.
3.2.3. Creation and sending
The creation and sending of PDF files/envelopes of the DocuSeal integration is identical to the creation/sending of PDF files/envelopes of the DocuSign integration.
For detailed information on the creation/sending of PDF files/envelopes of the DocuSeal integration, see section DocuSign - Creation and sending.
4. Practical examples
1 - Send quote digitally for signature
Initial situation: A sales employee has recorded a quote as a deal in brainX and wants to send it to the customer for digital signing - without printout, postal dispatch or rescanning.
Procedure: In the record of the Deals module, the switch Use for DocuSign/DocuSeal envelope is activated via the PDF export. A PDF template with the Signature placeholder is selected. In the Edit envelope popup, the referenced contact is confirmed as recipient and the envelope is sent directly to the customer by clicking Send.
Result: The customer receives an email with the quote and can sign it digitally on any device - without their own account at the signature provider. The signed PDF file is automatically referenced in brainX.
2 - Automatically trigger follow-up actions after contract signing
Initial situation: After the digital signing of a contract, a task for order processing is to be created automatically and a confirmation email is to be sent to the customer.
Procedure: In the automations, a trigger with the event DocuSeal: Signature received (or DocuSign: Signature received) is configured. The actions Create record (task) and Send email (confirmation) are stored. For DocuSeal, the value API is activated in the Also for changes via field.
Result: As soon as the customer signs the contract digitally, all follow-up steps run automatically - without manual intervention by the sales employee.
3 - Send envelope via automation on deal status change
Initial situation: When a deal changes to the status Quote sent, the quote is to be sent automatically as a digital envelope to the stored contact.
Procedure: An automation is configured with the trigger Record changed in the Deals module and the condition Status = Quote sent. As an action, Send email with a PDF template as an envelope is stored. In the To field, the referenced contact of the deal is set as recipient. The Every time option in the Frequency setting is not used.
Result: The envelope is sent automatically as soon as the deal status is set. Manual steps for the sending are completely eliminated.
4 - Send contract with several signatories
Initial situation: A framework contract must be signed digitally both by the customer and by an internal authorised representative.
Procedure: In the PDF template, separate Signature placeholders (one placeholder per recipient) are inserted for each signatory. When sending the envelope, two recipients with the role Must sign are entered in the Edit envelope popup. Both receive the envelope by email and sign independently of one another.
Result: Both parties sign the contract digitally - fully legally compliant and without physical documents. The fully signed document is available in brainX as a PDF.
5. Frequently asked questions
Do recipients of an envelope need their own account with DocuSign or DocuSeal?
No, recipients can sign an envelope digitally without having an account with the respective provider themselves. In this case, however, they cannot archive the signed envelope at the provider itself. The signed document is nevertheless available for download in brainX.
What is the difference between DocuSign and DocuSeal in brainX?
The range of functions and the operation of both integrations within brainX are almost identical. DocuSign is an established commercial market leader. DocuSeal is an open-source alternative that can also be self-hosted. Notifications in brainX are displayed for both providers – when an envelope is viewed, signed or declined.
Via which channel is the envelope sent to the recipient?
The sending takes place directly via the respective provider (DocuSign or DocuSeal) - not via the central mail server or an email account in brainX. A configured email account is not required for the envelope sending.
Can I set an expiry date for an envelope?
Yes, when creating an envelope, an expiry date up to which the envelope can be signed digitally can optionally be set. For records from the Deals module, the stored binding period is automatically pre-selected. If no date is set, the default value configured in the provider's account applies.
What happens if a recipient declines the signing?
The recipient can decline the signing and optionally give a reason for the decline. In brainX, the reason for the decline is displayed in the Envelope for digital signature block in the Reason for decline field. The date of the decline is also stored in the block.
Why is a DocuSeal trigger not triggered in an automation?
DocuSeal communicates with brainX via the API. In order for triggers to be addressed correctly, the value API must be activated in the Also for changes via field for every affected trigger - including all chained follow-up triggers. If this setting is not set, the trigger is not triggered by the DocuSeal push, even though the event has arrived correctly.